Safari: A Beginner’s Guide for iPhone or iPad Users

Your changes have been saved
Email Is sent
Please verify your email address.
You’ve reached your account maximum for followed topics.

Snapdragon X Elite vs. Apple M3 vs. Intel: What's Powering Your Next Laptop?
4 ways to send photos and videos from iphone to android without losing quality, why i wouldn't recommend anyone get adobe creative cloud in 2024.
On Apple devices, the default web browser is called Safari. It shares a lot of similar features to other common browsers, like Chrome, Firefox, and Edge. But if you’re new to using Safari, you may feel a little lost because the interface is slightly different to the others.
So, here’s a beginner’s guide on how to use the Safari app to browse the web on your iPhone or iPad.
How to Search for Content in the Safari App
As with all web browsers, you’ll need to first enable your iPhone’s mobile data or connect to a Wi-Fi network to access the internet.
Then, to search in Safari, simply type a term, phrase, or URL into the Smart Search bar at the bottom of the screen and tap Go on your keyboard. The Smart Search bar is a combination of the address bar and search bar. As you type, you’ll see search suggestions based on your keyword as well as results from your bookmarks and browsing history.
How to Navigate a Webpage in Safari
Once you obtain your search results, you tap on a link you’re interested in. Now let’s look at how you can navigate the webpage once it’s loaded.
How to Jump Back to the Top of Webpage
After swiping to scroll down a long article, you may want to go back up to access the website’s menu. To instantly jump back to the top of the webpage, just tap the topmost edge of your screen.
How to Go Backward (or Forward) a Webpage
After tapping on a link, perhaps the webpage isn’t quite something you’re looking for. To go back to your search results, swipe from left to right from the edge of your screen.
To go forward on a webpage, swipe from right to left instead.
Related: Essential Safari iOS Tips & Tricks for iPhone Users
How to Reveal the Safari Address Bar
Your Safari address bar is automatically hidden away when you’re scrolling down a webpage. To bring it back, tap the bottom edge of the screen that shows the website’s main URL.
How to Work With Multiple Tabs in the Safari App
Having multiple tabs opened in Safari can help you to compare information between webpages and search for new content without having to close your current webpage. Here’s how to work with multiple tabs in Safari on your iPhone or iPad.
How to Open a New Tab
To open a new tab, select the Tabs icon in the bottom-right corner, which looks like two overlapping squares. Then tap the Plus (+) to open a new tab.
How to Switch Between Tabs
Again, hit the Tabs icon. You’ll see a gallery of all your opened tabs in Safari. Select a tab to visit the webpage you want.
Since the release of iOS 15, Apple introduced a new feature in Safari: tab groups. Many of us are probably guilty of having way too many opened tabs. Therefore, organizing tabs into groups makes them more manageable. Learn more about how to use tab groups in Safari on your iPhone .
How to Open a Link in a New Background Tab
When you read long articles, you’ll likely come across a link or two within the content that sparks your interest. To avoid disrupting your reading process, you can make Safari open the link in the background, in a new tab. To do so:
- Go to the Settings app.
- Select Safari .
- Scroll down and tap Open Links .
- Choose In Background .
Next time you want to open a link, long-press it. Then, select Open in Background . When you want to visit that link, select Tabs to view all your opened tabs and choose the loaded webpage.
Saving and Sharing Webpages in Safari
The internet gives you access to a whole new world of information. Save a webpage to refer to it later, or share it with your family and friends.
How to Bookmark a Safari Webpage
To bookmark a webpage to read later, tap the Share icon in the middle of the bottom of the screen (it looks like an arrow coming out of a square) and select Add Bookmark . Type in a bookmark name.
To access your bookmarked webpage later, tap the Bookmark icon (an opened book) and browse through your bookmarks, reading list, and history to find what you’re looking for.
Besides the bookmark option, you’ll also notice that you can add a webpage to your favorites or reading list. Marking a webpage as a favorite will make it show up on your Safari home page. It’s useful if you visit the website often.
To learn more about reading lists, you can visit our guide on the differences between a bookmark and a reading list .
How to Share a Link From the Safari App
Stumble upon an interesting DIY project? A promising recipe you’d like to share with your family? You don’t have to bookmark and remind yourself to show the webpage to them later. You can share the link directly from the Safari app.
Tap the Share icon. You can then select the receiver’s name from the horizontal list of recent contacts, or choose your preferred communication app to send the Safari link to them.
Erasing Your Digital Footprint in Safari
If you’re an aspiring crime writer, having a friend notice your crime-filled search history when they peer over your shoulder is inevitably awkward. Hence, there are some things we’d prefer to keep private and erase all traces of once we exit a web browser.
Safari has a few features to help you with this.
How to Close a Tab
If you don’t close your tabs, old webpages will just auto-load again the moment you head into Safari. Having too many opened tabs affects your browsing speed as well.
Closing a tab is simple. You just need to tap the Tabs icon and then tap the Close (x) button in the corner of the tab.
How to Browse Privately in Safari
Similar to Google Chrome’s Incognito Mode, Safari has a feature called Private Browsing Mode. Your autofill information and browser history won’t be saved when you use this function. Here’s how to use it:
- First, tap the Tabs icon.
- Select the center Tabs button with an arrow next to it.
- Choose Private .
- To open a new private tab, tap the Plus (+) button.
Whenever you’re in doubt about whether you’re in Private Browsing Mode, just check the Smart Search Bar. It will be dark grey instead of white when you’re browsing privately.
How to Clear Your Safari Browsing History
If you forgot to use Private Browsing while searching for confidential information, don’t worry. You can still clear your history in Safari. Just follow these steps:
- Tap the Bookmarks icon.
- Select History (the clock icon).
- Tap Clear .
- Choose the time length from which you want Safari to clear your history.
Use the Safari App to Surf the Internet on Your iPhone
The Safari app has all the features you need for a seamless browsing experience. Once you’re familiar with these basic functions, you can check out and download Safari extensions from the App Store to enjoy more helpful features while surfing the internet on your iPhone or iPad.
- Safari Browser
How to Update Safari on iPad: A Step-by-Step Guide to the Latest Version
Updating Safari on your iPad is a straightforward process that ensures you have the latest features, security updates, and bug fixes. All you need to do is make sure your iPad is running the most recent version of iOS, as Safari updates are included within the iOS updates. Here’s how you can quickly and easily update Safari on your iPad.
How to Update Safari on iPad
In this section, you’ll learn the exact steps to update Safari on your iPad. Following these steps will ensure that your browser is up-to-date, providing you with the best browsing experience possible.
Step 1: Open the Settings App
The first step is to open the “Settings” app on your iPad.
To find the Settings app, look for the gray icon with gears on your home screen. Tap on it to open the settings menu.
Step 2: Tap on General
Step 2 involves tapping on “General” in the settings menu.
“General” is usually one of the top options in the settings menu. Tap on it to see more options, such as Software Update and About.
Step 3: Select Software Update
The third step is to tap on “Software Update.”
“Software Update” can be found under the General settings. This will check for any available updates for your iPad, including updates for Safari.
Step 4: Download and Install the Update
Step 4 is to tap on “Download and Install” if an update is available.
If there is an update available, your iPad will prompt you with a “Download and Install” button. Tap this and follow the on-screen instructions to complete the update.
Step 5: Enter Your Passcode
The final step is to enter your passcode if prompted.
Your iPad may ask for your passcode to confirm the update. Enter your passcode, and the update will begin.
After you have completed these steps, your iPad will restart, and Safari will be updated to the latest version available with your iOS update.
Tips for Updating Safari on iPad
Updating Safari might seem simple, but here are some tips to make sure everything goes smoothly:
- Backup Your Data : Always back up your iPad before performing an update, just in case something goes wrong.
- Stable Internet Connection : Make sure you’re connected to a stable Wi-Fi network to avoid any interruptions during the download.
- Sufficient Battery Life : Ensure that your iPad has enough battery life, or keep it plugged in during the update process.
- Check Storage Space : Ensure you have enough storage space on your iPad for the update.
- Regular Updates : Regularly check for iOS updates to keep Safari and other apps running efficiently.
Frequently Asked Questions
Is updating safari on ipad free.
Yes, updating Safari is free as long as you have an internet connection.
Can I update Safari without updating iOS?
No, Safari updates are bundled with iOS updates. You need to update iOS to get the latest version of Safari.
How long does it take to update Safari on iPad?
The time can vary depending on the size of the update and your internet speed. Usually, it takes a few minutes.
Will I lose my bookmarks and history after updating?
No, your bookmarks, history, and other data will be preserved after the update.
What should I do if the update fails?
If the update fails, ensure you have a stable internet connection, enough storage space, and sufficient battery life. You can also restart your iPad and try again.
- Open the Settings app.
- Tap on General.
- Select Software Update.
- Download and Install the update.
- Enter your passcode if prompted.
Updating Safari on your iPad is crucial for maintaining a smooth, secure, and efficient browsing experience. Following the steps outlined above ensures you’re always using the latest version of Safari, packed with new features and security enhancements.
While the update process is generally straightforward, always remember to back up your data as a precaution. A stable internet connection, enough battery life, and sufficient storage are essential for a hassle-free update.
Regularly checking for updates and installing them is a good habit that keeps your iPad running smoothly.
So, go ahead and update your Safari browser today to enjoy a seamless online experience. If you found this guide helpful, consider sharing it with friends and family who might also benefit from knowing how to update Safari on their iPads. Happy browsing!

Matthew Burleigh has been writing tech tutorials since 2008. His writing has appeared on dozens of different websites and been read over 50 million times.
After receiving his Bachelor’s and Master’s degrees in Computer Science he spent several years working in IT management for small businesses. However, he now works full time writing content online and creating websites.
His main writing topics include iPhones, Microsoft Office, Google Apps, Android, and Photoshop, but he has also written about many other tech topics as well.
Read his full bio here.
Share this:
Join our free newsletter.
Featured guides and deals
You may opt out at any time. Read our Privacy Policy
Related posts:
- 15 Ways to Fix Safari Not Working on iPhone in 2023
- How to Turn Off the Passcode Screen on an iPhone 6
- How to Turn Off the Passcode on the Apple Watch
- Safari History iPhone: How to See It [2023 Guide]
- How to Get Safari Back on iPhone 13
- How to Update Multiple iPad Apps at Once
- IOS 17: Step-by-Step Guide to Changing Your Passcode
- 15 iPhone Settings You Might Want to Change
- How to Change iPhone 11 Passcode
- iOS 17 Guide: How to Set Up a 4 Digit Passcode on iPhone
- How to Change the Password on Your iPad 2
- How to Show Bookmarks Bar in Safari on iPad
- How to Take Off the Password on My iPad: Step-by-Step Guide
- iOS 17: How to Turn Off Passcode in Simple Steps
- How to Make All Columns the Same Width in Excel 2013
- How to Update the iPad to a Newer Version: Step-by-Step Guide
- How to Turn Off the Passcode on an iPad in iOS 9
- How to Export iPad Safari Bookmarks
- 3 iPhone Update Settings You Can Change
- 3 iPhone Safari Tips You Might Not Know
How to use Safari on an iPhone or iPad

The iPhone's always been great for surfing the web, and Apple 's mobile version of Safari just keeps getting better. The browser boasts a sleek, efficient interface, which goes almost fullscreen the second you scroll (flick downwards to get the toolbars back), and also makes it easy to find content, via powerful web and in-page searching.
Articles you don't have time to peruse can be stashed for later, favourite sites can be bookmarked and shared, and you can subscribe to sites you love, so that you never miss an update.
For sites you visit daily, shortcuts can be added to your Home Screen by tapping Share and selecting Add to Home Screen. Most sites provide an app-like icon, meaning the shortcuts look perfectly at home among your apps.
1. Visit websites
At the top of the screen is the Unified Smart Search Field, into which you can type a URL (such as www.techaradar.com) or a search term, then tap Go.
During searches, Safari will attempt to provide intelligent results for locations, iTunes content or Wikipedia articles. Also, try visiting a site and performing a search.
Then next time you'll be able to search directly from the Unified Smart Search Field: just type the URL, a space, then your search term, and tap Go.
2. Text searches
One neat trick that some people overlook is the ability to search through the text of a page using the Unified Smart Search field.
Get daily insight, inspiration and deals in your inbox
Sign up for breaking news, reviews, opinion, top tech deals, and more.
Enter a word and scroll down to On This Page. Tap the Find "word" panel and Safari will highlight in yellow all instances of that word on the page.
You can move through matched words using the Next and Previous Match buttons in the bottom left, or enter a new search term in the search field in the bottom right of the screen.
3. Saving images
You can save images from Safari by tapping and holding on them until the menu appears; now choose Save Image and it'll be sent to the Photos app.
Return to your Home Screen and open Photos to view the image in your collection. You can share the image on Facebook, Twitter or Flickr by tapping Share.
4. Navigating web pages
Flick your finger up and down to scroll up and down through a web page. You can use the pinch-to-zoom gesture to zoom in on text and images, or double-tap a part of the screen to intelligently zoom to that element.
Simply tap on links to open them, and move back and forward using the icons at the left of the menu bar at the foot of the screen. Tap and hold on links to bring up a menu with options such as 'Open In A New Tab' or 'Add To Reading List'.
5. Adding bookmarks
To bookmark a page, tap the Share button and select Bookmark. By default, Bookmarks are added to Favourites (the grid of icons you see when opening a new tab), but you can select an alternative location.
Tap Save to bookmark the page. A faster way to add a page to your Favourites is to tap the URL, tap the clock, then tap Add to Favorites. Saved bookmarks can be browsed by tapping the Bookmarks icon, and managed/deleted using the Edit button.

6. Set up a Reading List
Safari Reading List is a great way to keep track of articles that you want to read at a later date. Tap the Share button, then Add to Reading List to add the page to your Reading List.
Now tap Bookmarks, then the Reading List icon (it looks like a pair of glasses). As you tap items in your reading list they'll disappear from the list; you can see items you've already read by tapping Show All at the bottom right of the screen.
7. Safari Reader
Safari Reader is a great way to view a web page without distractions (such as flashing adverts or animated graphics).
To view a page in Reader mode, tap on the Reader icon just to the left of the web address in the Unified Smart Search Field – the icon looks like four horizontal lines.
When you've finished, tap the Reader icon again to return to the standard page view.
8. iCloud Tabs
iCloud tabs show web pages open on other devices linked to your Apple ID. Tap the tabs button and then scroll down to see the list.
Tap anything in the list to open it. You can also remove an iCloud tab by swiping from right to left and tapping Delete.

9. Share via AirDrop
You can share pages wirelessly with other iOS 8 users using the AirDrop feature. Swipe your finger up from the bottom of the screen to open Control Centre, and tap AirDrop, then Everyone (or Contacts Only to be more selective).
Now in Safari tap the Share button, and anyone nearby with AirDrop turned on will appear in the Action sheet. Tap a person and they'll receive an invitation to view the page.

10. Shared Links
To access the Shared Links feature, tap on the Bookmarks icon in Safari and then tap the Shared Links tab (represented by the '@' symbol).
By default, the tab will show links shared via any Twitter accounts you've set up in Settings > Twitter. Very handy. But it goes further…
Visit any website that regularly updates, such as a blog, then return to the Shared Links tab and tap Subscriptions. If the site has a feed you can subscribe to, Add Current Site will be in blue.
Tap this to add the site to your list. Headlines will then be displayed; tap any entry to view the associated web page.
Apple could deliver an iPhone 16 Slim this year if it borrows this iPad Pro feature
A huge iPhone 17 leak just gave you 5 potential reasons to skip the iPhone 16
The Quest 3 is getting a personal assistant courtesy of Meta AI
Most Popular
- 2 Best Buy's massive weekend sale is live: 32 deals I'd buy on TVs, laptops, and appliances
- 3 AMD just unleashed FSR 3.1 – and it’s a great day for PC gamers no matter what brand of graphics card they own
- 4 Early 4th of July deal drops LG's all-new C4 OLED TV to a new record-low price
- 5 Everything new on Max in July 2024
- 2 Geekom launches yet another mini PC that makes it a little bit more difficult to justify buying a traditional desktop PC — AX8 Pro looks like Intel's legendary NUC but with an unbelievably low price tag
- 3 Microsoft pauses Windows 11 update as it’s sending some PCs into an infinite reboot hell
- 4 Netflix in 2024: the 9 most unmissable shows so far and what’s coming next
- 5 This One Million Checkbox game is sparking an internet war – and it's taken hours of our life we'll never get back
The Tech Edvocate
- Advertisement
- Home Page Five (No Sidebar)
- Home Page Four
- Home Page Three
- Home Page Two
- Icons [No Sidebar]
- Left Sidbear Page
- Lynch Educational Consulting
- My Speaking Page
- Newsletter Sign Up Confirmation
- Newsletter Unsubscription
- Page Example
- Privacy Policy
- Protected Content
- Request a Product Review
- Shortcodes Examples
- Terms and Conditions
- The Edvocate
- The Tech Edvocate Product Guide
- Write For Us
- Dr. Lynch’s Personal Website
- The Edvocate Podcast
- Assistive Technology
- Child Development Tech
- Early Childhood & K-12 EdTech
- EdTech Futures
- EdTech News
- EdTech Policy & Reform
- EdTech Startups & Businesses
- Higher Education EdTech
- Online Learning & eLearning
- Parent & Family Tech
- Personalized Learning
- Product Reviews
- Tech Edvocate Awards
- School Ratings
Product Review of the Matter Smart Multicolor Outdoor String Lights Smarter Kit
Product review of ramverk pro check-in luggage, the quest 3 is getting a personal assistant courtesy of meta ai, nyt strands hints, answers for july 24, wordle today: here’s the answer hints for july 24, hackers leak documents from pentagon it services provider leidos, elon musk doubles down on tesla’s dojo supercomputer, aiming to compete with nvidia, mark zuckerberg is asking the audience to help rate his ai-generated drip, show hn: we made glhf.chat – run almost any open-source llm, including 405b, mark zuckerberg imagines content creators making ai clones of themselves, safari: a beginner’s guide for iphone or ipad users.

If you’re new to the world of iPhones or iPads, you’ve probably come across the term “Safari” quite a few times by now. But what is Safari, and how do you use it?
Safari is Apple’s default web browser, and it comes pre-installed on all iPhones and iPads. It’s a powerful tool that allows you to browse the web, search for information, and access your favorite websites. In this guide, we’ll go over some of the basics of using Safari on your iOS device.
First, let’s talk about how to open Safari. You’ll find the icon for Safari on your home screen, usually located at the bottom of the screen. Simply tap on the icon to launch the app.
Once you’ve opened Safari, you’ll see a search bar at the top of the screen. This is where you can enter a website address or search for something on the web. To enter a website address, simply tap on the search bar and type in the address, then tap “Go” on the keyboard. If you want to search for something on the web, just enter your search term in the search bar and tap “Go.”
Once you’ve arrived at a website, you can scroll up and down to view the content. You can also zoom in or out by pinching or spreading your fingers on the screen. If you want to go back to a previous page, simply tap the “Back” button on the left side of the screen. To go forward, tap the “Forward” button.
Another useful feature of Safari is tabs. Tabs allow you to have multiple websites open at the same time, making it easy to switch between them. To open a new tab, tap the “New Tab” button on the right side of the screen. To switch between tabs, simply tap on the tab you want to go to. You can also close a tab by tapping on the “X” on the top left corner of the tab.
If you want to bookmark a website, simply tap on the “Share” button (which looks like a square with an arrow pointing up) at the bottom of the screen. From here, you can add the website to your favorites, reading list, or share it with others via email or text message.
Finally, Safari also includes some useful settings that you can customize to suit your preferences. For example, you can change the default search engine, adjust font sizes, and enable or disable pop-ups. To access these settings, tap on the “Settings” app on your home screen, then scroll down until you see “Safari.”
In conclusion, Safari is a powerful tool that allows you to access the web on your iPhone or iPad. With these basic tips, you’ll be able to browse the web, search for information, and access your favorite websites with ease.
How to Change the Default Email App ...
How to see your most visited sites ....

Matthew Lynch
Related articles more from author, what is an mdb file.
How to Fix a Slow Download Speed in Battle.net for Windows

What Is a GIF?

Consider these 5 factors of DCI technology

Is It Possible to Watch 3D Without Glasses?

Apple Gift Card vs. App Store Gift Card vs. Apple Store Gift Card: Which One Should You Buy?
Want to highlight a helpful answer? Upvote!
Did someone help you, or did an answer or User Tip resolve your issue? Upvote by selecting the upvote arrow. Your feedback helps others! Learn more about when to upvote >
Looks like no one’s replied in a while. To start the conversation again, simply ask a new question.
How do uninstall safari on a iPad
How do you uninstall safari on your iPad
iPad Air, iPadOS 14
Posted on May 9, 2021 7:10 AM

Posted on May 9, 2021 10:29 AM
Safari is an integral element of iOS/iPadOS - and cannot be updated or deleted independently of the OS. If your iPad has been updated to the most recent version supported by your iPad, then Safari is as up-to-date as is possible.
If you wish to use an alternative browser in preference to Safari, you can do so - and configure the alternative browser as the default browser from iPad settings.
Similar questions
- Uninstall Safari How do I uninstall Safari from iPad? 339 1
- How to delete safari on a iPad How to delete safari 469 1
- how can I permanently remove safari from IPad 5th generation Removing safari permanently from ipad 626 3
Loading page content
Page content loaded
May 9, 2021 10:29 AM in response to Marytollard

May 9, 2021 7:11 AM in response to Marytollard
safari cannot be uninstalled from an iPad.
You are using an outdated browser. Please upgrade your browser to improve your experience.
How to use Reader Mode in Safari on iPad

Reader Mode in Safari can help to simplify your reading experience.

Last updated 1 month ago
Whatever your reasons may be, something about a website just may not jibe with your eyes, and that is precisely where Reader Mode on Safari comes in. Reader Mode makes getting past this issue a breeze and makes reading articles on your iPad much more pleasant.
How to use Reader Mode in Safari
Actually opening up Reader Mode is very simple, and quite literally requires just two taps. With any largely text-based web page open in Safari, you need only tap on the "Aa" icon in the left-hand side of your address bar. Once that's been tapped, you'll see the option to "Show Reader." Once you've tapped "Show Reader" the web page will convert into a succinct block of text with pictures intact.

The "Show Reader" option is available on almost every primarily text-based web page. For websites like Instagram or Amazon, Reader Mode wouldn't do anything worthwhile for you even if you could enable it.
When entering Reader Mode, all the ads and suggested content from any given website will be stripped out in favor of a succinct reading experience. With that in mind, there are still some issues you can bump into. Some webpages, despite being mostly text, won't show up properly. In some instances this can be due to how the website is written, and in others it may just be that the text on the page is embedded within an image.
Another issue that can crop is multi-paged articles and how they "cooperate" with Reader Mode. For the most part, Reader Mode will only show you the first page of a multi-paged article when turned on. For these kinds of pages, you will have to turn Reader Mode on and off to progress through the article.
How to customize Reader Mode in Safari
Once you're in Reader Mode, you may find yourself wanting to make a few cosmetic adjustments. Doing so is as simple as returning to the menu you used to open Reader Mode. Once you have the menu opened up, you'll be greeted with a few key options, including:
- Adjusting the font
- Adjusting the font size
- Changing the background color
- Individual website settings

All of these options do exactly what it sounds like they would do. The individual website settings don't offer much that pertains to Reader Mode, but there is one absolutely game changing setting you can enable here.
That setting is "Use Reader Automatically." What this option will do is make it to where Safari automatically displays pages from that website in Reader Mode. Pages that can't normally be viewed in Reader Mode will still show up as normal, but the moment you enter a page that can be viewed in Reader Mode, the change will happen automatically.
With Reader Mode in your arsenal, you'll have a much better reading experience across the web on your iPad.
Do you people even try this feature cause it still doesn't work properly for your site. Kind of hilarious you're telling us how to use a feature that your site does not properly support. Whatever is in your formatting does not show bullet points or other special elements in Reader mode. And has not for months. I even tried emailing you but seems nobody is listening or cares over there. I stopped reading your site because it doesn't support Reader mode properly. For example in this article the 4 bullet points do not show when enabling reader mode.
Sponsored Content

How to Factory Reset iPhone without Password or Apple ID
Top stories.

How the Apple Ring will blow all the other smart ring manufacturers out of the water

Hands on: Everything new with CarPlay in iOS 18

iPhone 17 cameras may get variable aperture for better bokeh

iPhone 17 again said to kill off plus size in favor of iPhone slim

Microsoft Copilot is fairly relaxed about trademark use
Featured deals.

OWC extends its popular $99 Thunderbolt Dock sale through July 28
Latest news.

OWC's Thunderbolt dock, which is on sale for $99, features 14 ports to connect peripherals to your Mac or Windows machine.

Fortnite coming to iPhones in the EU via AltStore
Even with the Epic Games Store set to launch in the EU on iPhone, Epic has announced its games will be coming to other alternative app stores that "give developers a great deal," like AltStore PAL.

Sonos apologizes for screwing up its revamped iOS app launch
Sonos has issued a rare apology for its May iOS app update, promising that changes are on the way to improve a badly-received overhaul of the software.

Apple's M3 MacBook Pro 14-inch with 16GB RAM, 1TB SSD is on sale for a record low $1,749
A fresh M3 14-inch MacBook Pro price war has erupted, with the 1TB model equipped with 16GB unified memory now priced at a record low $1,749 thanks to a $250 price cut.

Apple's iPhone shipments are still getting squeezed in China by rising rivals
Apple's fortunes in China may be getting worse in the short term, with iPhone shipments for the second quarter reportedly down year-on-year as local rivals increase competition.

Apple plans fabric displays for future devices like the HomePod
Future HomePods, iPhone cases, Apple Watch bands and more could display information right on their familiar fabric covering, if the latest of very many Apple patent applications is anything to go by.

Life is unpredictable, and sometimes you might find yourself with a locked iPhone and no hope of recovery due to a lost password. Here's how to factory reset an iPhone without a password by using the Tenorshare 4uKey One-Click Password Unlocker.

Leagues Cup returns to Apple TV's MLS Season Pass
The Leagues Cup is back for 2024, with soccer fans able to watch all of the action only through the MLS Season Pass on Apple TV.

Best new 2024 M4 iPad Pro cases to keep your devices safe
Now that you've got your brand new M4 iPad Pro in hand, it's time for you to protect it with one of these great iPad Pro cases.

Apple's 'Underdogs' are back for a mad dash across Thailand
Every possible Apple device — for the first time including the Apple Vision Pro — is shown off in the latest of Apple's funny and tense "Underdogs" videos.
Latest Videos

How to use iPhone Mirroring in iOS 18 and macOS Sequoia

Retro gold rush: which emulators are on the App Store, and what's coming
Latest reviews.

Oyen Digital U34 Bolt SSD review - Enormous drive speed in a rugged package

Logitech MX Keys S review: Great typing feel and feature packed

MacBook Air M3 review three months later: The best Mac for nearly everyone

{{ title }}
{{ summary }}
How-To Geek
How to show or hide the favorites bar on safari for ipad.

Your changes have been saved
Email Is sent
Please verify your email address.
You’ve reached your account maximum for followed topics.
How to Find Your iPhone From an Android Device
The pros and cons of using a vpn for gaming, iphone getting hot here's why your iphone is overheating and how to fix it.
If you'd like to keep some of your favorite Safari bookmarks a quick tap away on your iPad, Safari lets you enable an on-screen Favorites bar. Once it's enabled, you'll find it under your address bar. Here's how to turn the Favorites bar on (or off, if you want to hide it).
First, launch Settings. Locate the grey "gear" icon on your iPad and tap it.
In Settings, scroll through the list and tap "Safari."
In Safari settings, find the "General" section. In that section, you'll see a switch labeled "Show Favorites Bar." Flip the switch beside it to turn it on.
(If it's already enabled and you want to hide the Favorites bar, flip the switch "off.")
After that, launch Safari. If you've enabled the Favorites bar, you'll see it located just below the address bar at the top of the screen.
To use it, just tap any one of the names on your Favorites bar, and the website will load in the tab or window you're currently using.
You can change which links appear in the Favorites bar by editing your bookmarks and rearranging your "Favorites" list. Whatever is at the top of that list will appear in the Favorites bar---depending on the space available and the length of the link names. Happy browsing!
Related: How to Hide Favorites on Safari's New Tab Page on iPhone and iPad
- iPhone & iPad
Safari App: The Ultimate Guide

Apple's web browser, Safari , keeps getting faster and better. It sports a smart search bar, tabs, and a special Split View version for iPad users. You can view Shared Links and add articles to your Reading List, or access your saved passwords and credit cards through iCloud Keychain. And you can pay for goods and services using Apple Pay , the company's secure contactless payment system.
If you've been curious about making the most of Safari, here's everything you need to know.
How to find web pages, bookmarks, history, and search page content in Safari on iPhone and iPad
The Smart Search bar is a hybrid of the old address and search bars melded into one universal place to type and go. You can access your default search provider, your browsing history, saved bookmarks, and even specific words on web pages all through the unified Smart Search bar at the top of your Safari browsing window.
- How to search the web using the Smart Search bar
- How to quickly copy URLs, search, and visit websites in Safari on your iPad
- How to search bookmarks and web history using the Smart Search bar on iPhone and iPad
- How to search the text on a specific web page using the Smart Search bar
- How to change your default search browser
How to use private browsing and tabs in Safari on iPhone and iPad

Tabs in Safari lets you keep multiple web pages open at the same time so you can switch between them or refer back to them whenever you want to. You can open links in new tabs so you don't lose what you're currently surfing, and you can even go into Private mode so nothing you search for or navigate to can come back to haunt you.
- How to open a new tab in Safari on iPhone and iPad
- How to use Safari's Split View on iPad
- How to switch tabs in Safari on iPhone and iPad
- How to close a tab in Safari on iPhone and iPad
- How to quickly close all tabs in Safari on iPhone and iPad
- How to view recently-closed tabs in Safari on iPhone and iPad
- How to view websites from your other devices in Safari on iPhone and iPad
- How to use private browsing in Safari on iPhone and iPad
How to use Bookmarks and Reading List in Safari on iPhone and iPad
Reading List is Apple's take on a read-it-later service: Built into the Safari browser for iPhone and iPad, Reading List let you save any articles you stumble across while browsing the web for offline viewing; you can then go back and peruse them at your convenience. Bookmarks, in contrast, aren't available offline, but can be added to your Favorites bar for easy repeat access. Because both Reading List and Bookmarks sync via iCloud, your links and stories are available while you're on the go with your iPhone, lounging at home with your iPad, or while you're enjoying a coffee at your Mac. Here's how to use them.
- How to add a bookmark
- How to add a bookmark to your Favorites bar
- How to search for a bookmark
- How to edit and remove a bookmark
- How to add an article to your Reading List in Safari
- How to access your Reading List in Safari
- How to delete articles from your Reading List in Safari
- How to use Reader View in Safari on iPhone and iPad
How to use Shared Links in Safari on iPhone or iPad

Shared Links let you make a custom feed right inside the iPhone and iPad's built-in web browser, Safari . You can add social accounts and your favorite websites to your Shared Links tab and get all the content that matters to you in one convenient place.
- How to access and use Shared Links in Safari
- How to add a social media subscription to Shared Links in Safari
- How to add a website subscription to Shared Links in Safari
- How to delete subscriptions to Shared Links in Safari
How to block cookies and stop websites from tracking you in Safari
If you've recently noticed that some advertisements you receive within apps seem oddly similar to something you've just been reading about or a game you've just started playing, it's not because Siri is listening in on your conversations or because your iPhone has gained self-awareness. It's because you have ad tracking on your iPhone. The Do Not Track policy exists to prevent social networks, analytics, and online advertising from following you around the internet and recording your browsing patterns. Browsers that respect Do Not Track — like Apple's Safari — will allow you to surf the web in peace and privacy.
Master your iPhone in minutes
iMore offers spot-on advice and guidance from our team of experts, with decades of Apple device experience to lean on. Learn more with iMore!
- How to limit ad tracking on iPhone and iPad
How to block ads in Safari
The Web has gotten messy. Whether it's ads, social widgets, or spoilers you want to avoid, you can make it a little less distracting by downloading and enabling content blocker widgets. Here's how to do so on your iPhone, iPad, or iPod touch.
- How to block ads on your iPhone or iPad
- How to view a Safari website without content blockers on your iPhone or iPad
- The best ad blockers for iPhone and iPad
- Can't enable content blockers on your iPhone or iPad? Here's the fix!
How to clear history and cookies in Safari
Whenever you visit a webpage using the Safari web browser, it gets recorded in your browser history so you can more easily go back and find that page again should you want to. Likewise, cookies get stored to make logins and other information easily available to you. If you don't want a particular page recorded in your history or cookies (we don't judge!) you can always use Private browsing mode. If you forget, however, you can quickly and easily clear your history and cookies and start over.
If you're worried about the safety of your kids while browsing online, we also offer a guide on setting up parental controls to block potentially nasty websites from young eyes.
- How to view and clear your browsing history in Safari on iPhone or iPad
- How to block websites in Safari on iPhone and iPad
Any Safari questions?
Any tips we missed or any other questions about Safari on iPhone or iPad? Drop them in the comments below!
Serenity was formerly the Managing Editor at iMore, and now works for Apple. She's been talking, writing about, and tinkering with Apple products since she was old enough to double-click. In her spare time, she sketches, sings, and in her secret superhero life, plays roller derby. Follow her on Twitter @settern.
The failed Apple Car could be reborn, but this time with a Porsche badge on the front and an enhanced CarPlay experience inside
Apple starts the Paris Olympics early with a stunning upgrade to Apple Maps — redesigned landmarks, public gathering sites, and more
iPhone 16 colors: What's in and what's out for 2024?
Most Popular
- 2 Apple to beat and superheat next-gen iPhone, iPad, and Vision Pro devices in new Chinese lab, so you don’t have to
- 3 The failed Apple Car could be reborn, but this time with a Porsche badge on the front and an enhanced CarPlay experience inside
- 4 Already downloaded the iOS 18 public beta? Try out these 5 new features right now!
- 5 Pocket Cable is like a Swiss Army Knife for charging your USB-C iPhone
- Snag These Great Outdoor Gadgets
- TV Streaming Services to Try
How to Manage Browsing History on Safari for iPad
Protect your privacy on your mobile device
:max_bytes(150000):strip_icc():format(webp)/ScottOrgera-f7aca23cc84a4ea9a3f9e2ebd93bd690.jpg "bedienung safari ipad")
What to Know
- Open Safari . Select the Bookmarks icon.
- Choose the Clock icon to open the History pane displaying the list of sites visited during the past month.
- Select Clear and indicate which entries to delete using one of the four options: The last hour, Today, Today and yesterday, and All Time.
This article explains how to manage browsing history on Safari for iPad, including how to view and delete the iPad Safari history, cookies, and stored website data. This article applies to all iPad devices with iOS 10 or iPadOS 13 or later. The process for managing browser history in Safari on an iPhone is slightly different.
How to View and Delete Your iPad Browser History in Safari
Reviewing your iPad browser history is a straightforward process. Safari stores a log of websites you visit along with other related components, such as the cache and cookies. These elements enhance your browsing experience, but you may want to delete your browsing history for privacy reasons.
You can manage your web browsing history on the iPad in two ways. The easiest option is to do it directly in Safari:
Open the Safari web browser.
Select the Bookmarks icon (it looks like an open book) at the top of the screen.
Select the clock icon to open the History pane. A list of sites visited over the past month appears.
To delete a single website from the browser history, swipe left on its name.
Select Clear at the bottom of the panel to reveal four options: The last hour, Today, Today and yesterday, and All time.
Select your preferred option to remove the browsing history from your iPad and all connected iCloud devices.
How to Delete History and Cookies From the iPad Settings App
Deleting the browser history through Safari doesn't remove all the data it stores. For a thorough cleaning, go to the iPad Settings app. You can also delete the browsing history and cookies from the Settings app. Clearing the history this way deletes everything Safari saved.
Select the gear icon on the Home screen to open the iPad Settings .
Scroll down and select Safari .
Scroll through the list of settings and select Clear History and Website Data to delete the browsing history, cookies, and other cached website data.
Select Clear to confirm, or select Cancel to return to the Safari settings without removing any data.
How to Delete Stored Website Data on iPad
Safari sometimes stores additional website data on top of a list of web pages you visited. For example, it can save passwords and preferences for frequently visited sites. If you want to delete this data but don't want to clear the browsing history or cookies, selectively delete specific data saved by Safari using the iPad Settings app.
Open the iPad Settings app.
Scroll to the bottom of the Safari settings screen and select Advanced .
Select Website Data to display a breakdown of the data each website currently stores on the iPad.
Select Show All Sites to display the expanded list if necessary.
Select Remove All Website Data at the bottom of the screen to delete the site data at once, or swipe left on individual items to clear items one at a time.
Get the Latest Tech News Delivered Every Day
- How to Turn Off Private Browsing on iPad
- How to Manage Your Browsing History in Safari
- How to Clear Cache and Cookies in Every Major Browser
- How to Enable Cookies in Your Browser
- How to Close All Tabs in Safari on the iPhone or iPad
- How to Clear Search History on iPhone
- How to Clear Cache on an iPad
- How to Clear Cookies on iPad
- How to Delete and Clear Cookies on an iPhone
- How to Reset Safari to Default Settings
- How to Clear Your Search Bar History
- Can An iPad Get Infected With a Virus?
- How to Manage History and Browsing Data on iPhone
- How to Control iPhone Safari Settings and Security
- How to Turn on Incognito Mode in Chrome, Edge, Firefox, Safari, and Opera
- How to Clear the Browsing History in Chrome for iPad

Beginners Guide to iPad: Tips and Tricks for Getting Started
iPads are much more than just oversized iPhones. When you purchase an iPad, you have to learn a whole host of new tools, features, and shortcuts. You can organize apps, customize the tools to fit your preferences, and take advantage of the modern technology at your disposal.
Whether you want to personalize your home screen for a more unique experience or learn shortcuts to speed up your workflow, this is the article for you. Let’s look at some of the best iPad tips and tricks for beginners.
activate find my ipad to keep it safe
Before you start exploring your new iPad, you need to connect it to the Find My app. Find My is one of the best forms of protection against theft and accidental loss. Once an iOS device is connected, Find My can locate it on a map. It even plays a sound from the lost device, making it much easier to find.
Here’s how to add your iPad to the Find My app.
- Go to settings
- Tap your Apple ID
- Press Find My
- Turn on Find My iPad
There are a few other options for those who really want to make the most of the Find My tool.
- Find My Network. Allows you to locate your iPad even when it’s offline, in power reserve mode, or turned off altogether
- Send Last Location. When your battery is critically low, your iPad will automatically send its location to Apple
You can also add your Apple Pencil to the Find My app for extra protection.
boost productivity with focus
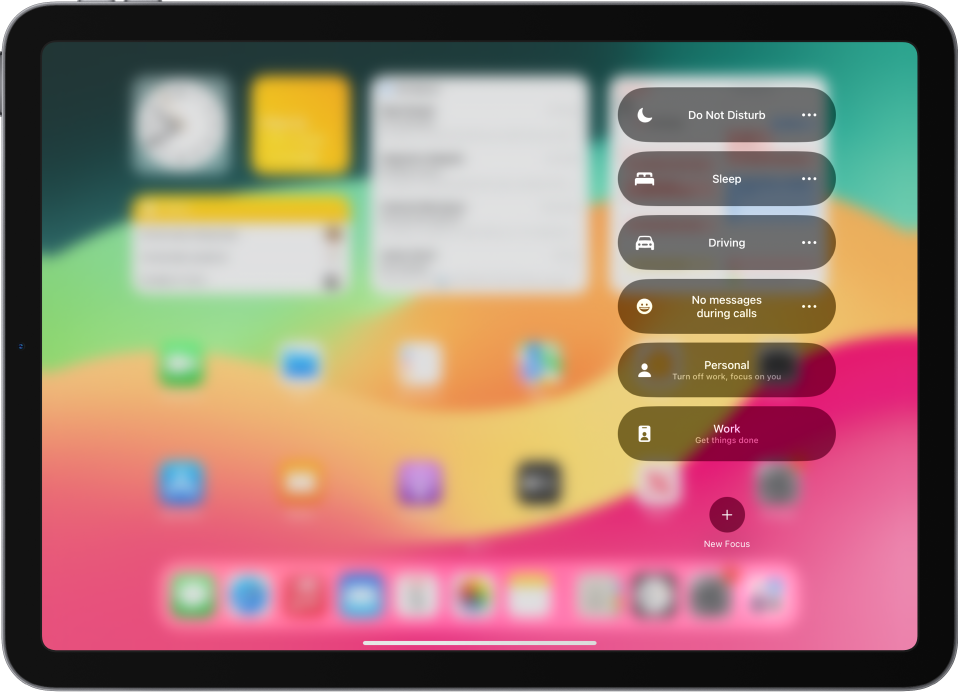
You are probably already familiar with Focus Mode; on iPhones, it allows individuals to streamline their notifications and avoid messages, calls, and any other beeps while they are focusing.
On iPads, Focus Mode is mostly the same. Go to Settings, select Focus, and choose from Personal, Sleep, or Work to customize your experience.
Out of all our iPad tips and tricks, this one has the most power to enhance your focus. You can use a range of filters to accommodate your specific needs, creating a solid divide between all the entertainment options on iPads and the more serious, focused tools.
Read the complete guide to Focus Mode for iPhone to learn more.
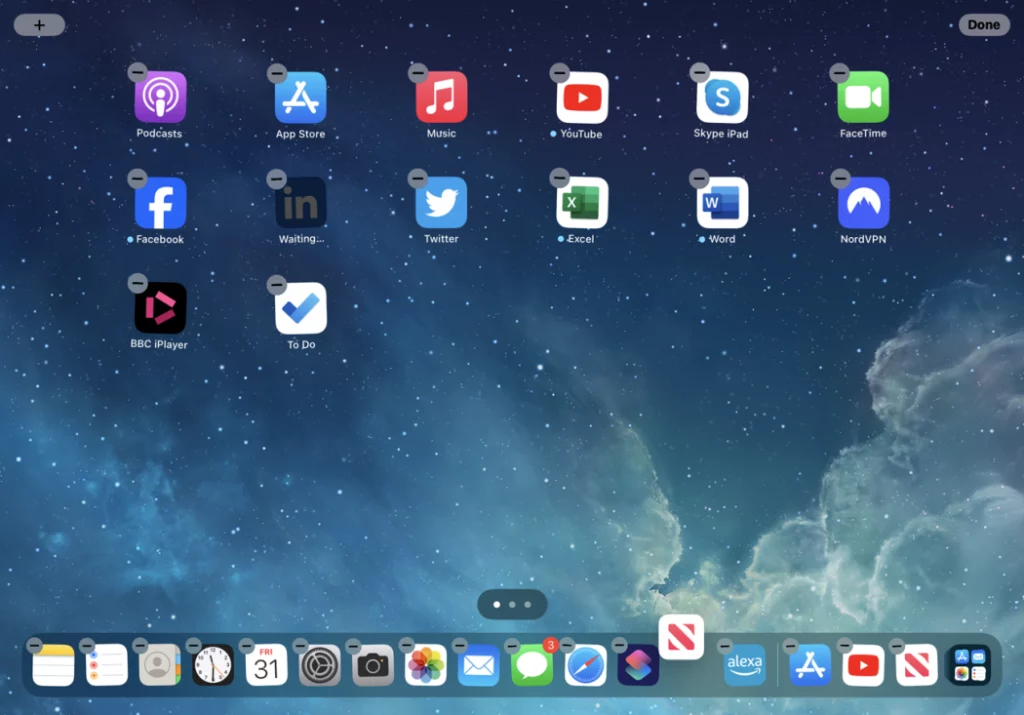
customize your dock
The Dock, which you might know as the toolbar at the bottom of your screen, is a great organization tool. It houses up to 13 apps, making it much longer than the Dock on an iPhone. Three slots on the right–hand side house your recently used apps, which leaves ten slots for your favorite apps.
To edit the Dock, follow these steps.
- Long-press an icon until you activate Edit Home Screen*
- Drag your favorite apps to the Dock
- Rearrange the Dock until you have the perfect order
You can also place entire folders in your Dock. Just drag the folder as normal, and arrange your folders in alphabetical order, color order, or a completely random arrangement.
*You know you have found Edit Home Screen when all the apps shake.
discover energy saving options
Some apps use more energy than others. If you allow them to keep running in the background, they will quickly run down your battery.
- Go to Settings
- Select Battery
- Scroll down to see which apps use the most energy
Apps such as Gmail, Snapchat, and Spotify are active in the background, even when you are not using them.
Your battery isn’t the only thing that benefits. We included this in our list of iPad tips and tricks for money-savvy people. Even the smallest changes can impact your expenses and, besides, using less energy is better for the environment.
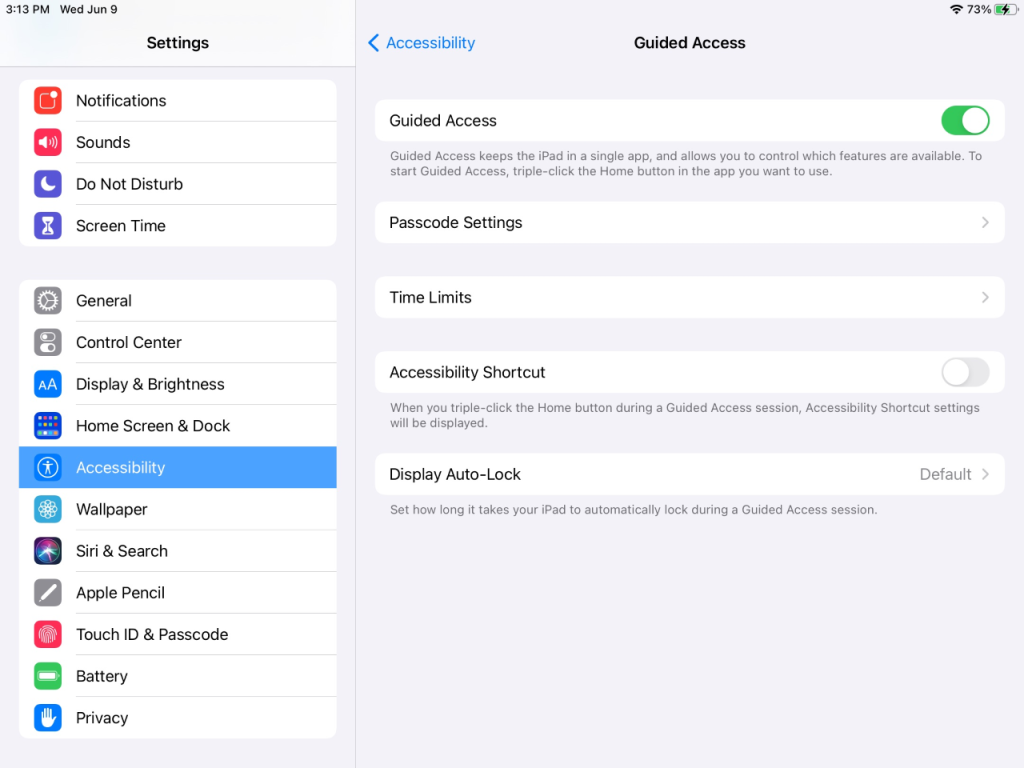
enable guided access to make your ipad child safe
Children love iPads, so it’s a good idea to invest in a child-safety system. Luckily for you, iPads come with a built-in Guided Access feature that allows you to limit access to a single app. You can allow access to educational and entertainment apps that are suitable for your child and protect them from the darker corners of the internet.
- Press Accessibility
- Activate Guided Access
- Select Passcode Settings
- Tap Set Guided Access Passcode
Once you have set a password, you can start a Guided Access session.
- Open the app you want
- If you have an iPhone X or later, triple-click the side button
- If you have an iPhone 8 or earlier, triple-click the home button
- To stop parts of the screen from responding to touch, use one finger to circle those areas. You can resize, move, or delete the circle
- Tap Guided Access, then tap Start
You can also activate Guided Access with Siri. Just open the app you want to use, activate Siri, and say, “Turn on Guided Access.”
To end your Guided Access session, triple-click the Home or Side button, enter your Guided Access code, and tap End.
This is one of the more time-consuming tips and tricks for iPads, but it gives you unparalleled peace of mind.
move widgets to your lock screen
iPadOS 17 was released late last year, and it ushered in a new wave of updates for widgets. Before, you could only put widgets on the Lock Screen of your iPhone. Now, Apple has given iPad users the same customization options.
Follow these steps to add widgets to your Lock Screen.
- Touch and hold the Lock Screen until the Customize button appears
- Tap Customize
- Press Lock Screen
- Select Widgets
- Drag or tap all the apps you want to see on your Lock Screen
You can also activate Live Activities to see alerts in real time.

protect your data
In the digital world, data is one of your most valuable commodities. Apple knows this and has created a foolproof way to protect your data.
- Press Touch ID & Passcode
- Scroll down to Erase Data
When you press Erase Data, it will no longer appear on your iPad. But don’t worry, as long as you regularly back up your data, you can find all your information on the iCloud.
send icloud tabs to other devices
It’s super easy to send information from your iPad to your iPhone or Mac. With the help of iCloud Tabs, you can send tabs open on your iPhone or iPad to the other device.
Follow these steps on your iPad or iPhone for seamless sharing.
- Go to Settings
- Select your name
- Press iCloud
- Press Show All
- Activate Safari
Once you’ve completed these steps, any tabs that you open on one device will automatically appear on the other. This tip might only save you a few minutes every day, but it takes just 30 seconds to set up.
split the keyboard for ultimate comfort
This is one of our favorite tips and tricks for iPads because it makes your experience so much more comfortable. You may have noticed that the default iPad keyboard is clunky and difficult to use: you either have to set your iPad down or juggle the iPad while you type.
To switch to a much more efficient typing experience, simply split the keyboard in two:
- Open the keyboard
- Press and hold the keyboard symbol in the bottom right-hand corner
Now you can type with your thumbs, which is much more similar to using an iPhone.
If you want to return to the normal keyboard, just hold the keyboard symbol and tap Merge. You can even experiment with the Undock button, which makes the keyboard float, and the Floating button, which gives you a mini keyboard.

swipe down for keyboard shortcuts
This could be one of the best-kept iPad tips and tricks out there. Open your keyboard and look at all the letters. Notice anything? Each letter has a corresponding number or symbol.
Typically, the alternative options appear when you press the shift button, but there’s an easier way to select them. Simply swipe down quickly on whichever key has the alternative symbol you need.
It is a small change, but it is a great way to streamline the iPad’s sometimes clunky keyboard.

swipe up to see recent apps
Forgotten what’s happening in the background? Swipe up from the Dock and all your open apps will appear as large thumbnails.
From there, you can close an app or go straight to an app. To close an app, swipe up on it. To go to an app, simply tap it.
slide over to boost productivity
Slide Over is an essential feature for every iPad newbie. Essentially, it allows you to use a primary app while another app sits in a smaller window on the screen.
- Open the app you want to display in the smaller window
- Press the three buttons at the top of the screen
- Select Slide Over
- Open the app you want to take the primary spot as the background app
You can answer messages while you browse the web, doodle while you scroll through pictures, or even answer emails while the primary screen plays your new favorite Netflix show.
split view for equal visibility
Slide Over and Split View are often mistaken for each other, but most people prefer Split View. It allows you to see two equal screens side-by-side, opening a new world of possibilities for productivity.
- Open an app
- Press the three dots at the top of the screen
- Tap Split View
- Choose another app
The two apps will automatically share the screen, giving you an equal view of both. You can research topics while you take notes, watch a movie while you Google plot points, and doodle with the reference image right next to your artwork.
As far as tips and tricks for iPads go, this one is great for students, professors, and professionals who use their devices for important work. Once Split View is set up, you can drag-and-drop text and pictures from one screen to another. This feature is a natural, more streamlined way to copy and paste.
Not every app supports drag and drop, but most do, so it’s worth checking out.
take advantage of Scribble
Scribble is the name for Apple’s handwriting-to-text feature, which is designed to be used with Apple Pencils. Most Apple apps support Scribble, and you can also use this feature on lots of non-Apple apps.
For most people, Scribble is nothing new. But we have mentioned it in our list of iPad tips and tricks because iPad users forget that they can Scribble in search bars, forms, and almost any other text field they come across.
Need to type in a location on Google Maps? Or search for your favorite celeb on Google? Just handwrite your search term, wait a second for the text to load, and hit search.
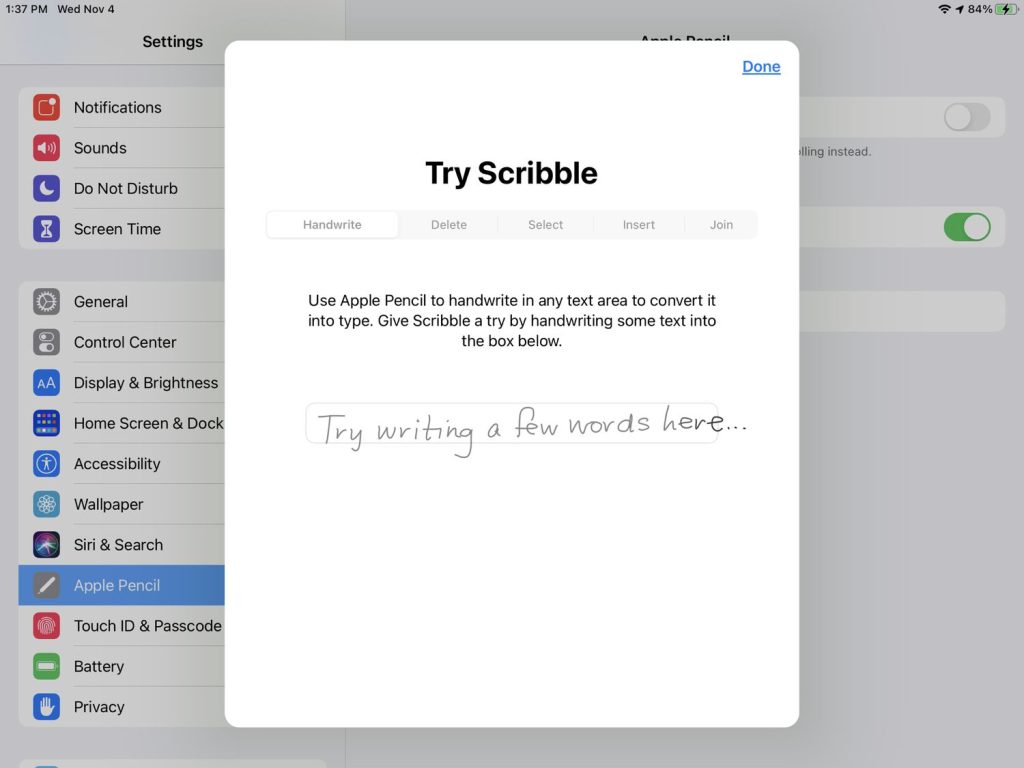
Want some tips for making your scribbles a bit neater? Check out How to Make Handwriting Better on iPad.
Choose the right accessories for your iPad
While learning the ins and outs of your iPad is great, you can really take your experience to the next level with the right iPad accessories. Here are a few of our favorites:
Rock Paper Pencil – a Realistic Pen-on-Paper Feel for iPad
Not a fan of the slippery feeling of the Apple Pencil on glass? Us either. Get the most realistic pen-on-paper feel for iPad with Rock Paper Pencil.
Rock Paper Pencil includes a reusable, paper-feel iPad screen protector and two ballpoint Apple Pencil tips. Built with nano-texture technology, Rock Paper Pencil adds subtle friction between your screen and Pencil, giving you more control while drawing or writing.
- Precision Apple Pencil Tips : Smoother, more controlled strokes
- Reusable Screen Protector : Easy application, removable and reusable.
- Matte Texture: Subtle friction mimics the feel of paper (no more slippery glass!)

Compact Easel – Comfortable Drawing and Notetaking
Make digital drawing or notetaking more comfortable with this adjustable easel .
- Compact and Portable: Weighing in at only 270 grams (0.6 lbs), our compact easel is foldable and ultra-lightweight allowing for easy storage and portability.
- Adjustable: With 7 angle options ranging from 8.7°- 32.5°, you can easily adjust the easel to a drawing height that is most comfortable for you.
- Sturdy: Made of aluminum alloy and equipped with silicone padding, the easel supports up to 10kg (22 lbs) and protects your tablet from sliding and scratching while drawing.
- X-Shaped Design : The x-shaped design of the easel is conducive to airflow and rapid heat dissipation.
- Widely Compatible : This easel is compatible with a wide range of tablets and laptops, including the iPad, iPad Air, iPad Pro, Samsung Galaxy tablet, Microsoft Surface, etc.

Luna Display – Turn Your iPad into a Second Display
Transform your iPad or Mac into a powerful second display with Luna Display :
- Computer to iPad: Turn your iPad into a second display – works with Mac and PC.
- Computer to Mac: Use any Mac as a second display for your Mac or PC. It also works on older Mac models.
- Headless Mode: Looking for a powerful travel-friendly setup with your Mac mini? Headless Mode lets you use your Mac or iPad as the main display for Mac mini and Mac Pro.

Squeeze Gesture, Barrel Rotation, & Adaptive Image Rendering

The highs and lows of building Astropad

Are the new 2024 iPads worth the upgrade?

10 Best Free Procreate Brushes [2024]
iPhone – Benutzerhandbuch
- Mit iOS 17 kompatible iPhone-Modelle
- R ' class='toc-item' data-ss-analytics-link-url='https://support.apple.com/de-de/guide/iphone/iph017302841/ios' data-ajax-endpoint='https://support.apple.com/de-de/guide/iphone/iph017302841/ios' data-ss-analytics-event="acs.link_click" href='https://support.apple.com/de-de/guide/iphone/iph017302841/ios' id='toc-item-IPH017302841' data-tocid='IPH017302841' > iPhone X R
- S ' class='toc-item' data-ss-analytics-link-url='https://support.apple.com/de-de/guide/iphone/iphc00446242/ios' data-ajax-endpoint='https://support.apple.com/de-de/guide/iphone/iphc00446242/ios' data-ss-analytics-event="acs.link_click" href='https://support.apple.com/de-de/guide/iphone/iphc00446242/ios' id='toc-item-IPHC00446242' data-tocid='IPHC00446242' > iPhone X S
- S Max' class='toc-item' data-ss-analytics-link-url='https://support.apple.com/de-de/guide/iphone/iphcd2066870/ios' data-ajax-endpoint='https://support.apple.com/de-de/guide/iphone/iphcd2066870/ios' data-ss-analytics-event="acs.link_click" href='https://support.apple.com/de-de/guide/iphone/iphcd2066870/ios' id='toc-item-IPHCD2066870' data-tocid='IPHCD2066870' > iPhone X S Max
- iPhone 11 Pro
- iPhone 11 Pro Max
- iPhone SE (2. Generation)
- iPhone 12 mini
- iPhone 12 Pro
- iPhone 12 Pro Max
- iPhone 13 mini
- iPhone 13 Pro
- iPhone 13 Pro Max
- iPhone SE (3. Generation)
- iPhone 14 Plus
- iPhone 14 Pro
- iPhone 14 Pro Max
- iPhone 15 Plus
- iPhone 15 Pro
- iPhone 15 Pro Max
- Grundlagen konfigurieren
- iPhone personalisieren
- Großartige Fotos und Videos aufnehmen
- Mit Freundeskreis und Familie in Kontakt bleiben
- Funktionen mit Familienmitgliedern teilen
- iPhone für tägliche Routinen verwenden
- Expertentipps vom Apple Support
- Neue Funktionen in iOS 17
- Einschalten und Konfigurieren des iPhone
- Aufwecken, Entsperren und Sperren
- Einrichten eines Mobilfunkdiensts
- Verwenden von Dual-SIM
- Herstellen der Verbindung zum Internet
- Mit Apple-ID anmelden
- Verwenden von iCloud
- Abonnieren von iCloud+
- Suchen nach Einstellungen
- Einrichten von Accounts für Mail, Kontakte und Kalender
- Bedeutung der Statussymbole
- Batterie laden
- Mit sauberen Energiequellen laden
- Batterieladung in Prozent anzeigen
- Zustand und Nutzung der Batterie prüfen
- Verwenden des Stromsparmodus
- Lesen des Benutzerhandbuchs und Setzen von Lesezeichen
- Grundlegende Gesten
- Erlernen von Gesten für iPhone-Modelle mit Face ID
- Anpassen der Lautstärke
- iPhone stummschalten
- Öffnen von Apps
- Finden von Apps in der App-Mediathek
- Zwischen geöffneten Apps umschalten
- Beenden und erneutes Öffnen einer App
- Multitasking mit Bild-in-Bild
- Zugriff auf Funktionen aus dem Sperrbildschirm
- Verwenden der Dynamic Island
- Ausführen von Schnellaktionen
- Suchen auf dem iPhone
- Abrufen von Informationen über dein iPhone
- Anzeigen oder Ändern der Einstellungen für die Mobilfunknutzung
- Reisen mit dem iPhone
- Ändern der Töne und des Vibrationsverhaltens
- Aktionstaste auf dem iPhone 15 Pro und iPhone 15 Pro Max verwenden
- Eigenen Sperrbildschirm erstellen
- Ändern des Hintergrundbildes
- Anpassen von Helligkeit und Farbbalance des Bildschirms
- Display des iPhone länger aktiviert lassen
- Standby verwenden
- Anpassen der Textgröße und Zoomeinstellung
- Namen deines iPhone ändern
- Ändern von Datum und Uhrzeit
- Ändern von Sprache und Region
- Verwalten von Apps in Ordnern
- Hinzufügen, Bearbeiten und Entfernen von Widgets
- Bewegen von Apps und Widgets im Home-Bildschirm
- Entfernen oder Löschen von Apps
- Verwenden und Anpassen des Kontrollzentrums
- Ändern oder Sperren der Bildschirmausrichtung
- Anzeigen und Beantworten von Mitteilungen
- Ändern der Mitteilungseinstellungen
- Einrichten eines Fokus
- Stummschalten oder Erlauben von Mitteilungen für einen Fokus
- Aktivieren oder Deaktivieren eines Fokus
- Erhaltung der Konzentration beim Fahren
- Anpassen der Teilen-Funktionen
- Tippen mit der Bildschirmtastatur
- Diktieren von Text
- Text auswählen und bearbeiten
- Verwenden von Textvorschlägen
- Verwenden von Textersetzungen
- Hinzufügen oder Ändern von Tastaturen
- Hinzufügen von Emoji und Stickern
- Bildschirmfoto aufnehmen
- Erstellen einer Bildschirmaufnahme
- In Dokumente zeichnen
- Hinzufügen von Text, Formen, Signaturen und mehr
- Ausfüllen von Formularen und Unterschreiben von Dokumenten
- Verwenden von Live Text zum Interagieren mit Inhalten in einem Foto oder Video
- Verwenden von „Visuelles Nachschlagen“ zum Identifizieren von Objekten in Fotos und Videos
- Ablösen des Motivs vom Hintergrund eines Fotos
- Laden von Apps
- Abonnieren von Apple Arcade
- Laden von Spielen
- Spiele mit Freund:innen in Game Center
- Verbinden eines Spielecontrollers
- Verwenden von App Clips
- Apps aktualisieren
- Anzeigen oder Kündigen von Abonnements
- Verwalten von Käufen, Einstellungen und Beschränkungen
- Installieren und Verwalten von Schriften
- Kaufen von Büchern und Hörbüchern
- Lesen von Büchern
- Markieren von Büchern
- Zugreifen auf Bücher auf anderen Apple-Geräten
- Anhören von Hörbüchern
- Festlegen von Lesezielen
- Verwalten von Büchern
- Lesen von PDF-Dokumenten
- Erstellen und Bearbeiten von Ereignissen in der App „Kalender“
- Senden von Einladungen
- Antworten auf Einladungen
- Ändern der Darstellung von Ereignissen
- Suchen nach Ereignissen
- Ändern der Einstellungen für Kalender und Ereignisse
- Planen oder Anzeigen von Ereignissen in einer anderen Zeitzone
- Ereignisse im Blick behalten
- Verwenden mehrerer Kalender
- Verwenden des Kalenders „Feiertage“
- Teilen von iCloud-Kalendern
- Kamera – Grundlagen
- Einrichten einer Aufnahme
- Anwenden fotografischer Stile
- Aufnehmen von Live Photos
- Aufnehmen mit dem Serienbildmodus
- Aufnehmen eines Selfies
- Aufnehmen von Panoramafotos
- Aufnehmen von Makrofotos und -videos
- Aufnehmen von Porträts
- Aufnehmen von Fotos im Nachtmodus
- Aufnehmen von Apple ProRAW-Fotos
- Anpassen der Lautstärke des Auslösers
- Anpassen von HDR-Kameraeinstellungen
- Aufnehmen von Videos
- Aufnehmen von räumlichen Videos für die Apple Vision Pro
- Aufnehmen von ProRes-Videos
- Aufnehmen von Videos im Kinomodus
- Ändern der Einstellungen für Videoaufnahmen
- Kameraeinstellungen sichern
- Anpassen des Hauptkameraobjektivs
- Ändern der erweiterten Kameraeinstellungen
- Anzeigen, Teilen und Drucken von Fotos
- Verwenden von Live Text
- Scannen eines QR-Codes
- Anzeigen der Weltzeit
- Wecker stellen
- Nächsten Wecker zum Aufwachen ändern
- Verwenden der Stoppuhr
- Verwenden mehrerer Timer
- Hinzufügen und Verwenden von Kontakten
- Bearbeiten von Kontakten
- Hinzufügen deiner Kontaktdaten
- Verwenden von NameDrop auf dem iPhone zum Teilen deiner Kontaktinformationen
- Verwenden von Kontakten anderer Accounts
- Verwenden von Kontakten aus der App „Telefon“
- Zusammenführen oder Ausblenden doppelter Kontakte
- Exportieren von Kontakten
- Einführung in die App „FaceTime“
- Tätigen von FaceTime-Anrufen
- Annehmen von FaceTime-Anrufen
- Erstellen eines FaceTime-Links
- Aufnehmen eines Live Photo
- Aktivieren von Live-Untertiteln in einem FaceTime-Anruf
- Verwenden anderer Apps während eines Anrufs
- Tätigen eines FaceTime-Gruppenanrufs
- Anzeigen der teilnehmenden Personen in einem Raster
- Verwenden von SharePlay für gemeinsamen Seh-, Hör- und Spielspaß
- Teilen des Bildschirms während eines FaceTime-Anrufs
- Zusammenarbeiten an Dokumenten in der App „FaceTime“
- Verwenden von Videokonferenzfunktionen
- Handoff eines FaceTime-Anrufs auf ein anderes Apple-Gerät
- Ändern der FaceTime-Videoeinstellungen
- Ändern der FaceTime-Audioeinstellungen
- Ändern deines Aussehens
- Beenden eines Anrufs oder Umschalten zur App „Nachrichten“
- Blockieren unerwünschter Anrufer
- Anruf als Spam melden
- Verbinden externer Geräte oder Server
- Dateien, Ordner und Downloads ändern
- Suchen nach Dateien und Ordnern
- Verwalten von Dateien und Ordnern
- Senden von Dateien
- Konfigurieren von iCloud Drive
- Teilen von Dateien und Ordnern auf iCloud Drive
- Verwenden eines externes Speichergeräts, eines Dateiservers oder eines Cloud-Speicherdienstes
- Teilen des Standorts
- Bekannte treffen
- Deinen Standort via Satellit teilen
- Hinzufügen oder Entfernen einer anderen Person
- Orten einer anderen Person
- Erhalten einer Mitteilung, wenn eine Person ihren Standort ändert
- Andere Person bei Standortänderungen benachrichtigen
- Deaktivieren von „Wo ist?“
- iPhone hinzufügen
- Hinzufügen der iPhone Wallet mit MagSafe
- Erhalten einer Mitteilung beim Zurücklassen eines Geräts
- Orten eines Geräts
- Markieren eines Geräts als „Verloren“
- Löschen eines Geräts
- Entfernen eines Geräts
- AirTag hinzufügen
- Teilen eines AirTag oder eines anderes Objekts in der App „Wo ist?“ auf dem iPhone
- Drittanbieter-Produkt hinzufügen
- Erhalten einer Mitteilung beim Zurücklassen eines Objekts
- Orten eines Objekts
- Markieren eines Objekts als „Verloren“
- Entfernen eines Objekts
- Anpassen von Karteneinstellungen
- Einführung in die App „Fitness“
- Erfassen der täglichen Aktivität und Ändern deines Bewegungsziels
- Anzeigen deiner Aktivitätsübersicht
- Synchronisieren einer Trainings-App eines anderen Anbieters
- Ändern von Mitteilungen für die App „Fitness“
- Teilen deiner Aktivität
- Apple Fitness+ abonnieren
- Suchen von „Apple Fitness+“-Trainings und -Meditationen
- Starten eines Trainings oder einer Meditation in Apple Fitness+
- Erstellen eines eigenen Plans in Apple Fitness+
- Gemeinsames Training mit SharePlay
- Ändern der angezeigten Bildschirmelemente während eines Trainings oder einer Meditation in Apple Fitness+
- Laden eines Trainings oder einer Meditation in Apple Fitness+
- Einführung in die App „Freeform“
- Erstellen von Freeform-Boards
- Zeichnen oder Schreiben per Hand
- Hinzufügen von Text
- Formen hinzufügen
- Hinzufügen von Dateien
- Verwenden durchgehender Stile
- Positionieren von Objekten auf einem Board
- Durchsuchen von Freeform-Boards
- Teilen und Zusammenarbeiten
- Löschen und Wiederherstellen von Boards
- Einführung in die App „Health“
- Hinterlegen deiner Gesundheitsinfos
- Einführung zu Gesundheitsdaten
- Anzeigen deiner Gesundheitsdaten
- Teilen von Gesundheitsdaten
- Ansehen von Gesundheitsdaten, die andere geteilt haben
- Herunterladen der Gesundheitsakte
- Gesundheitsakten anzeigen
- Überwachen der Stabilität beim Gehen
- Protokollieren von Zyklusinformationen
- Anzeigen von Vorhersagen und Verlauf des Menstruationszyklus
- Protokollieren deiner Medikamenteneinnahme
- Weitere Informationen über deine Medikamente
- Gemütszustand protokollieren
- Mentale Gesundheit testen
- Einrichten eines Zeitplans für den Fokus „Schlafen“
- Deaktivieren von Weckern und Löschen von Schlafplänen
- Hinzufügen oder Ändern von Schlafplänen
- Aktivieren oder Deaktivieren des Fokus „Schlafen“
- Ändern der Entspannungsphase, des Schlafziels und mehr
- Anzeigen des Schlafprotokolls
- Prüfen der Lautstärkepegel von Kopfhörern
- Verwenden von Audiogrammdaten
- Registrierung als Organspender
- Erstellen eines Backups deiner Gesundheitsdaten
- Einführung in die App „Home“
- Durchführen des Upgrades auf die neue Home-Architektur
- Einrichten von Geräten
- Geräte steuern
- Steuern deines Zuhauses mit Siri
- Verwenden von Stromnetzprognose zur Planung deines Energieverbrauchs
- Konfigurieren des HomePod
- Steuern deines Zuhauses
- Erstellen und Verwenden von Szenen
- Verwenden von Automationen
- Konfigurieren von Sicherheitskameras
- Verwenden der Gesichtserkennung
- Aufschließen deiner Tür mit einem digitalen Hausschlüssel
- Konfigurieren eines Routers
- Andere zum Steuern von Geräten einladen
- Hinzufügen weiterer Haushalte
- Abrufen von Musiktiteln, Filmen und TV-Sendungen
- Klingeltöne abrufen
- Verwalten von Käufen und Einstellungen
- Einführung in die App „Journal“
- Schreiben im Journal
- Anzeigen vorheriger Journaleinträge
- Ändern von Journaleinstellungen
- Vergrößern von Objekten
- Ändern der Einstellungen
- Anwesenheit von Personen in deiner Umgebung erkennen
- Erkennen von Türen in deiner Nähe
- Abrufen von Bildbeschreibungen für deine Umgebung
- Vorlesen von Text und Beschriftungen in deiner Nähe
- Einrichten von Kurzbefehlen für den Erkennungsmodus
- Hinzufügen und Entfernen von E-Mail-Accounts
- Konfigurieren einer eigenen E-Mail-Domain
- Abrufen von E-Mails
- Senden von E-Mails
- Zurückrufen von E-Mails mit „Senden widerrufen“
- Beantworten und Weiterleiten von E-Mails
- Speichern eines E-Mail-Entwurfs
- Hinzufügen von E-Mail-Anhängen
- Herunterladen von E-Mail-Anhängen
- Markieren von E-Mail-Anhängen
- Einrichten von E-Mail-Mitteilungen
- Suchen nach einer E-Mail-Nachricht
- Organisieren von E-Mails in Postfächern
- Markieren oder Blockieren von E-Mails
- Filtern von E-Mails
- „E-Mail-Adresse verbergen“ verwenden
- Verwenden des E-Mail-Datenschutzes
- Ändern von E-Mail-Einstellungen
- Löschen und Wiederherstellen von E-Mail-Nachrichten
- Hinzufügen des Widgets „Mail“ zum Home-Bildschirm
- Drucken von E-Mail-Nachrichten
- Anzeigen von Karten
- Abrufen von Reiserouten
- Auswählen weiterer Routenoptionen
- Suchen von Stopps auf einer Route
- Anzeigen einer Routenübersicht oder einer Routenliste
- Ändern der Einstellungen für gesprochene Wegbeschreibungen
- Abrufen von Fahrtrouten
- Abrufen einer Wegbeschreibung zum geparkten Auto
- Einrichten der Navigation für E-Fahrzeuge
- Melden von Verkehrsstörungen
- Abrufen von Fahrradrouten
- Abrufen von Fußgängerrouten
- Abrufen von ÖPNV-Routen
- Löschen der letzten Routen
- Abrufen von Verkehrs- und Wetterinformationen
- Buchen eines Fahrdiensts
- Voraussichtliche Wegzeit und Ankunftszeit
- Laden von Offline-Karten
- Suchen von Orten
- Finden von Sehenswürdigkeiten, Restaurants und Dienstleistungen in der Nähe
- Abrufen von Informationen über Orte
- Markieren von Orten
- Teilen von Orten
- Orte bewerten
- Sichern von Lieblingsorten
- Entdecken von neuen Orten mit Reiseführern
- Organisieren von Orten in „Meine Reiseführer“
- Löschen des Ortungsverlaufs
- Umsehen an Orten
- Flyover-Touren
- Abrufen der Einstellungen für die App „Karten“
- Größenmessungen
- Ansehen und Sichern von Messungen
- Messen der Größe einer Person
- Verwenden der Wasserwaage
- Einrichten der App „Nachrichten“
- Informationen zu iMessage
- Senden und Antworten auf Nachrichten
- Zurückrufen und Bearbeiten von Nachrichten
- Verfolgen von Nachrichten
- Weiterleiten und Teilen von Nachrichten
- Gruppenkonversationen
- Mit SharePlay gemeinsam Inhalte ansehen, anhören oder spielen
- Zusammenarbeiten an Projekten
- Verwenden von iMessage-Apps
- Aufnehmen und Bearbeiten von Fotos oder Videos
- Teilen von Fotos, Links und mehr
- Senden von Stickern
- Anfordern, Senden und Empfangen von Zahlungen
- Senden und Empfangen von Audionachrichten
- Animieren von Nachrichten
- Senden und Sichern von GIFs
- Aktivieren oder Deaktivieren der Lesebestätigungen
- Ändern von Mitteilungen
- Blockieren, Filtern und Melden von Nachrichten
- Löschen von Nachrichten und Anhängen
- Wiederherstellen gelöschter Nachrichten
- Laden von Musik
- Anzeigen von Alben, Playlists und anderen Objekten
- Wiedergeben von Musik
- Anzeigen von Titelinfos und Liedtexten
- Hinzufügen von Musik zur Warteliste
- Anhören von Radiosendern
- Apple Music abonnieren
- Gemeinsames Hören von Musik im Auto mit dem iPhone
- Anhören von verlustfrei komprimierter Musik (Format „Lossless“)
- Anhören von Dolby Atmos-Musik
- Apple Music Sing
- Suchen nach neuer Musik
- Hinzufügen von Musiktiteln zum Offline-Anhören
- Personalisierte Empfehlungen erhalten
- Suchen nach Musik
- Erstellen von Playlists
- Anzeigen der Musikauswahl deiner Freund:innen
- Verwenden von Siri für die Musikwiedergabe
- Art der Musikwiedergabe ändern
- Einführung in die App „News“
- Verwenden von News-Widgets
- Anzeigen speziell für dich ausgewählter Storys
- Lesen von Storys
- Folge deinen Lieblingsteams mit „Meine Sportarten“
- Anhören von Apple News Today
- Abonnieren von Apple News+
- Durchsuchen und Lesen von Storys und Ausgaben von Apple News+
- Verwenden des Offline-Modus zum Lesen von geladenen „News“-Inhalten
- Manuelles Laden von „Apple News+“-Ausgaben
- Anhören von Audiostorys
- Lösen von Kreuzworträtseln in Apple News
- Lösen von Kreuzworträtseln und Mini-Kreuzworträtseln
- Lösen von Quartiles-Kreuzworträtseln
- Suchen nach neuen Storys
- Sichern von Storys in der App „News“ zum späteren Lesen
- Abonnieren einzelner News-Kanäle
- Einführung in die App „Notizen“
- Hinzufügen oder Entfernen von Accounts
- Erstellen und Formatieren von Notizen
- Zeichnen oder Schreiben
- Hinzufügen von Fotos, Videos und vielem mehr
- Scannen von Text und Dokumenten
- Arbeiten mit PDFs
- Hinzufügen von Links
- Erstellen von Schnellnotizen
- Suchen von Notizen
- Verwalten in Ordnern
- Verwalten mit Tags
- Intelligente Ordner verwenden
- Exportieren oder Drucken von Notizen
- Sperren von Notizen
- Ändern von Einstellungen für Notizen
- Tätigen von Anrufen
- Anzeigen und Löschen der Anrufliste
- Annehmen oder Ablehnen eingehender Anrufe
- Vorgehen während eines Telefonats
- Tätigen von Konferenzanrufen oder Anrufen mit drei Personen auf dem iPhone
- Voicemail einrichten
- Abhören der Voicemail
- Voicemail-Begrüßung und Einstellungen ändern
- Auswählen von Klingeltönen und Vibrationsmustern
- Tätigen von Anrufen über ein WLAN
- Einrichten der Rufweiterleitung
- Einrichten von Anklopfen/Makeln
- Blockieren oder Vermeiden unerwünschter Anrufe
- Anzeigen von Fotos und Videos
- Wiedergeben von Videos und Diashows
- Löschen oder Ausblenden von Fotos und Videos
- Bearbeiten von Fotos und Videos
- Kürzen von Videos und Anpassen der Zeitlupe
- Bearbeiten von Videos im Kinomodus
- Bearbeiten von Live Photos
- Bearbeiten von Porträts
- Verwenden von Fotoalben
- Bearbeiten, Teilen und Organisieren von Alben
- Filtern und Sortieren von Fotos und Videos in einem Album
- Erstellen von Stickern aus Fotos
- Duplizieren und Kopieren von Fotos und Videos
- Zusammenfassen doppelter Fotos und Videos
- Suchen nach Fotos
- Personen und Haustiere identifizieren
- Fotos nach Aufnahmeort durchsuchen
- Teilen von Fotos und Videos
- Teilen von langen Videos
- Anzeigen von mit dir geteilten Fotos und Videos
- Ansehen von Rückblicken
- Personalisieren von Rückblicken
- Verwalten von Rückblicken und empfohlenen Fotos
- Verwenden von iCloud-Fotos
- Erstellen von geteilten Alben
- Hinzufügen und Entfernen von Personen in einem geteilten Album
- Hinzufügen und Löschen von Fotos und Videos in einem geteilten Album
- Einrichten oder Beitreten zu einer geteilten iCloud-Fotomediathek
- Hinzufügen von Inhalten zu einer geteilten iCloud-Fotomediathek
- Verwenden der geteilten iCloud-Fotomediathek
- Importieren und Exportieren von Fotos und Videos
- Drucken von Fotos
- Suchen nach Podcasts
- Anhören von Podcasts
- Verwenden der Option „Folgen“ für deine Lieblingspodcasts
- Verwenden des Widgets „Podcasts“
- Verwalten deiner Podcast-Mediathek
- Laden, Sichern oder Teilen von Podcasts
- Abonnieren von Podcasts
- Hören von Inhalten für Abonnent:innen
- Ändern der Downloadeinstellungen
- Einkaufsliste erstellen
- Hinzufügen von Objekten zu einer Liste
- Bearbeiten und Verwalten einer Liste
- Suchen und Verwalten von Listen
- Vorlagen verwenden
- Verwenden von intelligenten Listen
- Drucken von Erinnerungen
- Das Widget „Erinnerungen“ verwenden
- Ändern von Einstellungen in der App „Erinnerungen“
- Surfen im Web
- Suchen nach Websites
- Anpassen der Safari-Einstellungen
- Ändern des Layouts
- Verwenden von Safari-Profilen
- Öffnen und Schließen von Tabs
- Verwalten deiner Tabs
- Anzeigen der Safari-Tabs eines anderen Apple-Geräts
- Teilen von Tabgruppen
- Verwenden von Siri für das Anhören einer Webseite
- Hinzufügen von Lesezeichen für beliebte Webseiten
- Sichern von Seiten in einer Leseliste
- Anzeigen von mit dir geteilten Links
- Hinzufügen von Anmerkungen zu einer Webseite und Sichern als PDF
- Automatisches Ausfüllen von Formularen
- Laden von Erweiterungen
- Ausblenden von Werbeanzeigen und ablenkenden Inhalten
- Löschen von Cache und Cookies
- Privates Surfen im Web
- Verwenden von Passkeys in der App „Safari“
- Kurzbefehle
- Verfolgen von Aktienkursen
- Verwalten mehrerer Aktienlisten
- Lesen von Wirtschaftsnachrichten
- Hinzufügen von Gewinnberichten zu deinem Kalender
- Verwenden des Widgets „Aktien“
- Übersetzen von Text, Sprache und Konversationen
- Text in Apps übersetzen
- Übersetzen mit der Kameraansicht
- Abonnieren von Apple TV+, MLS Season Pass oder Apple TV-Kanälen
- Hinzufügen deines TV-Anbieters
- TV-Sendungen, Filmen und andere Inhalte abrufen
- Ansehen von Sportsendungen
- Ansehen von Major League Soccer mit MLS Season Pass
- Wiedergabe steuern
- Mediathek verwalten
- Einstellungen ändern
- Erstellen einer Aufnahme
- Wiedergabe einer Aufnahme
- Bearbeiten oder Löschen einer Aufnahme
- Aufnahmen auf dem aktuellen Stand halten
- Verwalten von Aufnahmen
- Suchen oder Umbenennen einer Aufnahme
- Aufnahme teilen
- Aufnahme duplizieren
- Aufbewahren von Karten aller Art in der App „Wallet“
- Einrichten von Apple Pay
- Verwenden von Apple Pay für kontaktlose Zahlungen
- Apple Pay in Apps und im Web verwenden.
- Bestellungen nachverfolgen
- Verwenden von Apple Cash
- Apple Card verwenden
- „Savings“ verwenden
- Bezahlen im ÖPNV
- Zugang zu deinem Zuhause, Hotelzimmer und Fahrzeug
- Ausweise hinzufügen
- Karten verwenden
- Verwenden von COVID-19-Impfkarten
- Überprüfen des Apple Account-Guthabens
- Expressmodus verwenden
- Verwalten von Wallet
- Karten oder Tickets entfernen
- Anzeigen von Wetterdaten
- Anzeigen der Wetterbedingungen an anderen Orten
- Anzeigen von Wetterkarten
- Verwalten von Wettermitteilungen
- Verwenden von Widgets „Wetter“
- Kennenlernen der Wettersymbole
- Verwenden von Siri
- Potenzial von Siri erkunden
- Bereitstellen von Informationen über dich für Siri
- Ankündigen von Anrufen und Mitteilungen durch Siri
- Hinzufügen von Siri-Kurzbefehlen
- Vorschläge von Siri
- Verwenden von Siri im Auto
- Ändern der Einstellungen für Siri
- Kontaktieren der Rettungsdienste
- Notruf SOS via Satellit verwenden
- Anfordern des Pannendiensts via Satellit
- Einrichten und Anzeigen deines Notfallpasses
- Verwenden der Funktion „Wegbegleitung“
- Verwalten der Unfallerkennung
- Zurücksetzen der Datenschutz- und Sicherheitseinstellungen bei einem Notfall
- Einrichten der Familienfreigabe
- Hinzufügen von Mitgliedern in der Familienfreigabe
- Entfernen von Mitgliedern in der Familienfreigabe
- Teilen von Abonnements
- Teilen von Einkäufen
- Teilen des Standorts mit der Familie und Orten von vermissten Geräten
- Konfigurieren von Apple Cash für Familien und Apple Card für Familien
- Konfigurieren der Kindersicherung
- Konfigurieren eines Geräts für ein Kind
- Einführung in „Bildschirmzeit“
- Schonen deiner Augen mit „Bildschirmentfernung“
- Bildschirmzeit einrichten
- Festlegen von Kommunikations- und Sicherheitslimits und Blockieren von unangemessenen Inhalten
- Einrichten der Bildschirmzeit für ein Familienmitglied
- MagSafe-Ladegeräte und externe MagSafe Batterien
- MagSafe-Cases und MagSafe-Hüllen
- Qi-zertifizierte kabellose Ladegeräte
- Verwenden von AirPods
- Verwenden von EarPods
- Apple Watch
- Drahtloses Streamen von Videos und Fotos an ein Apple TV oder Smart-TV
- Anschließen eines Displays über ein Kabel
- HomePod und andere kabellose Lautsprecher
- Koppeln des Magic Keyboard
- Eingeben von diakritischen Zeichen
- Wechseln zwischen Tastaturen
- Verwenden von Kurzbefehlen
- Auswählen eines alternativen Tastaturlayouts
- Ändern von Optionen für Eingabehilfen
- Externe Speichergeräte
- Bluetooth-Zubehör
- Teilen der Internetverbindung
- Erlauben von Telefonanrufen auf dem iPad und Mac
- Verwenden des iPhone als Webcam
- Handoff von Aufgaben zwischen Geräten
- Ausschneiden, Kopieren und Einsetzen zwischen iPhone und anderen Geräten
- Streamen von Videos oder Spiegeln des iPhone-Bildschirms
- Sofortiges Starten von SharePlay
- Verwenden von AirDrop zum Senden von Objekten
- Herstellen einer Verbindung zwischen iPhone und Computer über ein Kabel
- Dateien geräteübergreifend übertragen
- Übertragen von Dateien per E-Mail, Nachrichten oder AirDrop
- Übertragen von Dateien oder Synchronisieren von Inhalten mit dem Finder oder mit iTunes
- Dateien mit iCloud auf dem aktuellen Stand halten
- Einführung zu CarPlay
- Herstellen der Verbindung mit CarPlay
- Verwenden der integrierten Bedienelemente deines Fahrzeugs
- Verwenden der detaillierten Wegbeschreibungen
- Ändern der Kartenansicht
- Anzeigen deines Kalenders
- Senden und Empfangen von Textnachrichten
- Ankündigen eingehender Textnachrichten
- Wiedergeben von Podcasts
- Wiedergabe von Hörbüchern
- Anhören von News-Storys anhören
- Verwenden anderer Apps mit CarPlay
- Ändern der Anordnung von Symbolen auf dem CarPlay-Home-Bildschirm
- Ändern der Einstellungen in CarPlay
- Einführung in die Funktionen der Bedienungshilfen
- Aktivieren von Bedienungshilfen für die Konfiguration
- Anpassen der Bedienungshilfeneinstellungen für Siri
- Öffnen von Funktionen mit dem Bedienungshilfen-Kurzbefehl
- Ändern von Farben und Helligkeit
- Text leichter lesbar machen
- Reduzieren von Bewegung auf dem Bildschirm
- App-spezifisches Anpassen visueller Einstellungen
- Vorlesen von Bildschirminhalt und Eingaben
- Vorlesen der Audiobeschreibungen
- Aktivieren und Einüben von VoiceOver
- Ändern der VoiceOver-Einstellungen
- Verwenden von VoiceOver-Gesten
- Verwenden des iPhone bei aktiviertem VoiceOver
- Steuern von VoiceOver mithilfe des Rotors
- Verwenden der Bildschirmtastatur
- Schreiben mit dem Finger
- Bildschirm ausgeschaltet lassen
- Verwenden von VoiceOver mit einer externen Apple-Tastatur
- Verwenden eines Brailledisplays
- Eingeben von Brailleschrift auf dem Bildschirm
- Anpassen von Gesten und Tastaturkurzbefehlen
- Verwenden von VoiceOver mit einem Zeigergerät
- Verwenden von VoiceOver für Bilder und Videos
- Verwenden von VoiceOver in Apps
- AssistiveTouch verwenden
- Anpassen der Reaktion des iPhone auf Berührungen
- Auf Rückseite tippen
- Verwenden des Einhandmodus
- Anrufe automatisch beantworten
- Ausschalten der Vibration
- Ändern der Einstellungen für Face ID und Aufmerksamkeit
- Verwenden der Sprachsteuerung
- Anpassen der Seitentaste oder der Home-Taste
- Verwenden der Apple TV Remote-Tasten
- Anpassen der Zeigereinstellungen
- Anpassen der Tastatureinstellungen
- iPhone mit einer externen Tastatur steuern
- Anpassen der AirPods-Einstellungen
- Aktivieren der Apple Watch-Synchronisierung
- Steuern eines Apple-Geräts in der Nähe
- Einführung in die Schaltersteuerung
- Konfigurieren und Aktivieren der Schaltersteuerung
- Objekte auswählen, Aktionen ausführen und mehr
- Steuern von mehreren Geräten mit einem Schalter
- Verwenden von Hörhilfen
- Verwenden von Live-Mithören
- Verwenden der Geräuscherkennung
- Einrichten und Verwenden von RTT und TTY
- Verwenden des Anzeigelichts bei Mitteilungen
- Anpassen der Audioeinstellungen
- Abspielen von Hintergrundgeräuschen
- Anzeigen von Untertiteln und erweiterten Untertiteln
- Anzeigen von Transkriptionen für Intercom-Mitteilungen
- Anzeigen von Echtzeit-Untertiteln für gesprochenes Audio
- Text eingeben, um zu sprechen
- Aufnehmen einer persönlichen Stimme
- Beschränken des iPhone auf eine App mit der Funktion „Geführter Zugriff“
- Verwenden der integrierten Datenschutz- und Datenschutzfunktionen
- Festlegen eines Codes
- Einrichten von Face ID
- Einrichten von Touch ID
- Festlegen des Zugriffs auf Informationen im Sperrbildschirm
- Schützen deiner Apple-ID
- Verwenden von Passkeys zum Anmelden bei Apps und Websites
- Mit Apple anmelden
- Teilen von Passwörtern
- Automatisches Ausfüllen von starken Passwörtern
- Ändern von schwachen oder kompromittierten Passwörtern
- Anzeigen von Passwörtern und zugehörigen Informationen
- Sicheres Teilen von Passkeys und Passwörtern mit AirDrop
- Verfügbarkeit von Passkeys und Passwörtern auf all deinen Geräten
- Automatisches Ausfüllen von Bestätigungscodes
- Automatisches Ausfüllen von SMS-Codes
- Mit weniger CAPTCHA-Abfragen anmelden
- Verwenden der Zwei-Faktor-Authentifizierung
- Sicherheitsschlüssel entfernen
- Verwalten der Informationsfreigabe mit der Funktion „Sicherheitsprüfung“
- Steuern der Zustimmungen zum App-Tracking
- Kontrolle über geteilte Standortdaten
- Festlegen des Zugriffs auf Informationen in Apps
- Festlegen, wie Apple Werbung präsentiert
- Festlegen des Zugriffs auf Hardwarefunktionen
- Verwenden der integrierten Sicherheits- und Datenschutzfunktionen auf dem iPhone
- Sicheres Internetsurfen mit iCloud Privat-Relay
- Verwenden einer privaten Netzwerkadresse
- Verwenden der Option „Erweiterter Datenschutz“
- Blockierungsmodus verwenden
- Verwenden des Schutzes für gestohlene Geräte
- Warnungen zu sensiblen Inhalten empfangen
- Kontaktschlüsselbestätigung verwenden
- iPhone ein- oder ausschalten
- Neustart des iPhone erzwingen
- Aktualisieren von iOS
- Erstellen eines Backups deines iPhone
- Zurücksetzen der iPhone-Einstellungen
- Wiederherstellen aller Inhalte aus einem Backup
- Wiederherstellen von gekauften und gelöschten Objekten
- Verkaufen, Verschenken oder Inzahlunggabe deines iPhone
- Löschen des iPhone
- Installieren oder Entfernen von Konfigurationsprofilen
- Wichtige Informationen zur Sicherheit
- Wichtige Informationen zur Handhabung
- Weitere Ressourcen für Software und Service
- FCC-Konformitätserklärung
- ISED-Konformitätserklärung (Kanada)
- Informationen zum Ultrabreitband
- Informationen zu Laserklasse 1
- Apple und die Umwelt
- Informationen zur Entsorgung und zum Recycling
- Nicht autorisierte Änderungen von iOS
Surfen im Web mit der App „Safari“ auf dem iPhone
Websites in Safari anzeigen
Das Navigieren auf einer Webseite erfolgt ganz einfach durch Tippen.
Zum Anfang zurückkehren: Doppeltippe auf die obere Bildschirmkante, um schnell an den Anfang einer langen Seite zurückzukehren.
Mehr Inhalt einer Seite anzeigen: Drehe das iPhone in das Querformat.
Seiteninhalt aktualisieren: Streiche mit zwei Fingern von oberen Bildschirmrand nach unten.
Vorschau für Website-Links anzeigen
Lege den Finger auf einen Link in Safari, um eine Vorschau des Links anzuzeigen, ohne die Seite zu öffnen. Tippe zum Öffnen des Links auf die Vorschau oder wähle „Öffnen“.
Tippe zum Schließen der Vorschau und Verbleiben auf der aktuellen Seite auf eine beliebige Stelle außerhalb der Vorschau.

Webseite oder Bild übersetzen
Wenn eine Webseite oder ein Bild in einer anderen Sprache angezeigt wird, kannst du den Text mit Safari übersetzen lassen (nicht in allen Sprachen oder Regionen verfügbar).
Safari erneut zum Home-Bildschirm hinzufügen
Wenn die App „Safari“ nicht auf deinem Home-Bildschirm angezeigt wird, kannst du sie in der App-Mediathek suchen und erneut hinzufügen.
Streiche auf dem Home-Bildschirm nach links, um auf die App-Mediathek zuzugreifen.
Gib „Safari“ in das Suchfeld ein.
- a. Send us an email
- b. Anonymous form
- Buyer's Guide
- Upcoming Products
- Tips / Contact Us
- Podcast Instagram Facebook Twitter Mastodon YouTube Notifications RSS Newsletter
iCloud Private Relay Experiencing Outage
Apple’s iCloud Private Relay service is down for some users, according to Apple’s System Status page . Apple says that the iCloud Private Relay service may be slow or unavailable.

We'll update this article when the outage has been resolved.
Get weekly top MacRumors stories in your inbox.
Popular Stories

iPhone 17 Lineup Specs Detail Display Upgrade and New High-End Model

iPhone SE 4 Production Will Reportedly Begin Ramping Up in October

These 5 Features Will Make the iPhone 17 the Biggest Update in Years

Kuo: Ultra-Thin iPhone 17 to Feature A19 Chip, Single Rear Camera, Semi-Titanium Frame, and More

Everything New in iOS 18 Beta 4

iPhone SE 4 Rumored to Launch Early Next Year With OLED Display, 48MP Camera, and More
Iphone 17 rumored to feature mechanical aperture.

Internal Change to iPhone 16 Models Expected to Reduce Overheating
Top rated comments.
You may be confusing the ability to turn it off for 24 hours?
Next Article
Our comprehensive guide highlighting every major new addition in iOS 17, plus how-tos that walk you through using the new features.

Apple News+ improvements, cross-platform tracker alerts, website app downloads for the EU, and more.

Get the most out your iPhone 15 with our complete guide to all the new features.
A deep dive into new features in macOS Sonoma, big and small.

Updates to Mail, Photos, Messages, and more, with Apple Intelligence features throughout.

iPhone Mirroring, Safari improvements, new Passwords app, and Apple Intelligence features throughout.

Apple Intelligence features, Smart Script handwriting refinement, Calculator app, and more.

New hand gestures, rearrange apps in Home View, larger Mac Virtual Display, and more.
Other Stories

14 hours ago by Tim Hardwick

15 hours ago by Tim Hardwick

macOS Sequoia
Apple releases macos sequoia beta 4 for developers.
Alongside iOS 18 beta 4 , Apple is also rolling out macOS Sequoia beta 4 to developers. The build number for today’s macOS Sequoia beta 4 release is 24A5298h.
In addition to iPhone Mirroring, macOS Sequoia also includes a new window tiling feature, new features for Safari, a dedicated Passwords app, and more. Learn more about everything new in macOS Sequoia in our full, in-depth feature roundup .
As of right now, macOS Sequoia beta 4 is only available for developer beta testers. A new build will likely be released to public beta testers next week.
Spot any changes in today’s release of macOS Sequoia beta 4? Let us know in the comments below, on Twitter @9to5Mac , and on Threads @9to5Mac . Stay tuned for our full hands-on coverage with the new releases right here at 9to5Mac today and throughout the rest of the week.
Follow Chance : Threads , Twitter , Instagram , and Mastodon .
FTC: We use income earning auto affiliate links. More.

Check out 9to5Mac on YouTube for more Apple news:

Chance is an editor for the entire 9to5 network and covers the latest Apple news for 9to5Mac.
Tips, questions, typos to [email protected]

Manage push notifications
You are viewing this page in an unauthorized frame window.
This is a potential security issue, you are being redirected to https://nvd.nist.gov
You have JavaScript disabled. This site requires JavaScript to be enabled for complete site functionality.
Official websites use .gov A .gov website belongs to an official government organization in the United States.
Information Technology Laboratory
National vulnerability database.
- Vulnerabilities
The NVD has a new announcement page with status updates, news, and how to stay connected!
Weakness Enumeration
Change history, cve modified by cisa-adp 7/02/2024 9:51:06 pm, cve modified by apple inc. 6/21/2024 10:15:44 pm, cve modified by apple inc. 6/18/2024 11:15:09 pm, cve modified by apple inc. 6/10/2024 2:15:29 pm, cve modified by apple inc. 6/10/2024 1:16:23 pm, cve modified by apple inc. 6/10/2024 12:15:13 pm, new cve received by nist 5/14/2024 11:13:06 am.
COMMENTS
Du kannst deine Startseite mit neuen Hintergrundbildern und Optionen anpassen. Öffne die App „Safari" auf deinem iPad. Tippe auf oben rechts auf dem Bildschirm, um einen neuen Tab zu öffnen. Scrolle auf der Seite nach unten und tippe auf „Bearbeiten". Wähle Optionen für deine Startseite.
Change the display controls for a website on Safari. You can hide the search field, switch to Reader, and more. Open the Safari app on your iPad. Tap , then do any of the following: Hide the search field: Tap Hide Toolbar (tap the top of the screen to get it back). See a streamlined view of the webpage: Tap Show Reader (if available).
Step 1: Open Safari. Locate the Safari app icon on your iPad's home screen and tap it. Opening Safari is your gateway to the internet. The icon looks like a blue compass and is usually found on the dock or the first screen.
Lerne Safari in iOS 15 besser kennen. Du erfährst in diesem Video, wie du zwischen Tabs wechselst, ein Lesezeichen hinzufügst, den privaten Surfmodus verwend...
Trotz steigender Konkurrenz aus dem App-Store gehört Safari immer noch zu den beliebtesten Browsern auf dem iPhone. Sein Vorteil: Im Unterschied zu anderen A...
To do so: Go to the Settings app. Select Safari . Scroll down and tap Open Links . Choose In Background . Next time you want to open a link, long-press it. Then, select Open in Background. When you want to visit that link, select Tabs to view all your opened tabs and choose the loaded webpage.
The screenshots here were taken on an iPad, but Safari functions very similarly on an iPhone. Safari for Mac is a full desktop browser and works differently, although all versions of Safari sync with each other. Find in Page Related: 8 Navigation Tricks Every iPad User Needs to Know. Safari has a Find in Page feature, although it's a bit hidden
Updating Safari on your iPad is a straightforward process that ensures you have the latest features, security updates, and bug fixes. All you need to do is make sure your iPad is running the most recent version of iOS, as Safari updates are included within the iOS updates. Here's how you can quickly and easily update Safari on your iPad.
1. Visit websites. At the top of the screen is the Unified Smart Search Field, into which you can type a URL (such as www.techaradar.com) or a search term, then tap Go. During searches, Safari ...
Here's how. First, open Safari on your iPhone or iPad and open a new tab by tapping the tabs button (two overlapping rectangles), then tapping the plus ("+") button. You'll see Safari's "Start Page" by default. To edit what's on the Start Page, scroll down if necessary and tap the "Edit" button. When you tap "Edit," a "Customize Start Page ...
First, let's talk about how to open Safari. You'll find the icon for Safari on your home screen, usually located at the bottom of the screen. Simply tap on the icon to launch the app. Once you've opened Safari, you'll see a search bar at the top of the screen. This is where you can enter a website address or search for something on the web.
Safari is a great and powerful web browser on your device. On a mobile device it offers desktop quality browsing as well as lots of other featuresLet's take...
If your iPad has been updated to the most recent version supported by your iPad, then Safari is as up-to-date as is possible. If you wish to use an alternative browser in preference to Safari, you can do so - and configure the alternative browser as the default browser from iPad settings. Hello, safari cannot be uninstalled from an iPad.
Restart your iPad to hopefully fix Safari. Check your data connection. If your iPad is a Wi-Fi model, check you're connected to a Wi-Fi network with internet access. If your iPad has a cellular connection, check it has a signal and is working correctly. Tap Settings > Cellular and check the toggle next to Safari is On. Check Airplane mode.
How to use Reader Mode in Safari. Actually opening up Reader Mode is very simple, and quite literally requires just two taps. With any largely text-based web page open in Safari, you need only tap ...
In Settings, scroll through the list and tap "Safari." In Safari settings, find the "General" section. In that section, you'll see a switch labeled "Show Favorites Bar." Flip the switch beside it to turn it on. (If it's already enabled and you want to hide the Favorites bar, flip the switch "off.") After that, launch Safari.
Wissenswertes über dein iPad - direkt von Apple. Dieses umfassende Handbuch enthält eine Einführung in die Grundlagen deines iPad und ausführliche Beschreibungen der vielen fantastischen Funktionen, die dir zur Verfügung stehen.
Add Safari back to your Home Screen. If you don't see Safari on your Home Screen, you can find it in App Library and add it back. On the Home Screen, swipe left until you see the App Library. Enter "Safari" in the search field. Press and hold , then tap Add to Home Screen. In Safari on iPad, view websites, preview website links, translate ...
Now, here are 30 tricks to help you have a better experience when using Safari. 1. Navigate Tab Bar. (Credit: Lance Whitney / Apple) The jump to iOS 15 moved Safari's address bar to the bottom of ...
How to use Bookmarks and Reading List in Safari on iPhone and iPad. Reading List is Apple's take on a read-it-later service: Built into the Safari browser for iPhone and iPad, Reading List let you save any articles you stumble across while browsing the web for offline viewing; you can then go back and peruse them at your convenience. Bookmarks ...
Open the iPad Settings app. Scroll down and select Safari . Scroll to the bottom of the Safari settings screen and select Advanced . Select Website Data to display a breakdown of the data each website currently stores on the iPad. Select Show All Sites to display the expanded list if necessary. Select Remove All Website Data at the bottom of ...
Highlights is available in U.S. English at the current time, and as iOS 18 is in beta, this feature is not available on all websites. Highlights can be disabled by opening up the Safari ...
In iOS 17, Apple includes an option in Safari that allows Siri to read articles to you, just like an audiobook. Keep reading to learn how it's done on iPhone and iPad.
Luna Display - Turn Your iPad into a Second Display . Transform your iPad or Mac into a powerful second display with Luna Display: Computer to iPad: Turn your iPad into a second display - works with Mac and PC. Computer to Mac: Use any Mac as a second display for your Mac or PC. It also works on older Mac models.
Gib „Safari" in das Suchfeld ein. Lege den Finger auf und tippe auf „Zum Home-Bildschirm". In Safari auf dem iPhone kannst du Websites öffnen, eine Vorschau für Website-Links anzeigen, Webseiten übersetzen lassen und die App „Safari" wieder zu deinem Home-Bildschirm hinzufügen.
Apple is kicking off a new high-profile ad campaign today focused on Safari. The campaign takes direct aim at other browsers, such as Chrome, where "your browsing is being watched."
Apple's iCloud Private Relay service is down for some users, according to Apple's System Status page. Apple says that the iCloud Private Relay service may be slow or unavailable. The ...
In a press release today, the company announced that you can now access Apple Maps on the web using Safari and Chrome on Mac and iPad, as well as Chrome and Edge on Windows PCs.
Alongside iOS 18 beta 4, Apple is also rolling out macOS Sequoia beta 4 to developers.The build number for today's macOS Sequoia beta 4 release is 24A5298h. In addition to iPhone Mirroring ...
The issue was addressed with improved checks. This issue is fixed in iOS 17.5 and iPadOS 17.5, tvOS 17.5, Safari 17.5, watchOS 10.5, macOS Sonoma 14.5. An attacker with arbitrary read and write capability may be able to bypass Pointer Authentication.