Cookie Preferences
Our website uses cookies to help to improve your user experience and to support functional features by for example, remembering choices that you make as you browse the website. Agree to the use of cookies, or click on Manage Options to inspect the list of cookies.
- Find a Retailer
- Trade Portal

Change the logged in account
Filter options.

- Model Railway
- Plastic Kits
- Announcements
- Die-cast and Readymade
- Collectables
- Dioramas and Wargaming
- Scenery and Landscape
- Radio Control
- Tools and Equipment
- Catalogues and Publications
- Branchline - British OO Scale
Graham Farish - British N Scale
- Narrow Gauge
- Scenecraft - N, OO, O, G & 16mm Scale
- Liliput - European HO, HOe & N Scale
- Bachmann Trains - American N, HO, On30 & Large Scale
- Thomas & Friends ™
- Control Systems & Decoders
- Train Packs
- Steam Locomotives
- Diesel Locomotives
- Electric Locomotives
- Multiple Units
- Departmental Vehicles
- Accessories
- N Gauge Track
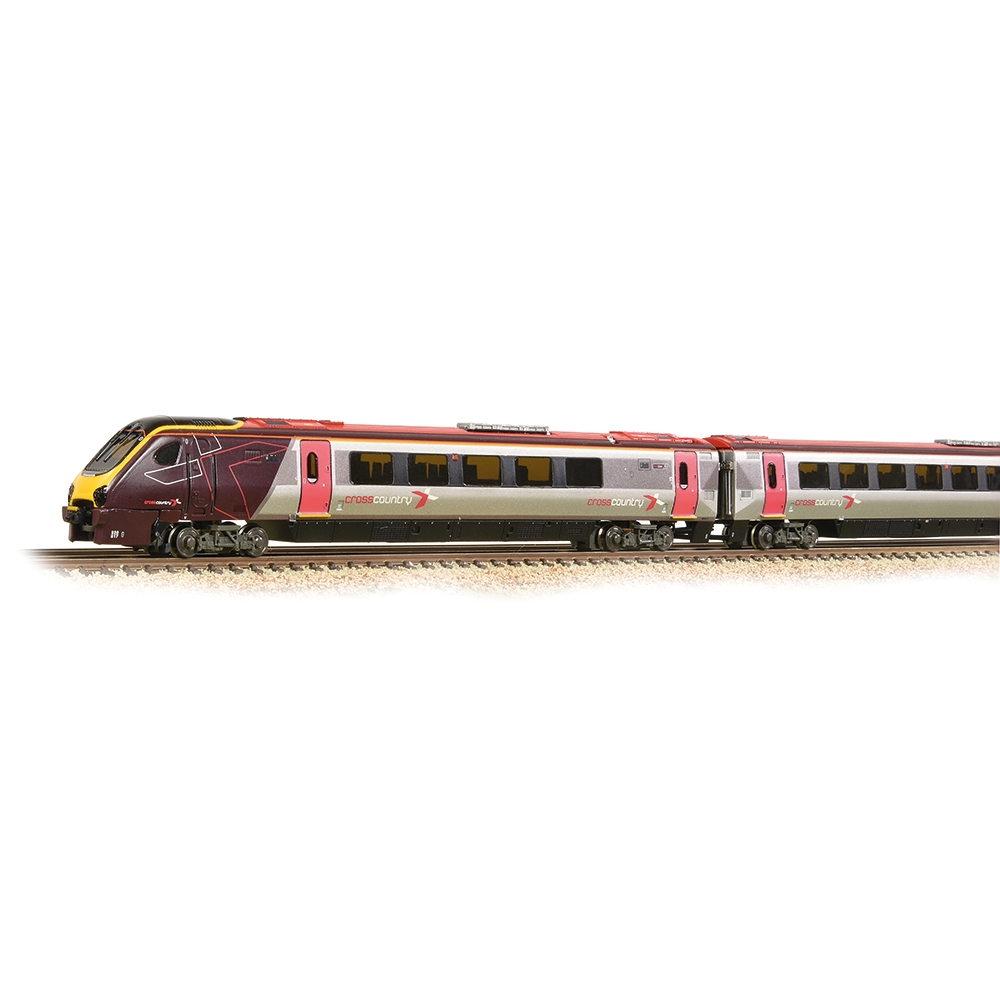
Class 220 4-Car DEMU 220009 Arriva Cross Country
£399.95

Product Number:
Scale/Gauge:
Manufacturer Product Code:
Availability:
- Description
- Additional Information
The Class 220 Voyager is a class of diesel-electric high-speed multiple-unit trains built in Belgium by Bombardier Transportation in 2000 and 2001.
They were introduced in 2001 to replace the 20-year-old InterCity 125 and 30-year-old Class 47-hauled Mark 2 fleets operating on the Cross Country Route, initially for Virgin CrossCountry and since 2007 by CrossCountry, within the Arriva group (now owned by DB). The Class 220s operate in four-coach sets with a top speed of 125 mph (200 km/h) and a maximum range of approximately 1,350 miles between refuelling and servicing.
Because CrossCountry's network has such a wide geographic reach, Class 220 Voyagers can be seen from Aberdeen to Penzance, Manchester to Bournemouth and Newcastle to Reading. They are most common at Birmingham New Street, which is the hub of the CrossCountry network.
You might be also interested in the following items:

£36.95
Customers who viewed this item also viewed:

Unit Of Measure Mismatch
KEY : DS or SF suffix = DCC Sound Factory Fitted | DC suffix = DCC Decoder Factory Fitted | [W] suffix = Weathered finish | [PF] suffix = Passenger Figures Fitted | [L] suffix = Supplied with a Wagon Load
ETA : This indicates the release of the product to our network of Retailers and is subject to change without notice. E&OE. Bachmann do not sell direct to the public, please contact our Stockists to purchase the products we distribute.
About Bachmann
- Latest News
- New Product Announcements
- Scenery & Landscape
- Toys and Education
New Arrivals
Arrivals this month
Customer Support (UK)
- Repairs & Service Requests
- Product Warranty
- Service Terms & Conditions
Information
Privacy Policy
Collectors Club
- Bachmann Collectors Club
Bachmann Spares (UK)
Bachmann Spares
Liliput (Germany)
Bachmann trains (usa).
Bachmann Trains
Copyright © 2024 Bachmann Europe Plc. All rights reserved.
- Accurascale
- Ammo by Mig
- Cityscape Models
- DCC Concepts
- Deluxe Materials
- Dundas Models
- Electrotren
- Exclusive First Editions
- Fleischmann
- Gaugemaster
- Golden Valley
- Graham Farish
- Harburn Hamlets
- ID Backscenes
- K&S Metals
- Model Railway Bits
- Natural Scenics
- Organised Octopus
- Osborn Model Kits
- Oxford Diecast
- Oxford Rail
- P&D Marsh
- Railway Miniatures
- Rapido Trains
- Sankey Scenics
- Slater's
- Tasma Products
- Woodland Scenics
- Locomotives
- Buildings/Accessories
- Other Scales
- Power/Control
- Scenics (Any Scale)
- Plastics/Metals
- Books/DVD's
- OO Vehicles
- OO Accessories
- Accessories
Bachmann 32-603 OO Gauge Cross Country 4 Car Voyager DEMU 220017
PLEASE REVIEW THE PHOTOGRAPHS AS WELL, ACCESSORIES/BOXES ETC WILL BE SHOWN IF THEY ARE INCLUDED
WORKING ORDER: Yes, including lights.
COSMETIC CONDITION: The paintwork is excellent, just a couple of very minor marks. A wiper is missing at one end, and there is no coupling piece under the nose at one end. The coupling bars are a little crooked, but they are not broken and all work.
- Regular price £171.42
- Will be in stock after

Cross Country Voyager, showing the bright right hand daylight headlight and much dimmer upper and left hand marker lights

Voyager Hazard Light (click on the image below to see a close-up)

The hazard lights in a passenger car, normally only illuminate when the doors are open.
If they illuminate when the doors are closed, this indicates that a malfunction has occurred
is one of the other car systems connected to the hazard lights, such as the brakes.

Decoder, LEDs, diodes and series resistors in place

Power car fixing screw locations on similar Class 221

Chassis separated from upper body shell on similar Class 221

Inter-Car cables on a real Voyager

The completed 4 car Class 220 Voyager Train with day running lights and hazard lights on
(Must be a platform on the other side of the train :-)
Digital Voyager
Digital voyager.
Bachmann’s ‘OO’ gauge models of the Class 220 and 221 Voyager units pre-date the inclusion of decoder interfaces, but with the right parts they can be upgraded to digital sound and lighting. MIKE WILD shows how.

Above: The Class 221 Super Voyagers were distinct from the standard Class 220 Voyager for their outside frame bogies, five-car formation and tilting ability.
Remarkably, 2021 marks 20 years since the first Virgin Trains Class 221 Super Voyager Diesel Electric Multiple Units (DEMUs) entered service and 21 years since arrival of the similar Class 220 four-car Voyagers. The order was for 34 Class 220 four-car units and 44 Class 221 five-car units to be built by Bombardier Transportation in Belgium to replace the ageing Class 47/8s and Mk 2 stock as well as Class 43 High Speed Trains on CrossCountry trains. The new trains were a world away from their predecessors and offered rapid acceleration due to the inclusion of a Cummins QSK19 750hp engine under each coach. This gave the fourcar Voyagers 3,000hp in total while the Super Voyagers were equipped with 3,750hp. Both train types have a maximum speed of 125mph.
Apart from their train length, the most distinctive difference between the two classes is the bogie design – the 220 having inside framed bogies which exposed the full wheel face while the 221 has conventional outside framed bogie. The Class 221 is also equipped with a tilting mechanism to allow the fleet to travel at a higher speed through curves.
In model form Bachmann released its models of the Class 220 and 221 in 2002 and 2004 respectively in correct four and five-car forms. They pre-dated the inclusion of decoder interfaces which makes them more complex as a sound installation. Interestingly though, as you will see in this guide, it’s actually the lighting in the driving cars which is the most complicated part of the project.
For this sound installation we are working with Class 221 221130 Michael Palin –a happy secondhand find in original Virgin Trains livery. The 221 has also been available in modern CrossCountry colours with the Class 220 being available in the same two colour schemes. Neither is a current production model, so if you haven’t already got one you will need to turn to the second-hand market.
The sound decoder and lighting decoders are from the ZIMO family namely an MX645R for the motor car to provide the sound and a pair of MX671 function decoders to control the lighting. These have both been provided by YouChoos which also pre-connected a Rail Exclusive ‘Boom Box’ 40mm x 20mm twin speaker and one of its own 17,000uF SuperCap capacitors to the MX645 to simplify the installation.
The sound profile is YouChoos’ latest updated version for the Class 220 and 221. It replicates all of the important sounds of the unit including engine sounds, announcements, horns and more. There is also live volume control through F27 and 28, active brakes on F2, coasting sounds on F22 and the option to notch up the power using function F7 on a DCC handset. As the unit isn’t designed with digital sound in mind, it does require a hardwired method which means using a soldering iron to connect all the wires together. It is a case of working methodically through the process as shown in our step by step guide and ensuring all joints are covered with heatshrink insulation to prevent any chance of a short circuit.
The more complex part is adding the decoders to the driving cars to operate the directional lighting. The method we have used is based on that from Bromsgrove Models and avoids the need for complete rewiring by using the existing Bachmann circuit boards with two small modifications and the connection of specific wires from the MX671 function decoders. Crucially, the yellow and white wires need to be joined to the opposite connection on each driving car so one shows white headlights and the other shows red tail lights to suit the direction of travel.
Bringing the Bachmann Class 221 to life with YouChoos sound and ZIMO decoders has been a challenging and rewarding project. The end result is a powerful sounding multiple unit which replicates the sound of the Cummins QSX19 diesel engines which gives these trains their total 3,000hp (four-car) or 3,750hp (five-car) power output and ability to achieve 125mph on the rails. If you already have one of these units or you have been thinking about getting one, adding sound is a complete game changer for their operation. We love it! HM

Above: Bachmann’s ‘OO’ gauge Super Voyager assembles into an impressive five-car train. The driving experience is enhanced with the addition of DCC controlled lights and sounds.
STEP BY STEP INSTALLING YOUCHOOS SOUND IN THE BACHMANN CLASS 221

1 The Bachmann ‘OO’ gauge Voyager family was introduced in the early 2000s prior to the widespread introduction of decoder sockets which makes them a more challenging unit to upgrade to digital sound. Our project unit is ‘Super Voyager’ 221130.

2 To bring the unit to life with digitally operated sound and directional lighting we are using components supplied by YouChoos from the ZIMO and Rail Exclusive ranges. The sound decoder is an MX645R with YouChoos’ own Class 220/221 sound profile.

3 YouChoos includes a comprehensive set of instructions with each of its sound decoders providing full details of the sound functions, CV values, installation tips and more.

4 To begin the installation process, we are working on the powered centre car first. Four crosshead screws – two at each end – need to be removed to allow the bodyshell to be unclipped. They are positioned either side of the coupling mount.

5 The body is clip fitted to its chassis. Carefully work along each side to unclip the body from the chassis. Insert business cards if needed to assist in keeping the body apart from the chassis during dismantling.

6 Inside the powered car, the five-pole motor sits at the centre with a pair of flywheels in the drivetrain to the bogies. Part relief seating is included too, but as you can see there is no decoder socket.

7 A dry run of the YouChoos SuperCap capacitor pack (left), MX645R sound decoder (centre) and Rail Exclusive ‘Boom Box’ speaker (right) shows there is ample space in the roof space of the unit to position them.

8 A small circuit board sits on top of the motor chamber. This needs to be removed completely by undoing the two securing screws. Keep track of the route of the wires to ensure you separate the motor and track pick-up wires.

9 All wires are black and red, but it is simple to trace the motor wires. There are pick-up wires from each bogie which will need to be joined together and to the decoder to power the unit.

10 As our MX645R decoder has an 8-pin plug on it we will need to remove it to make this a hardwired installation into the Class 221. Simply cut off the 8-pin plug with wire cutters or small sharp scissors.

11 Next, the track pick-up wires are joined together – red to red and black to black. Ensure that the motor wires are left separate: we’ll deal with those in a moment.

12 The red and black track pick-up wires have now been joined to the red and black wires from the MX645R sound decoder. Before soldering them, a 10mm length of heatshrink insulation is slotted over the decoder wire so it can then be positioned over the joint.

13 The same process has now been carried out with the motor wires by joining the remaining red and black wires from the motor to the orange and grey wires from the decoder. Heatshrink insulation covers the joint again.

14 The supports for the original circuit board have been cut away to make a clear space for the MX645R sound decoder to sit. Handily, YouChoos pre- connected the decoder to its stay alive pack and speaker before shipping.

15 The decoder and its wiring are held in place with a combination of black tack adhesive and black insulation tape to keep the wires neat. The speaker and capacitor have been fixed to the roof of the coach to minimise their intrusion into the passenger compartment using the same materials.

16 With all the components installed, the body can be returned to the chassis, clipped in place and the screws refitted. The powered car can now be tested to ensure it operates as expected before we move on to the directional lighting for the two driving cars.

17 The two driving cars of the Voyager require function only decoders to operate the lights. Both are identical inside and with one simple switching of a pair of wires during the installation we can ensure they have the right white lights at one end and red at the other.

18 Two screws hold the body in place positioned at either end of the central underframe moulding. They are crosshead screws. Remove them and keep them safe for reassembly.

19 At the front we found it easier (although not essential) to remove the rear half of the front fairing by undoing its single crosshead screw.

20 The bodies of the driving cars are considerably more difficult to remove. To assist in the process, business cards were slotted into each side as we started unclipping it from the chassis. Be prepared to be patient.
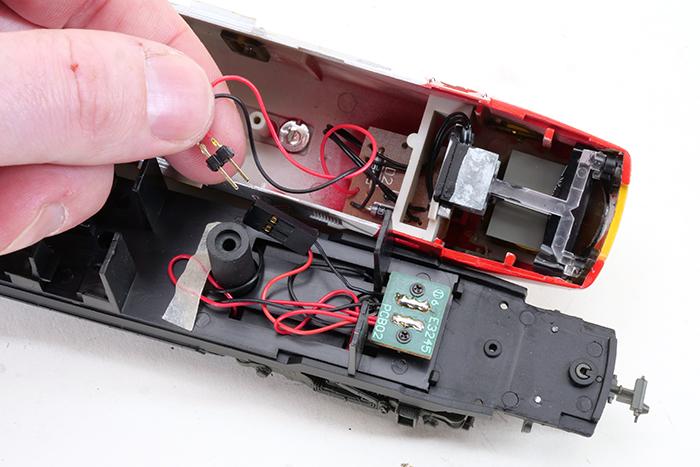
21 Once the body is off we can access the lighting circuits as supplied. They are connected to the chassis via a two-pin plug which can be detached to allow work on the lighting circuit.

22 Using a method outlined by Bromsgrove Models, the lighting circuits are removed from the cab by releasing their single securing screw. Once the screw is undone, the lighting unit, including its plastic base, slides back and then out of the body.

23 To control the lights we are using ZIMO MX671 function decoders. The body can be set aside while working on the lighting circuit.

24 The MX671 decoder provides wires to connect a stay alive capacitor. As it only needs enough energy to power the lights temporarily, we have used a single 470uF capacitor rated at 25V. This is connected with its long leg to the blue (positive) wire and short leg to the grey (negative) wire. The joints are covered with heatshrink insulation.

25 As with the sound decoder, we have cut the 8-pin plug off each of the decoders and removed the spare green and brown wires from the decoder. The remaining black, red, yellow, white and blue wires have had their ends stripped and tinned with solder ready for connection to the lighting unit.

26 More preparations! To avoid major rewiring, we are using as much of the original circuit board as possible. First the two diodes need to be removed from the base of the circuit board using wire cutters.

27 Next, the track on the top of the lighting PCB needs to be cut to prevent permanent track power going to the lights. We used the side of a small flat needle file. Ensure you file all the way through the track power circuit otherwise it will cause a short.

28 The black and red wires from the MX671 decoder are soldered to the same connections as the black and red wires from the track pick-ups. This provides power to the decoder.

29 The blue common positive wire from the decoder is connected next by soldering it to the second solder pad in from the nearest edge in this view.

30 Finally the yellow and white wires are connected to the terminals as illustrated here. On the other driving car, connect these two wires the other way round so the lighting displays correctly at each end of the train.

31 Having experienced multiple body removals on my first attempt, a top tip is to reconnect the track power connection and test your work before refitting the driving car body.

32 The lighting unit fits back into its original position as before while the decoder and capacitor are fixed to the roof in the area in front of the door using black tack. They will be invisible from the exterior in this position.

33 The two-pin plug can now be reconnected for the final time completing the installation process for the Voyager.

34 Refitting the body of the driving cars is easier than taking them off. Take care to clip the body back in place fully, refit the fixing screws and your Voyager is ready for service with digital control light and sound.

Above: It’s now 20 years since the first of the five-car tilting Super Voyagers entered traffic with Virgin CrossCountry. On July 5 2006 221123 Henry Hudson depart from York with a Newcastle service. Mike Wild.
- HM174 - Hornby Magazine December 2021
- Step by step
- Digital Sound
Related articles
PowerHaul Class 70 digital sound upgrades
21st October 2021
The Freightliner and Colas Rail Freight operated Class 70 diesel locomotives are amongst the most advanced on the British network. MIKE WILD shows how a ZIMO decoder can be installed into the Bachmann ‘OO’ gauge model along with DCC Concepts and Rail Exclusive products for a full suite of sound.
Killer ‘20s’ renumbered, weathered and sound fitted
30th April 2022
The Direct Rail Services-operated Class 20/3s offer an attractive and different locomotive for the modern railway scene. For his latest rolling stock project MIKE WILD decided to renumber, weather and sound fit a pair of the recent Bachmann ‘OO’ gauge models.
SUPER SOUND FOR THE BACHMANN GRESLEY ‘V2’
25th January 2022
Bachmann’s all-new Gresley ‘V2’ has been designed with digital sound in mind, but is there a way to introduce a bigger and more powerful speaker in the 2-6-2? MIKE WILD explores the options with a brand new sound file from Locoman Sounds.
Platinum purple bulleid
6th June 2022
The repaint of ‘West Country’ 34027 into a special Platinum Jubilee purple livery has generated huge interest. RICHARD HALL shows how you can recreate the look on a super-detailed Hornby Bulleid ‘Pacific’.

Originally published in Hornby Magazine
Subscribe to key model world online.
Subscribe to Key Model World now to access scale and rail model news, features, builds and step-by-step guides.
Subscribe now
Get the Key Model World newsletter
Receive exclusive content, offers, competitions and more.

Most Liked Past Month

VIDEO: The £500 Layout Challenge | Part Four
9th August 2024
The fourth and final part of our £500 Layout Challenge series is here. Can the team deliver a working and scenic model railway for £500 or less? Sign in or sign up now to watch the fourth part of our new series to find out.
Pete Waterman’s Leamington Spa
24th December 2021
It’s the model railway we all dream we could build if we had the space and time. PETE WATERMAN OBE invited Hornby Magazine behind the scenes to see the latest progress on his amazing ‘O’ gauge model of Leamington Spa, Hatton Bank and Brinklow. Join us for a full tour with exclusive KeyModelWorld only images and a full 30 minute long video tour inside. Photography, Mike Wild.
SERIES 9: The £500 Layout Challenge I Part Two
26th July 2024
In the second part of our new challenge series, we continue the project as we build our brand-new laser-cut modular platform kits and install them on the layout and add the ballast to start it on its scenic journey. Watch today with a Freemium (free member) account exclusively on Key Model World.

- Location & Map
- Latest News
- Browse By Gauge
- Browse By Manufacturer
- Browse By Category
- New Arrivals
- Special Offers
Class 221 5 car DMU 221135 Cross Country tilting "Voyager"
Bachmann 32-628.

Bachmann 32-628 Class 221 Arriva Cross Country Super Voyager 5 car DMU
If you buy after clicking affiliate links on this site we might receive a commission from companies such as eBay, Amazon etc This does not affect the price you pay. Click here to see similar items on eBay, and to buy.
Bachmann Class 221 Arriva Cross Country 5 car Super Voyager DMU. OO Gauge. The box has a lot of wear (see pictures) but the model itself is in excellent condition. Runs well. All couplings are present and I have included spares as well. The train tilts as it goes round curves and the tilting mechanism is in full working order, along with the directional lighting.
If you buy after clicking affiliate links on this site we might receive a commission from companies such as eBay, Amazon etc This does not affect the price you pay. Click here to buy, and to see similar items on eBay
Category: Collectables:Model Railways and Trains:OO Gauge:Locomotives Location: Norwich
Privacy Overview

- Remember me Not recommended on shared computers
Forgot your password?
- Modelling Questions, Help and Tips
Slow Bachmann Voyager?
By Houndog1372 , January 1, 2017 in Modelling Questions, Help and Tips
Recommended Posts
Houndog1372.
I have two Bachmann Voyagers,a 4 car Cross Country Voyager and a 5 car Virgin Tilting Super Voyager.
My Cross Country Voyager is brilliant, it's smooth and fast. However,My Super Voyager is really slow. It crawls around the layout at full speed, nothing like the cross country voyager.
Does anyone know any ways of fixing this? My layout is dc powered.
Link to post
Share on other sites.
Check that the wheels are clean & don't forget the backs of the wheels.
Also insure that the pickups are making good contact.
I have done, and the track is clean, it's just this one Voyager that is slow.
Seams I have no luck with models, I've already had to send a 8 back to manufactures this year
I picked one up secondhand a few years ago which has similar performance 'issues'. Again, usual checks such as wheel cleaning etc don't seem to have made much of a difference, so any other suggestions anyone can come up with would be much appreciated.
I don't want to send mine back to Bachmann as I have a feeling they'll say it's fine and send it back. I've had poor service from there repairs department before when my FL 66 came back still not working.

The Johnster
Hey guys, I have two Bachmann Voyagers,a 4 car Cross Country Voyager and a 5 car Virgin Tilting Super Voyager. My Cross Country Voyager is brilliant, it's smooth and fast. However,My Super Voyager is really slow. It crawls around the layout at full speed, nothing like the cross country voyager. Does anyone know any ways of fixing this? My layout is dc powered.
Think I've travelled on one of those...
Lay it on its side on a table or work bench & apply voltage from your controller to each set of wheels & see if the motor runs any faster that way.
I don't have a model like it so I don't know how many motors are in it or how the various units are coupled together.
Maybe someone who has a similar set might enlighten us.
Duff motor?
I have packaged the motorcar up to send it to Bachmann,hopefully it comes back better.
Motor failure is quite common on the Bachmann 221
Any tips on how to get the body off?

As far as I remember it's just 4 screws and the body pops off.
I have a class 220, I believe the motor is the same as the 221 & I always thought the model runs very slow indeed, but not having another to compare with I have left it as it is. Let us know how you get on performance wise in the future.
My original release 220 is the same whereas my 221 is fine. Remember chatting to Rob Cooper of New Mills one day who said he stripped the motor on his to find out what he problem was and discovered the brushes were to tight causing to much friction.
Bearing in mind that these are probably ten year old models now and am unsure if the Bueler motors are still used as I believe they were replaced due to emissions.
hope any of this s helpful
Cheers Trailrage
- RMweb Premium

Four screws and sharp finger nails to get under the body clips - inserting pieces of thin card as you go
Two pairs of hands is also a useful implement..........................
I've had the same issue for years. Oddly, the model does get faster after a few laps. I wonder if that confirms or disconfirms the tight brushes diagnosis.
- 2 weeks later...

Sir TophamHatt
I'll have to remember this.
Bought mine over 10 years ago - never been run.

- 1 month later...
bensanchez43310
Got the same problem with mine aswell, it runs slow, unlike my original release voyager... is yours the later release, i got doctor who and it runs slow as well as gradually getting slower until it gives up after 5 minutes, any known cures to this?

I had this problem too with my Virgin 220, and tried everything I could, but nothing cured it. In the end I shoved in a motor taken from a Hornby class 20, cut and shut one driveshaft and took the worm gear out of the bogie without a motor connection, and it now runs round at about 150 mph quite happily! A bit extreme I know but it's worked and I can now use it properly.
Any can motors people recommend to replace my Bachmann issue one with?
- 3 years later...
SouthernMafia
Sorry to dig up old threads but this seemed the most suitable.
Recently I've been working on my 3 Voyagers (2x220 and 1x221), DCC fitting, upgrading the lighting, and trying to run an 8-car. After a false start with trying to create a dummy 4-car set (as has been noted on RMWeb before, it seems Voyagers cannot handle more than their own weight), I now have 2 motors, chipped with the same DCC Concepts z218 chip, and after fiddling about with CVs an 8-car seems to run ok round the club layout:
After 20 minutes or so of running, all seemed well but I noted both motor coach bodies were very very warm. I whipped the body off one and found the motor, fly wheels and metal chassis were hot, the motor in particular very hot.
Having not run these for a long time I'm wondering if running them back in might help, but then I saw the numerous threads on here about dodgy motors, and cleaning the brushes. I might yet give this a go but I was wondering if anyone else has had similar problems, and indeed a diagnosis. Perhaps a new motor from Bachmann but at £25 or so each I'm a bit loathed to.
I didn't test my 221 as much as this was giving me other problems at the time.
Graham Radish
There is a cure for this, its getting slower because the protective windings in the motor are burning hot, if its 60c outside it will be 80c inside.
The overheating motor problem is something Bachmann or Hornby have never sorted out, but there is a cure, what you need to do is get this from ebay: https://www.ebay.co.uk/itm/Arctic-Thermal-Pad-6-W-mK-120-x-20-x-1-5mm-for-Intel-AMD-CPUs-No-Silver/114255283628?epid=16038982004&hash=item1a9a2545ac:g:CloAAOSwGD9e4Qpp
This is the only advantage ringfield motors have over sealed types, with a ringfield the movement alone cools it.
Theres nothing actually wrong with the motor itself but there will be very quick if you dont sort it. you need 1mm thermal pads or 2 part thermal epoxy.
attach a cm square of it to each side of the motor between the motor and the metal chassis, the heat will drop from about 65c right down to 30c as then the chassis becomes a very good heatsink, the motors arent heastsunk, this is a very stupid thing to do in a high speed train, in the end the stator of the motor will burn out if you dont do this. The heat just builds up until as i say, bye bye motor, this would cost Bachmann or Hornby literally pence per model to fix but theyre too lazy to do it
This problem lies in all farish models too. if there is no air cooling to a motor you need to add a compound/heatsink
or this could be planned obsolescence at it's finest.

wandering blue
3 hours ago, Graham Radish said: There is a cure for this, its getting slower because the protective windings in the motor are burning hot, if its 60c outside it will be 80c inside. The overheating motor problem is something Bachmann or Hornby have never sorted out, but there is a cure, what you need to do is get this from ebay: https://www.ebay.co.uk/itm/Arctic-Thermal-Pad-6-W-mK-120-x-20-x-1-5mm-for-Intel-AMD-CPUs-No-Silver/114255283628?epid=16038982004&hash=item1a9a2545ac:g:CloAAOSwGD9e4Qpp This is the only advantage ringfield motors have over sealed types, with a ringfield the movement alone cools it. Theres nothing actually wrong with the motor itself but there will be very quick if you dont sort it. you need 1mm thermal pads or 2 part thermal epoxy. attach a cm square of it to each side of the motor between the motor and the metal chassis, the heat will drop from about 65c right down to 30c as then the chassis becomes a very good heatsink, the motors arent heastsunk, this is a very stupid thing to do in a high speed train, in the end the stator of the motor will burn out if you dont do this. The heat just builds up until as i say, bye bye motor, this would cost Bachmann or Hornby literally pence per model to fix but theyre too lazy to do it This problem lies in all farish models too. if there is no air cooling to a motor you need to add a compound/heatsink or this could be planned obsolescence at it's finest. regards.
Hi Graham. Any chance of a photo of the inside of your voyager to see how the heat sink is arranged? Have you glued the pad into place with 2 part thermal epoxy?
Hello, the thermal pad just goes between the motor and the metal chassis of the loco, or you can use a 2 part thermal epoxy to do the same thing, the pad doesnt need to be glued as such its a gap filler, it transfers heat directly from the motors shell to the chassis.

Pete the Elaner
I have a 5 car 220 (I didn't know such a model existed until I saw it on sale S/H).
The train is slow, managing around a scale 60-65mph, but I noticed the coaches did not roll very freely, so I tried the motor vehicle on its own.
A centre car running around with no driving ends looks a bit strange but its speed increased to something like 100-110.
60-65 would be fine for my layout, but I am not happy that the trailer coaches are making the motor work so hard.
That was a few years ago & because the model is not typically what I would run, it has not been on the layout for a few years (& to be honest, I don't even know where it is).
When I do run it again, I will see what I can do to lessen the rolling resistance of the trailer vehicles.
The voyager motor is hung in a dedicated plastic housing and does not touch the metal chassis. I have 2x221 voyagers with Express lighting kits and sound fitted and both run better than scale speed. Perhaps you could check the the collet in the flywheels as they can slip in the recess. I have experienced this with other Bachmann motors, fixed with a drop of Locktite.
Create an account or sign in to comment
You need to be a member in order to leave a comment
Create an account
Sign up for a new account in our community. It's easy!
Already have an account? Sign in here.
- Existing user? Sign In
- NFRM - NEC National
RMweb Premium and Gold Membership
- RMweb Premium = £12 per annum
- RMweb Gold / World of Railways Plus with digital BRM/Garden Rail and Narrow Gauge World = £5.99 per month
- Browse more
- Exhibition layout database
- Festival of British Railway Modeling - Doncaster
- London Festival of Railway Modelling - Alexandra Palace
- Bristol Model Railway Exhibition
Our magazines
- British Railway Modelling
- Garden Rail
- Narrow Gauge World
- Engineering in Miniature
- Online Users
- Leaderboard
- old Home Page
- Create New...
Bachmann Branchline 32-628Unboxed Class 221 5 car DMU 221135 Cross Country tilting "Voyager" - DO NOT USE - USE 32-628 - Unboxed

This items has a damaged box, but item inside is fine. Being sold as unboxed.
This product belongs to the following era(s): Era 9 Initial Privatisation


IMAGES
COMMENTS
The Class 220 Voyager is a class of diesel-electric high-speed multiple-unit trains built in Belgium by Bombardier Transportation in 2000 and 2001. They were introduced in 2001 to replace the 20-year-old InterCity 125 and 30-year-old Class 47-hauled Mark 2 fleets operating on the Cross Country Route, initially for Virgin CrossCountry and since ...
As you would gather from watching the video, the XC Voyager is a lot louded than normal compared with the same class 220 bachmann train.The video was made to...
Welcome to My Channel South Coast Trainspotter. This Video: Bachmann Cross Country Voyager Class 220 Model Review. Please Comment, Like, Share, Subscribe and...
Bachmann 32-602. Class 220 4- Car DEMU 220018 "Dorset Voyager" in Virgin Trains Livery. £ 220.00 Add to basket. Bachmann 32-625OT115. Class 221. 221115 in Advanti West Coast Livery. £ 325.00 Add to basket. Bachmann 32-625. Class 221 221130 Michael Palin in Virgin Trains Livery.
Bachmann 32-628 Class 221 Arriva Cross Country Super Voyager.5 Car DMU On Test Track @ Cooke Model Railway Club(CMRC),16/03/2018.
OO Gauge (1:76 Scale) Class 221 Super Voyager 5 car DMU 221135 in Cross Country Trains. Motor fitted but no DCC socket. CAN motor. Tooling Info: Bachmann Branchline 2004 OO. Real Vehicle Profile: Class 221 'Super Voyager'.
Product Details. Bachmann Branchline 32-603. OO Gauge (1:76 Scale) Class 220 Voyager 4-car DEMU 220017 in Cross Country livery. DCC compatible but no socket. Tooling Info: Bachmann Branchline 2003 OO. Real Vehicle Profile: Class 220 'Voyager'.
Bachmann 32-603 OO Gauge Cross Country 4 Car Voyager DEMU 220017. PLEASE REVIEW THE PHOTOGRAPHS AS WELL, ACCESSORIES/BOXES ETC WILL BE SHOWN IF THEY ARE INCLUDED . WORKING ORDER: Yes, including lights. ... Bachmann 32-603 OO Gauge Cross Country 4 Car Voyager DEMU 220017. Our Price
This page provides a summary of the process adopted to incorporate a sound system, hazard lights and internal coach lighting to the Cross Country Trains variant of the Bachmann 5-car Class 221 Voyager (OO gauge). (This unit already has its primary external lighting converted to LED technology.)
A second Voyager DCC conversion and LED Lighting update. This time a Bachmann Class 220 Voyager 4 car DMU is equipped with chip LEDs and hazard lights. This page describes how DCC decoders, correctly operating external LED lighting and hazard lights were incorporated into a second Cross Country Trains variant of the Bachmann Voyager, this time ...
Virgin Cross Country 1997 - 2007 View 1 Products Livery/operator factfile. CrossCountry Trains 2007 - Present ... Bachmann Branchline 32-603 Class 220 Voyager 4-car DEMU 220017 in Cross Country livery .
The British Rail Class 220 Voyager is a class of diesel-electric high-speed multiple unit passenger trains built in Belgium by Bombardier Transportation in 2000 and 2001. They were introduced in 2001 to replace the 20-year-old InterCity 125 and almost 40-year-old Class 47-hauled Mark 2 fleets operating on the Cross Country Route.They were initially operated by Virgin CrossCountry and since ...
Digital Voyager. Digital Voyager. Bachmann's 'OO' gauge models of the Class 220 and 221 Voyager units pre-date the inclusion of decoder interfaces, but with the right parts they can be upgraded to digital sound and lighting. MIKE WILD shows how. Above: The Class 221 Super Voyagers were distinct from the standard Class 220 Voyager for ...
My Bachmann Class 221 Voyager in Cross Country livery
Details on the Class 221 5 car DMU 221135 Cross Country tilting . arcadia rail. specialists in model railways. Ordering and Enquiries 01706 882900. Opening Hours. ... Class 221 5 car DMU 221135 Cross Country tilting "Voyager" Bachmann 32-628 £110.00. This product currently out of stock, call us on 01706 882900 for the latest availability. ...
Click here to see similar items on eBay, and to buy. Bachmann Class 221 Arriva Cross Country 5 car Super Voyager DMU. OO Gauge. The box has a lot of wear (see pictures) but the model itself is in excellent condition. Runs well.
I have two Bachmann Voyagers,a 4 car Cross Country Voyager and a 5 car Virgin Tilting Super Voyager. My Cross Country Voyager is brilliant, it's smooth and fast. However,My Super Voyager is really slow. It crawls around the layout at full speed, nothing like the cross country voyager. Does anyone know any ways of fixing this? My layout is dc ...
The British Rail Class 220 Voyager is a class of diesel-electric high-speed multiple unit passenger trains built in Belgium by Bombardier Transportation in 2000 and 2001. They were introduced in 2001 to replace the 20-year-old InterCity 125 and almost 40-year-old Class 47-hauled Mark 2 fleets operating on the Cross Country Route.
The name Stavropol (Russian: Ста́врополь) is a Russian rendering of the Greek name, Stauropolis (Greek: Σταυρούπολις 'City of the Cross'). According to legend, soldiers found a stone cross there while building the fortress in the city's future location. [14] It is unrelated to Byzantine Stauroupolis (ancient Aphrodisias) in Asia Minor, nor to the city of Stavropol-on ...
Stavropol Krai has a population of 2,907,593, according to the 2021 Census . Stavropol is the largest city and the capital of Stavropol Krai, and Pyatigorsk is the administrative center of the North Caucasian Federal District. Stavropol Krai is bordered by Krasnodar Krai to the west, Rostov Oblast to the north-west, Kalmykia to the north ...
Stavropol Krai - Overview. Stavropol Krai is a federal subject of Russia located in the central part of Ciscaucasia and on the northern slope of the Greater Caucasus in the North-Caucasian Federal District. Stavropol is the capital city of the region. The population of Stavropol Krai is about 2,780,200 (2022), the area - 66,160 sq. km.
Product Details. Bachmann Branchline 32-628Unboxed. OO Gauge (1:76 Scale) Class 221 5 car DMU 221135 Cross Country tilting "Voyager" - DO NOT USE - USE 32-628 - Unboxed. Motor fitted but no DCC socket.
Designed by. V. Solovyov, T. Solovyov and I. Postnikov. The flag of Stavropol Krai of Russia is a Nordic Cross charged with the krai's coat of arms in its centre. The cross itself is white set on a golden background. In one version, the coat of arms is depicted entirely in gold, in correspondence to the flag's background.