- Press Releases
- Industry News
- Product Spotlight
- Fresh from Apple
- Video Production
- Installation Videos
- Explainer Videos
- Testing Lab
- Networking & Security
- Special OWC Deals
- The Other World
- Powered by OWC
- Space & Beyond
- Random Thoughts & Topics
- OWC Unplugged
- Article Archives
- Make a Suggestion

Send us a Topic or Tip
Have a suggestion for the blog? Perhaps a topic you'd like us to write about? If so, we'd love to hear from you! Fancy yourself a writer and have a tech tip, handy computer trick, or "how to" to share? Let us know what you'd like to contribute!
How to Take a Screenshot of an Entire Webpage in Safari on a Mac

Taking screenshots of a webpage is a normal operation for many. Perhaps it’s to capture an image for a meme, graphs for a presentation, or to send that annoying error message to a disbelieving customer service rep. Whatever the reason, some of the standard Mac screenshot options may not do the trick.
Most of us are familiar with Shift-Command-3 to capture the entire screen, or Shift-Command-4 to capture a selected portion of a screen. You may even be familiar with Shift-Command-5 to capture a single window. But what if you want to take a scrolling screen capture of an entire webpage? The aforementioned tools can’t do that – they can only capture visible areas of your screen. So, is it even possible to take a screenshot that includes a portion of a webpage you would normally need to scroll to see?
Yes, there is! But it does take a few extra steps than just executing a single keystroke combination.
Screenshot a Webpage
- Open Safari and go to “ Safari > Preferences… “
- Click the Advanced tab and toggle on “ Show Develop menu in menu bar .”

- Navigate to the webpage you want to capture and from the Develop menu, choose “ Show Web Inspector .” Alternatively, you can hit alt-command-I (⌥⌘I).

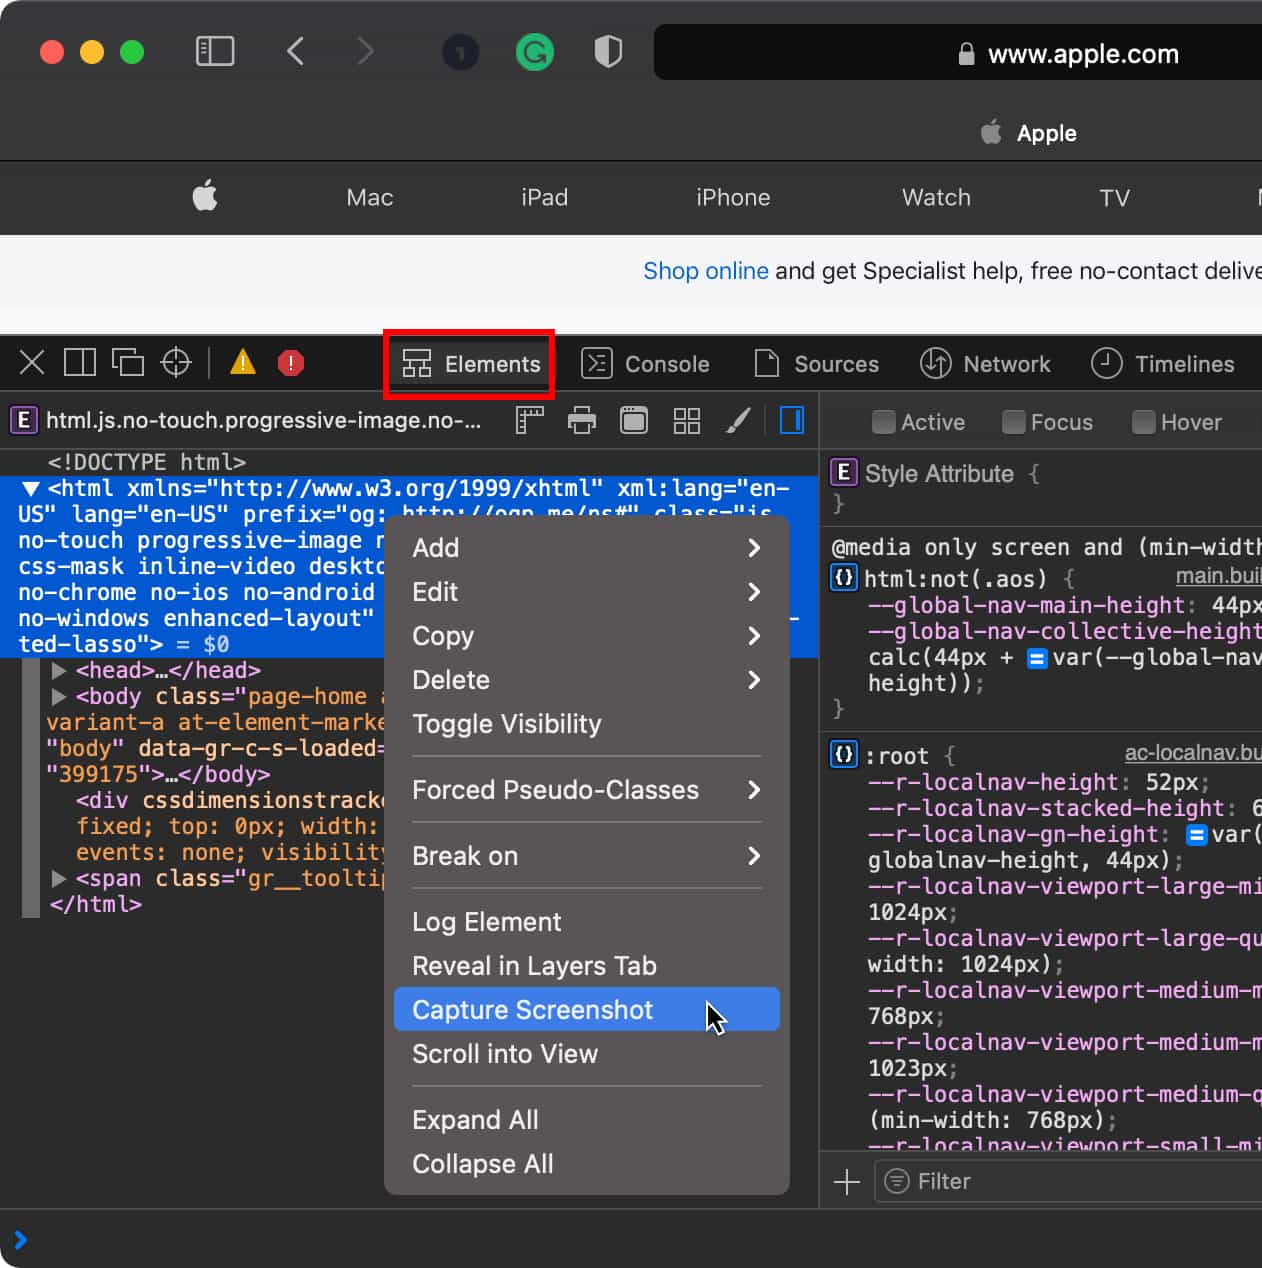
- Select the Elements tab and right-click on the line that begins with “<html…”
- Choose Capture Screenshot
- Give it a moment to do it’s magic, and then select a name and location to save the file.

All done! Well, almost…
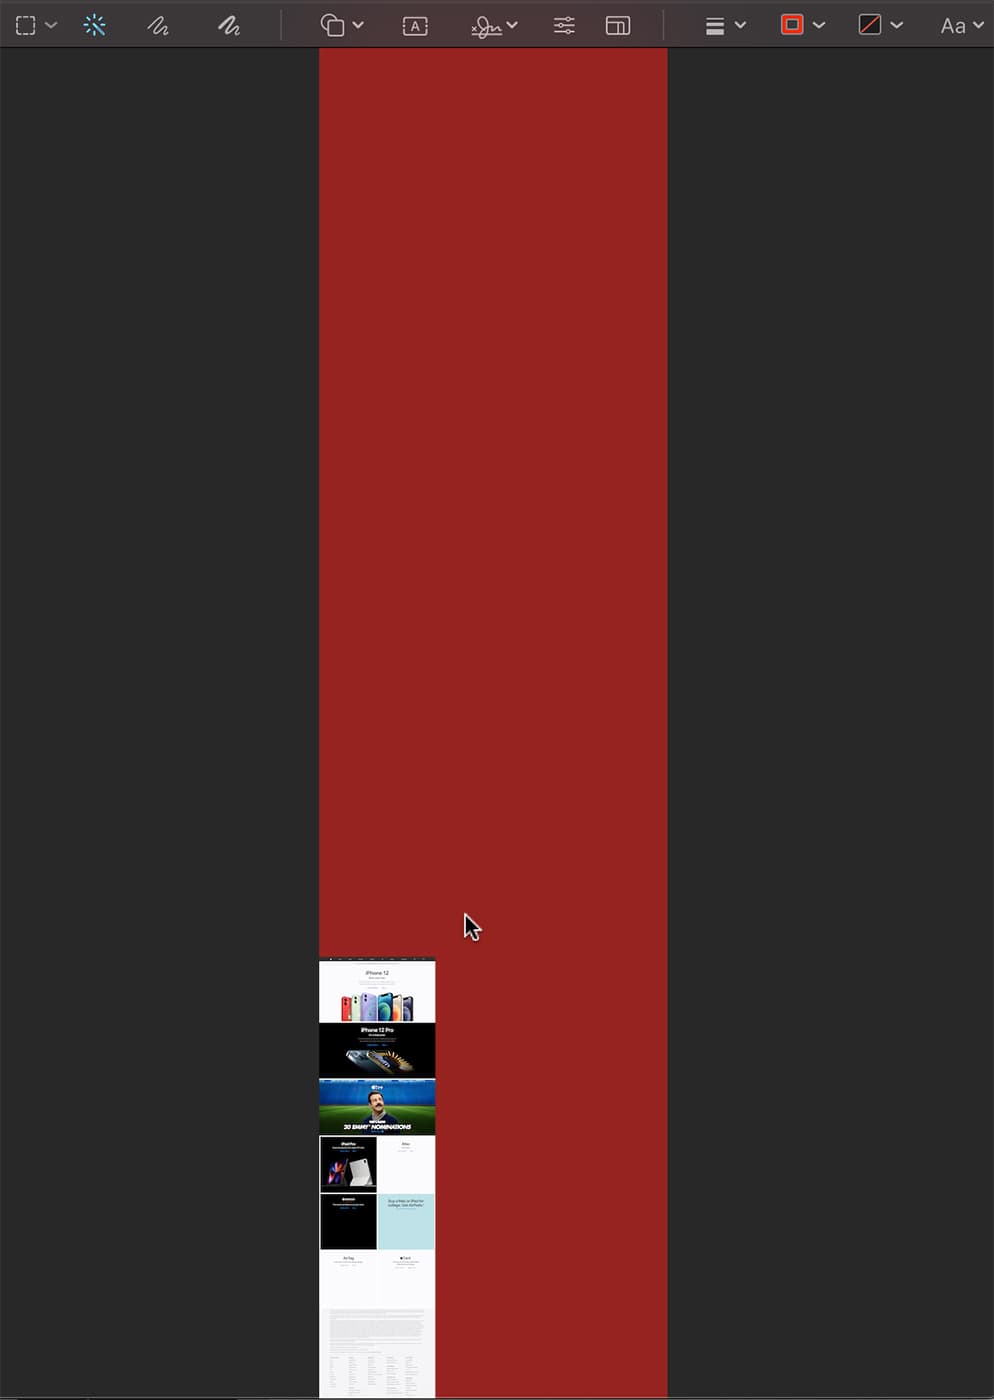
This could just be an issue I run into, but when capturing entire pages in this manner, there is a lot of empty container buffer around the image in the PNG file. You can see this in the Quick Preview of the file:

Let’s fix that.
- Open the file in Preview . If Preview is already your default application to open PNG files, you can simply double-click its icon.

- Drag the crosshairs in the empty area around the image. You’ll see the empty space selected and highlighted in red. Drag too far, and you’ll pick up the image itself. Don’t do that, we only want to select the empty area.
- When you let go of the mouse button, the highlighted color will disappear and be replaced with a dotted line indicating the selected area.

- Hit Shift-Command-I (⇧⌘I) to invert the selection.

- Hit Control-K (⌘K) to crop the image to the selection.
- Now you can hit Save (⌘S) and you truly are done. One cleaned up screenshot of an entire webpage.

Related Links
- macOS 101: What’s in the Utility Folder, Part 2
- Friday Five: Apple Webpages You Should Bookmark Right Now
- Using Activity Monitor Part 1: CPU and Memory
- Your Mac Doesn’t Want to Empty the Trash? Make It!
- How to Print a Webpage Without Ads and Backgrounds on a Mac
Other Topics You Might Like:

Leave a Reply Cancel reply
Save my name, email, and website in this browser for the next time I comment.
Notify me of follow-up comments by email.
Notify me of new posts by email.
13 Comments
OH man, Thank you so much for this post. it really helped me and saved a lot of my time.
Thanks for the helpful screen capture. I cannot get the clean up to work. The Shift+Command+I doesn’t work and I cannot get the Control+K to work. Can select the red area but that’s it.
Hoping you can help.
You show us how to capture OTHER web pages but NOT your own? That’s not cool dudes! If its not NOT for you, its not OK for anyone, right?
on Catalina, the part involving Preview to crop the image was a bit different, but I figured it out. Click on the show Markup Toolbar icon, then click on Rectangular Selection, then draw a box around the bit of interest, then click on “crop” in the toolbar. Repeat if needed. Zoom as needed.
Thanks for the insight!
Tried it on the article and when I try to pen saved .png I get message that either file is corrupted or can’t open the file format.
I ran into this also, then I quickly realized the file does not have the .png extension. Recaptured the screen and ensured when renaming the file, I added .png. Opened as a webpage though not as a preview. Still to figure out how to set preview as the default file opener for png files.
I’ve often wanted to do this. However, on this very page, while the initial steps seem to work, the resulting .png is un-openable by Preview or Pixelmator Pro or Quicklook. (“It may be damaged or use a file format that Preview doesn’t recognize.”)
File->Print->Save as PDF, and File->Export as PDF work as expected in Safari (full HTML-rendered page) with the added features of selectable text and extractable images in the PDFs (for those memes y’all). ~Tim~ macOS Big Sur, 11.4 Safari 14.1.1
Awesome tip! These are the articles that make it worthwhile to keep visiting Rocket Yard of OWC. Thanks. BTW an application to do it is Paparazzi! (but it does not work in all cases) https://derailer.org/paparazzi
I just tried that same Apple webpage with Safari 14.1.1 in OS 11.4. Went to File > Export as PDF… and bingo! Got a nice high-res 8.2MB PDF on my desktop instantly. Image is clean, no unexpected margins.
That works! Thank you!
Huh. I just tried that in Mojave with the latest Safari (14.1.2), using this webpage for the test.
I end up with a 20.6mb file ending in .PNG format, but which will not open. It’s either “damaged” or in a format that Preview can’t open.
In most other applications, this function would be easily performed using the Print button, and then Save as PDF. It is truly unfortunate that web developers have blocked the normal Print functionality on the web.
You Might Also Like

Future-proof Your Setup With the OWC Express 1M2: All the SSD You Need—and Then Some

Getting the Most Performance out of Spinning Hard Drives, Part 4: the Many Ways to Configure 4/8 Hard Drive Enclosures

How to Use Inline Predictive Text to Speed Up Typing in macOS Sonoma

Getting the Most Performance out of Spinning Hard Drives, Part 3: Multi-Drive Enclosures Provide Convenience and Performance
Email Address
- Brand Assets
8 Galaxy Way Woodstock, IL 60098 1-800-275-4576 +1-815-338-8685 (Int)
All Rights Reserved, Copyright 2020, OWC – Since 1988 | Terms of Use | Privacy Policy
We use cookies to provide you with a full shopping experience, including personalized content, and to help us improve your experience. To learn more, click here .
By continuing to use our site, you accept our use of Cookies, Privacy Policy and Terms of Use .
How To Take A Screenshot On Safari

- Software & Applications
- Browsers & Extensions

Introduction
Taking a screenshot is a handy skill that allows you to capture and save a snapshot of what's displayed on your screen. Whether you want to preserve a memorable moment, share information with others, or keep a record of important details, knowing how to take a screenshot on Safari can be incredibly useful. Safari, the default web browser for Apple devices, offers several methods for capturing screenshots, each with its own unique advantages. In this article, we'll explore three simple and effective ways to take a screenshot on Safari, empowering you to effortlessly capture and save images of web pages, online articles, or any other content you encounter while browsing the internet.
By mastering these screenshot techniques, you'll be equipped to capture and share visual information with ease. Whether you're a student needing to save excerpts from online research, a professional seeking to document web content for presentations, or simply someone who wants to preserve memorable online moments, the ability to take screenshots on Safari will prove to be a valuable skill. So, let's dive into the methods and learn how to capture and save screenshots using Safari on your Apple device.
Method 1: Using Keyboard Shortcuts
Capturing a screenshot on Safari using keyboard shortcuts is a quick and convenient method that allows you to capture the entire screen, a specific window, or a selected portion with ease. These keyboard shortcuts are intuitive and can be executed seamlessly, making them a popular choice for many users.
Full Screen Screenshot
To capture the entire screen, simply press the Command + Shift + 3 keys simultaneously. Upon doing so, Safari will instantly capture a screenshot of the entire screen, including the browser window and any open tabs or applications in the background. The captured image will be automatically saved to your desktop, ready for you to access and utilize as needed.
Screenshot of a Specific Window
If you wish to capture a screenshot of a specific Safari window, such as a single browser tab, you can do so by pressing Command + Shift + 4 followed by the Spacebar . This combination will transform your cursor into a camera icon, allowing you to click on the desired Safari window to capture a screenshot of it exclusively. Once captured, the image will be saved to your desktop, providing you with a focused snapshot of the selected Safari window.
Custom Selection Screenshot
For scenarios where you only need to capture a specific portion of the Safari window, the keyboard shortcut Command + Shift + 4 enables you to create a custom selection screenshot. Upon pressing this combination, your cursor will transform into a crosshair, empowering you to select the exact area of the Safari window that you want to capture. Once the selection is made, releasing the mouse or trackpad will trigger the screenshot to be saved to your desktop, offering you a tailored image of the chosen portion.
By leveraging these keyboard shortcuts, you can efficiently capture screenshots while browsing on Safari, empowering you to preserve and share valuable visual information effortlessly. Whether you need to capture the entire screen, a specific window, or a custom selection, the keyboard shortcuts in Safari provide a seamless and efficient way to capture and save screenshots, enhancing your browsing experience and productivity.
Method 2: Using the Screenshot Toolbar
Another convenient method for capturing screenshots on Safari is by utilizing the built-in Screenshot Toolbar. This feature, introduced in macOS Mojave and later versions, offers a user-friendly interface that simplifies the process of taking screenshots while browsing. The Screenshot Toolbar provides various options for capturing specific portions of the screen, adding annotations, and even recording video clips, making it a versatile tool for visual documentation.
To access the Screenshot Toolbar while using Safari, simply follow these steps:
Open Safari : Launch the Safari browser and navigate to the web page or content you wish to capture.
Activate the Screenshot Toolbar : Once on the desired page, press the Shift + Command + 5 keys simultaneously. This keyboard shortcut triggers the Screenshot Toolbar to appear at the bottom of the screen, presenting a range of screenshot and recording options.
Select Screenshot Type : Within the Screenshot Toolbar, you can choose from various screenshot options, including capturing the entire screen, a specific window, or a custom selection. By selecting the appropriate screenshot mode, you can tailor the capture to suit your specific needs.
Customize Screenshot Settings : The Screenshot Toolbar also allows you to customize additional settings, such as setting a timer for delayed captures, choosing the save location for screenshots, and enabling options for showing the mouse pointer in the screenshot.
Capture and Save : Once the desired settings are configured, simply click on the "Capture" button within the Screenshot Toolbar to initiate the screenshot. The captured image will be saved to the designated location, ready for you to access and utilize as needed.
The Screenshot Toolbar not only streamlines the process of capturing screenshots on Safari but also offers additional features for annotating and editing the captured images. After taking a screenshot, the Screenshot Toolbar provides options for adding text, shapes, and other annotations to the image, empowering you to highlight specific details or provide context to the captured content.
Furthermore, the Screenshot Toolbar enables users to record video clips of their screen, making it a comprehensive tool for visual documentation and communication. Whether you need to capture a static image of a web page or record a dynamic demonstration within Safari, the Screenshot Toolbar equips you with the necessary features to accomplish these tasks seamlessly.
By leveraging the Screenshot Toolbar in Safari, users can enhance their screenshot capabilities, benefiting from a user-friendly interface and versatile options for capturing, annotating, and recording visual content while browsing the web. This method provides a modern and intuitive approach to taking screenshots on Safari, catering to a diverse range of visual documentation needs.
Method 3: Using the Preview App
In addition to the keyboard shortcuts and the Screenshot Toolbar, Safari users can also utilize the Preview app, a versatile and feature-rich tool that offers advanced capabilities for capturing and editing screenshots. The Preview app, which comes pre-installed on macOS devices, serves as a powerful image viewing and editing application, and it includes seamless integration with Safari for capturing and annotating screenshots.
To utilize the Preview app for capturing screenshots while browsing on Safari, follow these simple steps:
Access the Preview App : Once on the desired page, navigate to the Applications folder or use Spotlight Search to locate and open the Preview app.
Capture the Screenshot : Within the Preview app, click on the "File" menu and select "Take Screenshot." This action will present options for capturing the entire screen, a specific window, or a custom selection.
Customize Screenshot Settings : After selecting the desired screenshot mode, the Preview app allows users to customize additional settings, such as setting a timer for delayed captures, choosing the save location for screenshots, and enabling options for showing the mouse pointer in the screenshot.
Annotate and Edit : Once the screenshot is captured, the Preview app provides a comprehensive set of tools for annotating and editing the image. Users can add text, shapes, arrows, and other annotations to highlight specific details or provide context to the captured content. Additionally, the app offers features for cropping, resizing, and adjusting the image, empowering users to refine the screenshot according to their preferences.
Save and Share : After annotating and editing the screenshot, users can save the image in their preferred format and share it with others as needed. The Preview app supports various image file formats, ensuring compatibility and flexibility in sharing the captured screenshots.
By leveraging the Preview app, Safari users can elevate their screenshot capabilities, benefiting from advanced annotation and editing features that enhance the visual documentation process. Whether you need to capture, annotate, or edit screenshots of web pages, online articles, or any other content within Safari, the Preview app provides a comprehensive solution for these tasks, empowering users to capture and customize visual content with precision and efficiency.
Incorporating the Preview app into your screenshot workflow expands your capabilities, allowing you to capture and refine screenshots seamlessly while browsing on Safari. This method offers a robust and versatile approach to capturing and editing screenshots, catering to a diverse range of visual documentation and communication needs.
In conclusion, mastering the art of taking screenshots on Safari opens up a world of possibilities for capturing and preserving visual content while browsing the web. By exploring the three methods outlined in this article, users can equip themselves with versatile and efficient techniques for capturing screenshots on Safari, each offering unique advantages and capabilities.
The keyboard shortcuts method provides a quick and intuitive way to capture screenshots, allowing users to effortlessly capture the entire screen, specific windows, or custom selections with ease. This method is ideal for those seeking a streamlined approach to capturing screenshots without the need for additional interfaces or tools.
The Screenshot Toolbar, introduced in macOS Mojave and later versions, offers a modern and user-friendly interface for capturing and annotating screenshots. With its versatile options for capturing specific portions of the screen, adding annotations, and even recording video clips, the Screenshot Toolbar caters to a diverse range of visual documentation needs, enhancing the screenshot experience on Safari.
Furthermore, the integration of the Preview app with Safari provides advanced capabilities for capturing, annotating, and editing screenshots. By leveraging the comprehensive set of annotation and editing tools offered by the Preview app, users can refine and customize their screenshots with precision, adding context and visual enhancements to the captured content.
By incorporating these methods into their workflow, Safari users can elevate their screenshot capabilities, benefiting from a range of options for capturing, annotating, and refining visual content with precision and efficiency. Whether it's capturing web pages, online articles, or dynamic content within Safari, the ability to take screenshots empowers users to preserve and share valuable visual information seamlessly.
In essence, the knowledge and proficiency in taking screenshots on Safari not only enhance individual productivity and documentation needs but also contribute to effective communication and collaboration. Whether you're a student, professional, or casual user, the ability to capture and share visual content with ease enriches the browsing experience and facilitates seamless information sharing.
By embracing these screenshot techniques, users can harness the power of visual documentation, preserving valuable moments, information, and insights encountered while browsing on Safari. With these methods at their disposal, users can confidently navigate the digital landscape, equipped with the tools to capture, annotate, and share visual content effortlessly.
Leave a Reply Cancel reply
Your email address will not be published. Required fields are marked *
Save my name, email, and website in this browser for the next time I comment.
- Crowdfunding
- Cryptocurrency
- Digital Banking
- Digital Payments
- Investments
- Console Gaming
- Mobile Gaming
- VR/AR Gaming
- Gadget Usage
- Gaming Tips
- Online Safety
- Software Tutorials
- Tech Setup & Troubleshooting
- Buyer’s Guides
- Comparative Analysis
- Gadget Reviews
- Service Reviews
- Software Reviews
- Mobile Devices
- PCs & Laptops
- Smart Home Gadgets
- Content Creation Tools
- Digital Photography
- Video & Music Streaming
- Online Security
- Online Services
- Web Hosting
- WiFi & Ethernet
- Browsers & Extensions
- Communication Platforms
- Operating Systems
- Productivity Tools
- AI & Machine Learning
- Cybersecurity
- Emerging Tech
- IoT & Smart Devices
- Virtual & Augmented Reality
- Latest News
- AI Developments
- Fintech Updates
- Gaming News
- New Product Launches
Sanjuksha Nirgude Soaring High with Robotics
Openstack backup and recovery software, related post, apple wallet availability in the pocketguard app: sync your apple card, apple cash, and savings from apple card accounts, ai writing: how it’s changing the way we create content, how to find the best midjourney alternative in 2024: a guide to ai anime generators, unleashing young geniuses: how lingokids makes learning a blast, 10 best ai math solvers for instant homework solutions, 10 best ai homework helper tools to get instant homework help, related posts.

How To Download Apps From Safari

10 Best Browsers for Privacy That Aren’t Google Chrome

How To View Page Source On Tablet

How To Download The Latest Version Of Safari

How To Get Adblock For Safari

What Is A Headless Browser

MovieBox Pro: How to Install It on Your Phone

What Is Cross-Browser Testing
Recent stories.

5 Ways to Improve IT Automation

What is Building Information Modelling?

How to Use Email Blasts Marketing To Take Control of Your Market

Learn To Convert Scanned Documents Into Editable Text With OCR

Top Mini Split Air Conditioner For Summer
- Privacy Overview
- Strictly Necessary Cookies
This website uses cookies so that we can provide you with the best user experience possible. Cookie information is stored in your browser and performs functions such as recognising you when you return to our website and helping our team to understand which sections of the website you find most interesting and useful.
Strictly Necessary Cookie should be enabled at all times so that we can save your preferences for cookie settings.
If you disable this cookie, we will not be able to save your preferences. This means that every time you visit this website you will need to enable or disable cookies again.
How To Take Full Page Screenshots In Safari For Mac
Safari comes as the default browser on Mac computers. It is a perfectly capable browser and if you prefer using native software instead of downloading third-party browsers, we get it. However, unlike Edge, there is no straightforward built-in tool for capturing full page screenshots in Safari.
We’re not sure if Apple ever plans to introduce the feature in an easier manner, but don’t worry, if capturing full page screenshots is something you’re interested in, there are ways around this problem which we will cover in the guide below, so read on to find out.
Saving Websites As PDFs
What’s interesting about this method is that if you try to take a scrolling screenshot on an iPhone , it actually saves as a PDF, so this method is pretty similar.
- Open Safari
- Go to the website you want to capture
- Click on Show Reader View
- From the menu, select File > Export as PDF
- Choose the location and name and click Save
Note that because you’re saving it as a PDF file, it is actually not an image file. The upside to this method is that if you have a PDF editor, you can actually make some edits to the file like adding notes. The downside is that it is equally easy for someone else to make the same edits if they have the file, versus images which might be slightly trickier to manipulate seamlessly.
Using Safari’s Developer Tools
Similar to how Google approaches full page screenshots with Chrome, it appears that Apple has also hidden its full page screenshot tool for Safari behind its developer tools.
- Click on Develop > Show Web Inspector
- In the newly opened window, right click the very first line that reads “html”
- Select Capture Screenshot
- Save the file
The upside to this method is that if you don’t need to capture the entire page, you can just highlight portions of the code that you want to capture, but that’s assuming you know what you’re looking at. Also, Apple already built-in screen capture tools into macOS that will work in Safari (except it doesn’t do full page captures), so that would be an easier method than this.
Using Awesome Screenshot Extension For Safari
If neither of the options above sound appealing to you, then you might be interested to learn that you can use a browser extension for Safari called Awesome Screenshot that makes the entire process a lot simpler.
- Download and install the Awesome Screenshot extension
- Once the extension is installed, go to the website you want to capture
- Click the extension’s icon and select Capture entire page
- You can now make edits to the screenshot if you want
- When you’re ready to save it, click the download icon and it’ll save it to your computer
Using TechSmith’s Snagit Desktop Tool
If you don’t mind paying for software, then perhaps TechSmith’s Snagit could be the end-all to all your screenshot needs. This is because Snagit won’t just work with Safari, but it will work across your Mac so in addition to capturing websites, you can use the Snagit tool to capture other screenshots like from applications, games, and so on.
- Download and install Snagit
- Launch Snagit and click the “All-In-One” tab to the left
- Click the Capture button
- Select the area of the website you want to capture and click the “Launch a Panoramic Capture” button
- Click start and start scrolling down the website and click Stop when you’re done
Keep in mind that Snagit is not free. There is a free trial that you can check out to see if this is what you want, but once the trial is up, you’ll have to pay $50 for a single-user license. It is expensive, but if you think you can get your money’s worth, why not?
Filed in Apple > Computers . Read more about macOS and Safari .
- a. Send us an email
- b. Anonymous form
- Buyer's Guide
- Upcoming Products
- Tips / Contact Us
- Podcast Instagram Facebook Twitter Mastodon YouTube Notifications RSS Newsletter
How to Screenshot An Entire Webpage on Mac
In iOS, Apple's Safari browser includes a built-in screenshot feature that lets you capture entire webpages on your iPhone or iPad for sharing elsewhere.

Note that in step 4, you can drag or click on the page to select a region and then save just that region by clicking Download , or you can save just the visible area of the page by clicking Save visible in the top-right corner.
Tip: You can also customize the Firefox toolbar to add a Screenshot button. Click the Menu button (three lines) in the top-right corner of the browser window. A special tab will open, where you can drag and drop items in or out of the overflow menu and the toolbar. Simply drag the Screenshot item (the cutting scissors icon) to the toolbar, then click Done .
Get weekly top MacRumors stories in your inbox.
Popular Stories

Apple Event Announced for September 9: 'It's Glowtime'

iPhone 16 Likely to Launch on September 20 With These New Features

When to Expect the iPhone SE 4 to Launch

iPhone 16 Pro Max Looks This Much Bigger Beside iPhone 15 Pro Max

16GB of RAM Could Be the New Minimum in Apple's Upcoming M4 Macs

All Four iPhone 16 Pro Colors Revealed in New Image

Apple Watch X? September 9 Event Date Marks 10th Anniversary
Next article.

Our comprehensive guide highlighting every major new addition in iOS 17, plus how-tos that walk you through using the new features.

Update now for a number of important security fixes.

Get the most out your iPhone 15 with our complete guide to all the new features.
A deep dive into new features in macOS Sonoma, big and small.

Action button expands to all models, new Capture button, camera improvements, and more.

Larger displays, new Capture button, camera improvements, and more.

Updates to Mail, Photos, Messages, and more, with Apple Intelligence features throughout.

iPhone Mirroring, Safari improvements, new Passwords app, and Apple Intelligence features throughout.
Other Stories

5 hours ago by Joe Rossignol

11 hours ago by Tim Hardwick

1 day ago by Joe Rossignol
Screenshot entire webpage (Mac)
Martina Nikolova
Table of Contents
How to screenshot an entire webpage on Mac
The easiest way to screenshot an entire webpage on Mac is to use the Shift + Command + 3 combination. Alternatively, you can use built-in browser screen capture features to screenshot an entire webpage on Mac, but the way to do this would depend on the browser.

Taking a screenshot on a Mac computer is very easy – all you need to do is press Shift + Command + 3 and this will create a screenshot using the built-in Screenshot mac utility. This app actually has several useful options, so, to actually open it and gain access to those options you can search for them in Spotlight by typing Screenshot and opening the first result. You can also use the Shift + Command + 5 combination from your keyboard to directly open the Screen capture utility. Once you open it, at the bottom of your screen, you’d be given the different options of the app – to screenshot the entire screen or a specified selection, or to record a video of your entire screen or of a selection. If you want to take a screenshot of the whole screen, click the first button from left to right (should be labeled Capture Entire Screen) and then click anywhere on your screen. A screenshot image file will soon be saved in a location specified in the settings of the Screenshot utility. To see what that location is and to change it if you want, click Options when the Screenshot utility is open and see what folder is checked below Save to . If you want, you can change that folder to another location.
If you want a quick way of making screenshots of specified selections of the screen, you can instead use the Shift + Command + 4 keyboard combination. This will directly turn your cursor into a selection tool. To use it, click and hold somewhere on your screen and then drag the cursor over the area of your screen that you want to capture. Once you’ve selected the area you want, release the click and a screenshot will be taken and saved to the Save to the location of the Screenshot utility.
This is the easiest way to take screenshots on Mac, but note that a lot of browsers offer their own screenshot utilities and functions. Below, we will show you how to take a screenshot of a webpage using Chrome and Firefox.
How to screenshot a webpage in Chrome on Mac
- Open the Chrome browser on your Mac and go to the page you want to screenshot.
- Press the Command + Option + I keyboard combination, and you will see a window appear to the right.
- Next, press Command + Shift + P and then type “ Screenshot” in the Run field.

- If you chose the Capture area screenshot feature, click-hold on your screen and drag the cursor while holding the click to select the area you want to screenshot and then release the click. Any screenshots you create in this way will be saved to the Google Chrome download location, but you can also directly open the screenshot by clicking it from the bottom of your screen, as it should appear there after you take it.
How to screenshot a webpage in Firefox on Mac
- Launch Firefox and visit the page that you need to screenshot.

Martina likes to get into nitty-gritty of tomorrow’s tech, from product design across to security based solutions. A long time mac user and developer, she has the expertise and strives to give new insight
Leave a Reply Cancel reply
Your email address will not be published. Required fields are marked *
Save my name, email, and website in this browser for the next time I comment.
Loading layout...
How to capture full page screenshots in Safari, Firefox, and Chrome on Mac
In this tutorial, we will show you how to take a screenshot of a full web page in Safari, Chrome, and Firefox on your Mac using built-in and third-party methods.

Important: Most websites use the lazy-loading feature, which loads the image only after you scroll to that point on the page. So, before following the steps below, load the web page completely and scroll to its bottom to ensure all images are also visible. After that, take a full-page screenshot (also known as a scrolling screenshot ).
Also see: How to take a full-page screenshot in any iPhone app
Screenshot an entire web page using built-in browser tools
To accomplish this in Safari, you’ll need to display the Develop tab in the menu bar. If you already have it, you’re a step ahead. If you don’t, follow these steps first.
- Open Safari and click Safari > Settings or Preferences from the menu bar.
- Go to the Advanced tab.
- Check the box for Show features for web developers or Show Develop menu in menu bar .

Now, head to the web page you want to capture and follow these steps.
1) Click Develop > Show Web Inspector from the menu bar. The Inspector will open with the webpage on either the right or the bottom, depending on the default position. This displays the HTML code for the page.
2) Go to the top of the code in the Elements tab and right-click the first line beginning with “html.”
3) Select Capture Screenshot from the shortcut menu. It can take several seconds before you see the screen in the next step, so be patient.

4) Choose a location to save the image and optionally rename it.
5) Hit Save .
You can then open the saved image in Preview or your Mac photo editor to see it in full.
To close the Web Inspector in Safari after you capture the shot, just click the X on the top left corner of the panel.
Firefox users will be happy to know that this browser provides the easiest option for capturing a scrolling screenshot.
1) Head to the page you want to capture. Now, right-click on the page and choose Take a Screenshot .
2) Click Save full page on the top right.

3) Hit Download to save the image or Copy to place it on your clipboard to paste where needed.

And that’s all there is to it! After you choose to Download or Copy the image, the webpage will go back to its original view.
Google Chrome
1) Visit the webpage you want to capture and click the Customize and Control button (three dots) on the top right.
2) Move down to More Tools and pick Developer Tools in the pop-out menu.

3) When the panel opens on the right of the webpage, click the Toggle Device Toolbar button at the top.
4) With your webpage on the left, you can choose to view it as a different device at the top or just leave as Responsive.
5) Click the three dots on the top right of the left-hand panel and select Capture full size screenshot in the menu.

The image will be downloaded for you to grab and open in whichever app you like. You can close the Developer Tools by clicking the X on the top right of that panel.
Use the Awesome Screenshot extension
You can use the excellent Awesome Screenshot extension to capture full-page screenshots inside any popular browser.
Start by getting the extension for Safari , Chrome , or Firefox . After that, click the extension icon and choose Capture Full Page > Done > Download .

Note: For Safari, you will have to first:
- Allow screen recording permission: Once the app is downloaded, open it and click Go to Screen Recording Setting . It will take you to System Settings > Privacy & Security > Screen & System Audio Recording. From here, enable the switch for Awesome Screenshot & Recorder and confirm. After that, click Quit & Reopen .
- Enable the extension: Go to Safari Settings > Extensions and check the box for Awesome Screenshot before its icon appears in the top left of the address bar.
On a related note:
- 3 ways to quickly find all screenshots on your Mac
- How to capture a screenshot of a whole text thread on iPhone
How to take a screenshot on a Mac
The ultimate guide to how to take a screenshot on a Mac

Once you learn how to take a screenshot on a Mac, each and every way (there are more than a few), you'll have an expertise that comes in handy quite often. As Tom's Guide's resident Mac power user, I've mastered the practice and use the skill to help the team cover live-streamed events.
You might not realize it at first, but the general full-screen view is just one of three kinds of screenshots you can take. Oh, and there are three screenshot options you can choose from, to customize the process completely.
- How to use macOS — essential tips and tricks
- The best laptops right now
- MacBook Air vs Pro : What's right for you?
Here is our ultimate guide for how to take a screenshot on a Mac:
How to take a screenshot on a Mac: Full-screen screenshot
- Perform the keyboard shortcut Command + Shift + 3 to get an image of your Mac's screen, as well as images for any connected monitors.
- The image will appear on your desktop , unless you change your preferences, as I'll get to below.
The easiest way to screenshot on a Mac is also the most … well, comprehensive.
How to take screenshot on a Mac: Pre-cropped screenshot
- Perform the keyboard shortcut Command + Shift + 4.
- Click and drag your touchpad or mouse to select the region you want to capture , and release.
- Your screenshot will show up on your desktop , though you can set it to appear somewhere else, as I'll explain below.
My preferred screenshot method, because it removes all the need for resizing the canvas of your image afterwards, turns your mouse into a set of crosshairs.
If you want to capture the same part of your screen repeatedly, there's an even better way to pull off this trick, and it's my secret weapon for capturing pre-cropped screenshots expediently.
- Perform the keyboard shortcut Command + Shift + 5.
- In the pop-up menu, select "Capture Selected Portion," the third option from the left
- Adjust the selected portion of the screen by dragging the corners of the frame.
- Hit Enter.
- Repeat as necessary, as you will get the same crop again when you go back through this. While Command+Shift+4 is great for one-time screenshots, this method is great for creating batches of screenshots on the fly.
- Your screenshot will show up on your desktop .
How to take a screenshot on a Mac: Directly to your clipboard
Hate creating clutter on your screen? We've got a tip for you too.
Sign up to get the BEST of Tom's Guide direct to your inbox.
Get instant access to breaking news, the hottest reviews, great deals and helpful tips.
- Perform the keyboard shortcut Command + Control + Shift + 4.
- Hit Command + V in a document or program.
Now you'll have no new files on your desktop.
How to take a screenshot on a Mac: Just an app window
Often, mostly for these "how to" articles, I take screenshots that have all of one window in macOS, and nothing else.
- On the window that pops up, select "Capture Selected Window," the second option from the left,
- Click on a window you want to capture.
- Your screenshot will show up on your desktop.
How to take a screenshot on a Mac: Change default screenshot file location
- Click Options.
- Under Save to, pick a destination. Options include your desktop, your documents folder, your clipboard (so hitting Command + V would paste that screenshot into a document) and other apps, such as Mail, Messages and Preview.
- Click Other Location to select a custom destination.
How to take a screenshot on a Mac: Using a timer delay
Sometimes you need to perform a screenshot that requires an action to be performed right before hitting the screenshot.
- Select 5 seconds or 10 seconds.
- Then hit Enter, and your timer will begin.
How to take a screenshot on a Mac: Bonus options
- You can uncheck "Show floating thumbnail" to get your screenshots faster , and stop macOS from putting your screenshots in the corner of your screen (which is mostly good for performing edits in the preview mode).
- If you uncheck "Remember last selection" macOS' screenshots tool will return to its defaults after each screenshot.
- Check or uncheck "Show mouse pointer" if you want your mouse cursor to appear in your screenshots -- it can be helpful for explaining how to perform certain actions.
More macOS tips
- How to record screen on a Mac
- How to print screen on a Mac
- How to force quit on Mac
- How to copy and paste on a Mac
- How to show the hidden files in Mac
- How to uninstall apps on a Mac
- How to fix a Mac that won't start
- How to reset a MacBook Pro — and any other Mac
Henry is a managing editor at Tom’s Guide covering streaming media, laptops and all things Apple, reviewing devices and services for the past seven years. Prior to joining Tom's Guide, he reviewed software and hardware for TechRadar Pro, and interviewed artists for Patek Philippe International Magazine. He's also covered the wild world of professional wrestling for Cageside Seats, interviewing athletes and other industry veterans.
Think tap to pay is safer? New Android malware uses stolen NFC data to drain your accounts
Act fast! This RTX 4070 gaming laptop is on sale for $300 off
5 best thriller shows on Netflix you need to stream right now
Most Popular
- 2 Don't buy an iPad Mini right now — low stock hints a refresh could be coming soon
- 3 I used my Pixel 9 Pro XL to create the ultimate EV savings cheat sheet — here’s what I learned
- 4 Mega Brooks running shoe sale — 11 deals for every runner from $79
- 5 5 best new movies to stream on Netflix, Peacock and more (Aug. 27-Sept. 2)
How-To Geek
4 ways to take a scrolling screenshot on a mac.

Your changes have been saved
Email is sent
Email has already been sent
Please verify your email address.
You’ve reached your account maximum for followed topics.
Quick Links
Take full-page screenshots in safari with the develop menu, take a scrolling screenshot with the fireshot safari extension, take screenshots in an online tool, take scrolling screenshots in any app with shottr.
macOS has a built-in tool for taking screenshots, but it can only capture what's actually visible on the screen at any time. What if you need to take a screenshot of an entire web page or lengthy document? Here are the best ways to take scrolling screenshots on a Mac.
Safari has a hidden screen capture tool that you might not know about. It's a bit technical, but is accessible to everyone, and if you only need it for occasional use, this is the simplest option to try.
To access the feature, you first need to enable the Developer Settings in Safari. Go to Safari > Settings > Advanced and click "Show Features for Web Developers".
Exit the settings, and you should see that a "Develop" option has appeared in the Safari menu bar. Now load up the web page you want to screenshot and go to Develop > Show Web Inspector. A panel will open at the bottom of the screen. It looks pretty complicated if you aren't used to it, but don't be put off—you don't need to know what any of it means.
To take your screenshot, make sure the Elements tab is selected at the top of the panel. In the code in the left-hand pane, scroll to the top and right-click on the line that begins "html"—it'll normally be the second line. From the dialog box that opens, click "Capture Screenshot."
You'll now be prompted to choose where to save your image. Click "Save" and you're done.
If you take screenshots of websites regularly, then you'll be better off using an app to handle it. For Safari, you can install an extension to capture scrolling screenshots. The one we like is FireShot, which is free and is also available as an extension for Chrome and other third-party browsers.
Head to FireShot on the Mac App Store and download it by clicking "Get" followed by "Install."
Now open Safari and go to Safari > Settings > Extensions and locate FireShot in the Installed pane. Check the box alongside the name to activate the extension. In the right-hand pane, you can click "Always Allow on Every Website" if you plan to use it a lot. For security reasons, it's better not to do this. You can simply grant permission for the extension to work as and when you need it instead.
Now load up the page you want to screenshot in Safari. You'll see that a FireShot icon has been added to the toolbar alongside the address bar. It'll be grayed out at first, so click the icon and select "Allow for One Day" to give it permission to run.
Click the icon again, followed by "Capture Entire Page." The screenshot will open in a new tab, and you can choose to save it as an image (in the PNG format) or PDF, email it, copy it to your clipboard, or print it.
The other good option for taking full-page screenshots of websites is by using an online tool. This is less convenient in some cases, but it comes with the benefit of being able to share your screenshots between your Mac and another device more easily.
There are many web services that can capture full-screen screenshots of websites. FullPageScreenCapture.com is as good as any. It's free to use and fast, and it assigns a unique URL to every screenshot it saves, so you can access it through any browser on any device.
Simply head to fullpagescreencapture.com and type or paste the URL of the web page you want to save into the box, then click "Capture Now."
It takes a few seconds to process. Once it's done, you'll see the image displayed on the site. Click it to open the image in a new browser tab, then right-click on the image and select either "Save to Desktop" or "Save As."
You can also click in the address bar in Safari and hit Command+C to copy the unique URL for the image and share it with other devices.
Finally, if you need to take a full-page or scrolling screenshot from within any app, not just of a website, you can do this with the third-party app Shottr. You can use it to capture screenshots of PDF files, spreadsheets, documents, large photos, or anything else.
You can use the app for free for as long as you like. After 30 days, it will occasionally ask you if you want to pay for it. You're not obligated to do so, but it only costs $8 and is great value if you use it a lot.
The app isn't available through the Mac App Store. Instead, download it from the official Shottr website and install it to get started .
Launch Shottr, and its icon will appear in your menu bar at the top of the screen where it's always easily accessible. Open the app and content you want to screenshot, then click the Shottr icon and select "Scrolling Capture."
Your mouse pointer will turn into a crosshair. Click in the top-left corner of the area you want to screenshot, then drag to the bottom-right. When you let go of the mouse button, the screen will begin to scroll up. Everything within the width of the rectangle you drew will be captured, right down to the bottom of the page.
Your screenshot will open in a preview window. You can annotate or crop it, or click the Save icon to save it. If you close the preview accidentally, click the Shottr icon and select "Reopen Shottr."
It's easy to take scrolling screenshots on a Mac. Whether you just need a quick tool or a more professional solution, choose the method that's best for you, and you can grab full-page screenshots in any app.
- How to take screenshots on your Mac
Apple’s screenshot app makes it simple.
By Barbara Krasnoff , a reviews editor who manages how-tos. She’s worked as an editor and writer for almost 40 years. Previously, she was a senior reviews editor for Computerworld.
Share this story
:format(webp)/cdn.vox-cdn.com/uploads/chorus_asset/file/23952308/HT016_macOS_0002.jpg "screenshot on mac safari")
Screenshots can be really handy. You can use them to show your grandparent how to use a new app. You can use them to send a shot of that strange error message to your company’s IT department. You can use them to capture tweets before they disappear down the deletion black hole. So in case you need to capture a screenshot or two, here’s a quick and simple guide to taking screenshots on your Mac.
Since the Mojave version of macOS, Macs come with an app that saves your screenshots as PNG files. Press Shift-Command (⌘)-5 to get a command bar at the bottom of the screen.
- The first three buttons from the left let you take a screenshot of the entire screen, a specific window, or an outlined selection of the screen.
- The next two buttons let you start a video capture of all or part of your screen.
- The Options button lets you choose where you want to save your screenshot, set a 5- or 10-second delay, show a thumbnail or a mouse pointer, or remember the last selection. (In other words, if you took a full-screen screenshot last time, that’s the option that will come up this time.)
- When you’re ready, click on the Capture button on the right end of the command bar.
:format(webp)/cdn.vox-cdn.com/uploads/chorus_asset/file/20148083/Screen_Shot_2020_07_23_at_12.22.11_PM.png "screenshot on mac safari")
If you’re in a hurry and don’t want to deal with the command bar, you can still save screenshots to your desktop.
- To take a screenshot of the entire screen, press Shift-Command-3.
- To take a screenshot of part of the screen, press Shift-Command-4 and then drag the cursor to outline the area you want to capture.
- If you want to capture a specific window, press Shift-Command-4. Hit the spacebar. The cursor will turn into a camera. Hover the cursor over the window you want to capture until it highlights, and then click on it.
- How to take screenshots on your Windows PC
- How to take screenshots on your Android phone
- How to take screenshots on your iPhone
Update May 2nd, 2023, 4:10PM ET: This article was originally published on July 23rd, 2020, and has been updated to account for changes in the OS.
Ryzen CPU owners can now download better gaming performance thanks to a Windows 11 update
Apple’s iphone 16 launch event is set for september, martin shkreli must surrender his wu-tang album copies, at&t fixed a software issue that disconnected many customers for a few hours, brilliant is back from the brink.
More from The Verge Guide to macOS
Tips and tricks.
- macOS 101: how to force quit a Mac app
- How to type special characters on Macs
- How to record your screen on a Mac
- How to uninstall apps in macOS
- How to easily resize and arrange windows in macOS Catalina
- How to enable picture-in-picture for YouTube on your Mac
- The 11 best apps for your new Mac
- How to wipe your MacBook, iMac, Mac Pro, or Mac mini
- How to manage app updates in macOS
- macOS 10.15.5 is out now with a new battery health feature
- How to manage system updates on macOS
- How to use an external display with your Mac
Which device to buy
Take a screenshot on your Mac
You can capture the entire screen, a window, or just a portion of the screen.
How to take a screenshot on your Mac

To take a screenshot, press and hold these three keys together: Shift, Command, and 3.
If you see a thumbnail in the corner of your screen, click it to edit the screenshot. Or wait for the screenshot to save to your desktop.
How to capture a portion of the screen

Press and hold these three keys together: Shift, Command, and 4.
To take the screenshot, release your mouse or trackpad button.
How to capture a window or menu

Open the window or menu that you want to capture.
Click the window or menu to capture it. To exclude the window's shadow from the screenshot, press and hold the Option key while you click.
Where to find screenshots
By default, screenshots save to your desktop with the name ”Screen Shot [date] at [time].png.”
In macOS Mojave or later, you can change the default location of saved screenshots from the Options menu in the Screenshot app . You can also drag the thumbnail to a folder or document.
In macOS Mojave or later, you can also set a timer and choose where screenshots are saved with the Screenshot app. To open the app, press and hold these three keys together: Shift, Command, and 5. Learn more about the Screenshot app .
Some apps, such as the Apple TV app, might not let you take screenshots of their windows.
To copy a screenshot to the Clipboard, press and hold the Control key while you take the screenshot. You can then paste the screenshot somewhere else. Or use Universal Clipboard to paste it on another Apple device.
Contact Apple Support
Need more help? Save time by starting your support request online and we'll connect you to an expert.
How to Take a Screenshot on Mac: The Complete Guide

Clémence Daniere

Table of contents
What is a screenshot, different methods to screenshot on mac:, how to edit and save screenshots on mac, choose a third-party tool for more editing functionality, organizing and managing screenshots on mac, keep your screenshots magically organized with snagit, subscribe to techsmith’s newsletter.
There comes a time when you will need to take a screenshot on Mac for one reason or another.
You can use screenshots to demonstrate a process at work and share feedback with your team members. And who doesn’t like to send funny memes and gossip about the latest celebrity feuds?
Screenshots have become an essential part of our daily lives.
Computers have built-in screenshotting functions that make it super easy to take a basic capture of your screen. However, third-party applications take more advanced captures that you can edit and share quickly.
There’s something out there for everyone’s screenshot needs. Now, let’s dive into how to screenshot on Mac.
A screenshot , also called a screen capture or screengrab, is a still image that displays the exact contents of a computer display. They can be edited and are usually shared with others or stored away for future reference.
With a screenshot, you can capture exactly what you see on your screen. That makes it super convenient to share an error message with IT, showcase a mockup of your latest project, or even send funny memes to your coworkers.
They are helpful in many situations, which makes them an essential part of people’s workdays. Above all, screenshots are an easy way to show something that would be incredibly difficult to put into words.
Basic screen capture tools are usually built into mobile and desktop operating systems. However, there are downloadable software that are designed for advanced screen capture.
The best snipping tool for Windows and Mac
Don’t let clumsy built-in tools hold you back. Take and edit screenshots with Snagit!

With a third-party tool like Snagit, you’ll quickly forget your basic, bland screenshots and create visual masterpieces instead. In three easy steps, you can create a capture, edit it to fit your needs, and share it with anyone.
Whether you’re planning on using your built-in tool or downloading a third-party app, we’re here to help you take a perfect screenshot on Mac.
Screenshot on Mac with keyboard shortcuts
Shift Command 3 is the most straightforward option. This keyboard shortcut captures a screenshot of your entire screen and automatically saves it. This is a go-to choice for anyone wondering how to take a screenshot on a Mac without much effort.
Shift Command 4 turns your cursor into a crosshair. From there, you can either:
- Press and release the spacebar. This will turn your mouse from a crosshair to a camera icon. Release the mouse button or trackpad on the window you’d like to capture. This option also lets you capture specific windows.
- Click and drag the crosshairs to the desired dimensions. Once you release your mouse button or trackpad, your Mac will instantly capture the selected area.

Once captured, your screenshot will be saved to your desktop, and multiple screenshots will be stored in a folder.
How to take a screenshot on mac with the Screenshot app
Macs have a built-in screenshot app that allows you to take more precise and curated captures than the keyboard shortcuts above.
Shift Command 5 will pop up a small screen-capture window. This is the screenshot app. After that, three screenshot buttons will let you carry out these options:
- Capture the entire screen.
- Capture a portion of the screen.
- Capture a single window.
- Record the entire screen
- Record a portion of the screen

Pick whichever fits your needs best and get to screenshotting! Again, your captures will be saved to your desktop for easy retrieval. It’s important to note that they will not be copied to your clipboard at that time.
Expert tip: By pressing the Control (Ctrl) button at the same time as your keyboard shortcuts (for example: Shift Command 3 Control), your screenshot will be copied to your clipboard. However, it will not be saved to your desktop.
Using third-party applications
Do you use screenshots more than just a few times per year? If so, you would benefit from trying out an advanced screen capture and screen recording tool.
Although built-in screenshotting functions can be useful, they are restricting.
That is why third-party applications have become a much-needed tool for many professionals. An application like Snagit provides countless editing and sharing options. That makes it an essential tool for anyone who relies on screenshots to share information because the functionality can save you so much time.
Annotate and edit screenshots with Snagit
Professional mark-up tools and powerful features make it easy to create helpful images.

Snagit provides users with advanced features that are easy to use, like scrolling capture . For example, it allows users to take a screenshot of a full, scrolling web page without the hassle of stitching together multiple screenshots.
You can also create videos from images to explain processes quickly and easily. Record your screen, camera, and microphone audio to create quick, informative videos.
These, and countless other features, make Snagit an indispensable tool for visual communication
Snagit brings more flexibility and creativity to your screenshots compared to built-in snipping tools.
Add context and clarity to your screenshot by editing it. Incorporating text, marking up your screen, and cropping out what you don’t need all make your screenshots easier to understand.
Once you take a screenshot on your Mac, a preview will pop up in the bottom right corner of your screen. Click on the icon to open Apple Preview with your screenshot inside. This is where you will be able to edit your capture.
The expandable toolbar allows you to edit the screenshot. In the editor, you can add shapes, change color composition, incorporate text, draw on the screen, and more. When you’re done, save your screenshot by clicking “Save as” and filing it in the appropriate folder.

Or, you can edit your screenshots in Apple’s presentation tool Keynote . This app has different features, like adding shadows and effects.
However, for the best results, you may need to edit screenshots with a third-party app.
If you regularly need to edit screenshots, a tool like Snagit will save you time and get you more professional results.
For instance, it’s full of helpful features like the Simplify tool that lets you block out unwanted text to keep information secure and your screenshots less cluttered.
You can even move elements of your screenshots around with the Smart Move tool. It makes rearranging information, showing potential edits, and altering workflows easy.

The first step in keeping your captures organized is to name them appropriately. Your Mac screenshots are saved with the name “ScreenShot” with the date and time attached by default. To make retrieval quicker, use file names you can easily remember!
All desktops have a file library. File your screenshots in a designated folder and rename it. Additionally, you can tag your screenshots by color. This will remind you what files belong together and where to find them.
Your Mac device includes all of these management tools. But third-party apps are your best bet if you don’t want to do all that work.
Snagit’s library organizes screenshots like your Mac but also uses an advanced filing system. Your captures will automatically be managed by application, website, and month.
This neat feature lets you find your screenshots in multiple places. Without any work on your part, your screenshots are organized and ready for you to refer to easily.

And there you have it! Using Mac keyboard shortcuts and the Screenshot app, it’s easy to create basic screenshots and screen recordings.
We advise you to look into third-party applications for more advanced screen capture. They can take your screenshots to the next level.
Snagit is a great tool and a leading screen capture and screen recording software. For example, it allows you to look good, feel good, and communicate with clear intent. Its revolutionary capture powers, advanced editing features, and easy sharing options make it our go-to screenshotting software.
There you have it! Now you know how to take a screenshot on Mac using different built-in shortcuts and the best third-party app for your needs.
So, get on to screenshotting and have fun looking better and working smarter!
Explore our blog and subscribe to our bi-weekly newsletter to learn more about screenshot tips and tricks.
The default keyboard shortcut on Mac is Shift Command 3, which captures the entire screen.
To screenshot a specific area or region, use the keyboard shortcut Shift Command 4 and create a selection area with your crosshair cursor.
Capturing the entire screen screenshots everything you see on your display, while capturing a selected area lets you choose a portion of the screen. Capturing a specific window captures just the content of the currently active window. Snagit allows you to specify your capture window down to the pixel, so you get the exact screenshot you need every time.
Yes, you can change the default save location for your screenshots. Snagit’s library offers different options for an organized filing system, such as application type, website, and tags.
Snagit is a screen capture and screen recording software that is full of advanced but easy-to-use features for anyone looking to improve their screen capture tools.
You can use the built-in Preview app to annotate and edit your screenshots. Snagit also includes original stamps, a blurring tool , a step tool, and much more for a finer editing process.
If you’re facing issues, you can troubleshoot by checking your keyboard shortcuts, available storage space, and any third-party software that may interfere with screenshot functions.
Yes, you can capture a screenshot of a dropdown or context menu by using keyboard shortcuts or the Screenshot app. Ensure the menu is open before taking the screenshot.
You can share your screenshots by copying and pasting them into documents, emails, or image editing software. In addition, you can use Screencast by TechSmith to share your screenshots with a link to anyone.
Additional Resources
How to remove the background from an image, how to blur text in screenshots: 5 tips for clear, private screenshots, how to screen record on windows 10 or 11 (with audio).

How To Take A Scrolling Screenshot On Mac (5 Ways)
It’s easy to use a Mac, but not all the features are readily available and apparent. That is especially true if you’re a new user and simply want to capture what’s on the screen. Whether you’re a new or seasoned user, you may struggle with how to take a scrolling screenshot on a Mac.
You can take a scrolling screenshot on a Mac if you open Safari, press Command, Shift, and 5 then click “Capture Entire Page” in the pop-up menu. Apps like Chrome Screen Capture and Preview let you take a scrolling screenshot on Mac with the same method. Macs come with the Preview app which you can also use to take scrolling screenshots.
Other third-party apps you can use to take scrolling screenshots include Movavi Screen Recorder, Capto, and Lightshot. Follow along as we explore how to take a scrolling screenshot on a Mac.
Table of Contents
How to Take a Scrolling Screenshot of the Full Webpage on Mac
Safari screenshot tool.
The easiest way to take a scrolling screenshot on Mac is with Safari. To take a scrolling screenshot on Safari, press Command, then Shift, and 5 to pull up the screenshot menu . Click “Options” and “Capture Entire Page” to take a scrolling screenshot.
You don’t need to manually scroll through the page with this method. Make sure to save the screenshot when it pops up on your home screen after you edit it.
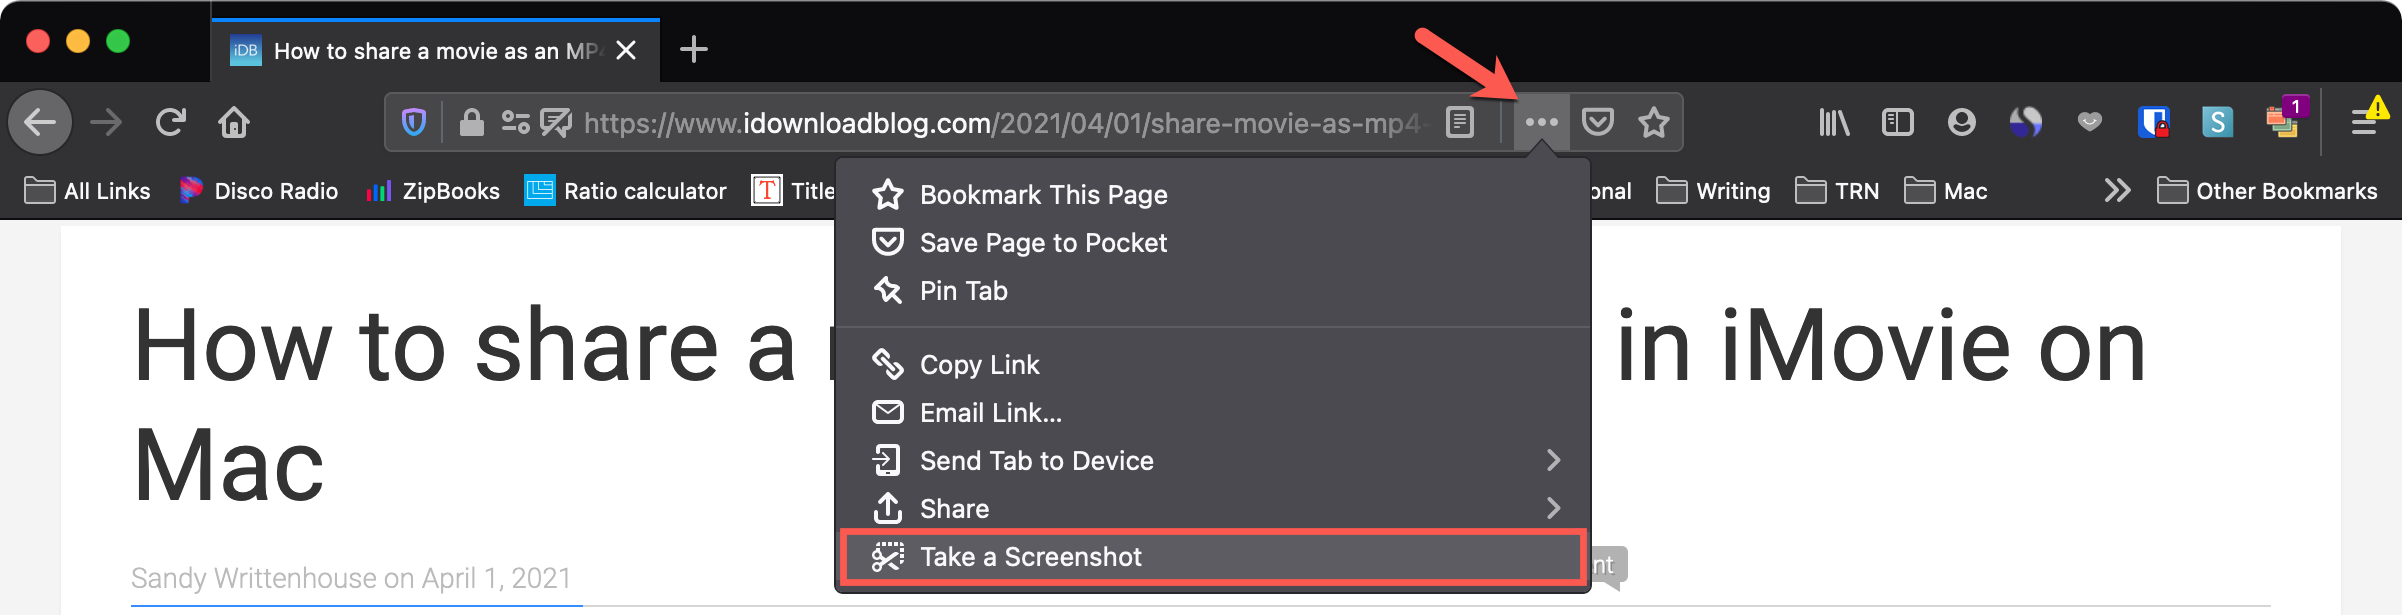
Image credit: idownloadblog.com
Use the Preview App
Each Mac comes with the Preview app, and it makes it easy to take a scrolling screenshot. Simply open the applications menu, scroll down, and select Preview. Next, click “File” at the top of the screen and scroll down to “Take a Screenshot”.
This will open a small pop-up menu. Click on “From Entire Screen” to take a scrolling screenshot . Once you take the screenshot, you can edit it or save it as is.
Chrome Screen Capture
Google Chrome is one of the most reliable web browsers, and it also features a great screen capture extension . You can take scrolling screenshots and record your screen activity with Chrome’s Full Page Screen Capture extension. While you can take scrolling screenshots with this extension, it’s not necessary.
As the name suggests, Chrome Full Page Screen Capture lets you screenshot the whole page at once without scrolling. The app is easy to use and free to download.
Capto is a screen capture app available for Mac users that lets you take scrolling screenshots and record your screen. There is essentially no limit to how you can take screenshots with Capto, and you can capture the full page or just a small portion of it . It is a paid app, but there is no fee to continue using Capto once you’ve bought it.
Movavi Screen Recorder
Movavi Screen Recorder is another paid screen recording program that lets you take scrolling screenshots on Mac. While it is paid, they do offer a 7-day free trial, so you can test it out if you need a scrolling screenshot quickly just once . You can easily record your screen activity or take a scrolling screenshot and edit it with Movavi Screen Recorder.
Lightshot is a free screen-capturing app for Mac and Windows users that lets you capture, edit, and share scrolling screenshots. First, you must put the Lightshot app on your Mac’s toolbar so you can easily access it. Next, simply open the webpage you want to capture, click the Lightshot icon, and select “Capture Scrolling Window” .
Scroll down on the page at a steady pace so Lightshot can take a scrolling screenshot. When you’re done, the screenshot will pop up and you can save it to your Mac.
How Do You Take a Picture of the Whole Page on Mac Without Scrolling?
If your Mac is up to date on the latest software, you can easily take a picture of the whole page on Mac. This is especially useful if not everything on the browser page appears on the screen. First, you must set the browser to full-screen so you can get the best screenshot .
Next, hold “Command” and tap (-) to bring the full webpage into view. Hold the Command key again and press Shift and 4. Highlight the full page with the cursor and let go to take a screenshot of the whole page.
So, How Do You Take a Scrolling Screenshot on Mac?
You can take a scrolling screenshot on Mac if you press Command, then Shift, and 5 on Safari then click Capture Entire Page.
The Preview app also lets you take a screenshot on Mac if you click File, Take a Screenshot, and From Entire Screen. Apps like Chrome Screen Capture, Capto, and Movavi Screen Recorder also make it easy to take a scrolling screenshot on Mac.
David Miller is a seasoned tech aficionado with a profound expertise in NGINX and Ubuntu. With a career spanning over a decade, David has honed his skills in optimizing web servers and enhancing server performance to perfection. His deep-rooted passion for open-source technologies has led him to become a go-to resource in the field. Whether it’s crafting intricate NGINX configurations or troubleshooting complex Ubuntu server issues, David’s problem-solving prowess shines through.
Sign up for our daily newsletter
- Privacy Policy
- Advertise with Us
How to Take a Scrolling Screenshot on Mac

Is the full screen screenshot on Mac not enough for your web page image capturing needs? Use these built-in tools, third-party apps, and browser extensions to take a scrolling screenshot on Mac . These tools and apps only work for web pages and files you can view in browsers.
How to Take a Scrolling Screenshot on Mac Using Safari
Third-party apps for taking scrolling screenshots, how to use browser extensions to take scrolling screenshots on mac, frequently asked questions.
Tip : you can also take scrolling screenshots in Windows using web browsers and third-party apps like Microsoft Edge and ShareX.
You can take a scrolling screenshot on Mac without downloading or using third-party apps. You only need Safari, which comes with Mac computers as the default web browser. Follow these steps to use it to take a scrolling screenshot:
- Go to the web page you want to screenshot.
- Scroll down to the bottom of the web page.

- From the menu bar, click on “Safari,” then select “Settings … “

- In the Safari settings window, go to the “Advanced” tab, tick the “Show Develop menu in menu bar,” then close the settings window.

- From the menu bar, click on “Develop,” then select “Connect Web Inspector” or “Show Web Inspector.”

- A window will appear containing elements and other web page assets.

- Select the first HTML element under the “Elements” tab in the web inspector.

- Right-click on the element, then select “Capture Screenshot.”

- Rename the screenshot, select a save destination, and click on “Save.”

- You can find the image in the save location you selected when you saved it to your Mac. In this example, we are saving the screenshot to the “Desktop” folder as shown above.
If you find Mac’s native scrolling screenshot method complicated, you can download and use third-party apps instead. Two such apps that you can use are listed below:
How to Take a Scrolling Screenshot on Firefox
The Firefox web browser has a built-in tool that makes taking screenshots of entire web pages a breeze. Follow these easy steps:
- Launch Firefox and visit the web page you want to capture.
- Right click on a blank space within the web page and select “Take Screenshot.”

- Click on “Save full page” to take a screenshot of the whole web page.

- In the pop-up window with the screenshot preview, click on the “Download” button.

- You can find the downloaded image in Firefox’s default downloads folder or a different location that you have previously selected.
How to Take a Scrolling Screenshot on Microsoft Edge
Windows’s native browser, Microsoft Edge, has a built-in screenshot tool that lets you capture a scrolling screenshot on Mac. The steps below show how to take a screenshot of a full web page using Microsoft Edge for Mac:
- Right click on a blank space within the web page, then select “Web Capture.” You can also press Shift + Command + S .

- When a small pop-up appears, click on “Capture Full Page” to capture the whole web page.

- In the web capture preview window, click on the floppy disk icon to save the image.

- You’ll find the image you downloaded in Microsoft Edge’s default downloads folder or different location that you have previously selected.
How to Use Full Page Screen Capture to Take a Scrolling Screenshot on Mac
Full Page Screen Capture is a free web app you can use to download a screenshot of a web page by pasting the page link on the app’s website. Use this tool with any web browser on your Mac. These step-by-step details show how to get a scrolling screenshot on your Mac using this third-party web app:
- Launch your web browser and go to Full Page Screen Capture’s website.
- Paste or type the URL of the web page you want to take a screenshot of, then click “Capture Now.”

- Wait for the app to process the web page’s screenshot.
- When the screenshot is ready, you’ll see a preview below the URL field. Click on the “Click to Download” button over the web page’s image. You’ll be directed to a new tab to view and save the full screenshot of the website.

- In the new tab, right-click on the image, then click on “Save Image As … “

- Add a filename, choose the image’s save destination, then click “Save.”

- You can find the image in the save location you selected when you saved it to your Mac. In the example above, we are saving the screenshot to the “Desktop” folder.
Aside from using Mac’s native tool and third-party tools, you can add dedicated web browser extensions, then use them to take scrolling screenshots on Mac. Listed below are two free browser extensions that can be used for this:
How to Use GoFullPage to Take a Scrolling Screenshot
GoFullPage is a browser extension that takes full web page screenshots . You need to add GoFullPage as a browser extension to use it. Follow these steps to take a scrolling screenshot on Mac:
- Launch Google Chrome and add the GoFullPage Chrome extension to your browser by clicking on the “Add to Chrome” button.

- A pop-up will appear asking if you want to add the GoFullPage browser extension. Click on the “Add extension” button to continue.

- After adding the GoFullPage extension to your browser, you’ll be taken to a web page showing you how to use it.

- Pin the GoFullPage icon to Chrome for quick access. To do this, click on the puzzle piece icon at the top right of Google Chrome’s window, then click on the pin icon to the right of GoFullPage.

- Go to the web page you want to take a scrolling screenshot of.
- Click on the GoFullPage icon at the top right of the Google Chrome window to process a screenshot of the web page. You will be directed to a new tab where you can view and download the screenshot.
- In the new tab, you can download the screenshot as a .pdf or an image (.png). Click on your preferred file type to start downloading the image.

- You can find the image in your Mac’s downloads folder or different location that you have previously selected.
How to Use Movavi Screenshot Chrome Extension
The Movavi Screenshot Chrome Extension is a screenshot tool from Movavi’s multimedia suite that will take scrolling screenshots on Mac. Like GoFullPage, you only need to add Movavi Screenshot Chrome Extension to your browser to use it. Follow this step-by-step guide to use it:
- Launch Google Chrome and go to the Movavi Screenshot Chrome Extension page on the Chrome Web Store.
- Click “Add to Chrome” to add this as a Google Chrome browser extension.

- A pop-up will ask you if you want to add Movavi Screenshot Chrome Extension. Click on the “Add extension” button to continue.

- Open the extensions tab by clicking on the puzzle piece icon at the top right of Google Chrome’s window. Click on the pin icon to the right of “Movavi Screenshot Chrome Extension” to pin it for easy access.

- Visit the web page you want to take a scrolling screenshot of.
- At the top right of your browser window, click on the Movavi Screenshot Chrome Extension camera icon.
- Select “Capture entire page” to take a screenshot of the whole web page.

- Let the extension process the image. When it’s done, you’ll be directed to a new tab where you can view and download the screenshot.
- In the new tab, click on the “Save JPG” button to download the image.

- When the extension asks for your permission to manage your downloads, click on the “Allow” button.

- Rename your screenshot, select a save destination, then click on “Save.”

- You can find the image in the save location you selected when you saved it to your Mac. In the above example, we are saving the screenshot to the “Desktop” folder.
Can I use the inspect tool to take a scrolling screenshot on a non-Safari browser?
Firefox also has a screenshot feature within its inspect tool. Just like on Mac, you can right-click on the first element and select “Screenshot Node” to save an image of a whole web page. Google Chrome doesn’t offer this feature.
Do GoFullPage and Movavi Screenshot Chrome Extension work with other browsers?
GoFullPage works on Google Chrome and Microsoft Edge. Movavi Screenshot Chrome Extension works on Google Chrome and Firefox.
How can I remove extensions on Google Chrome?
Click on the puzzle piece icon at the top right of Google Chrome’s window. Find the extension you want to remove, click on the three horizontal dots to its right, then select “Remove from Chrome.”
Image credit: Unsplash . All screenshots by Natalie dela Vega.
Our latest tutorials delivered straight to your inbox

Natalie is a writer specializing in tech how-tos and gaming. When she's not writing, she plays PC games and travels. Here at MakeTechEasier, you will see her write about guides, tips, and solutions for Windows and iOS.

You can make a difference in the Apple Support Community!
When you sign up with your Apple ID , you can provide valuable feedback to other community members by upvoting helpful replies and User Tips .
Looks like no one’s replied in a while. To start the conversation again, simply ask a new question.
How to take a screenshot on safari without the toolbar in fullscreen mode?
I always use Safari in fullscreen mode. I always have the "Always show toolbar in Full screen" option unticked, to maximize screen real estate, it's in menu View, top line.
Whenever I try to take a screenshot with " Capture selected window ", or Command+Shift+4+space, I would expect to have the entire screen captured without the toolbar as I have hidden it. But to my surprise, the result image always includes the toolbar, which shows all the tabs I have opened, and I don't want the recipient to see those tabs. This is confusing because the toolbar is not even showing on the screen, but the screenshot still has the toolbar!? Please see the photos below:
This is my actual screen: (as I'm writing this post)
And this is what I get after hitting Command+Shift+4+Space, aka, Capture selected window:
I'm not sure but I might as well point out that I'm using a Macbook Air 2022, with a notch, which might has something to do with this(?)
MacBook Air, macOS 13.4
Posted on Jun 7, 2023 3:51 AM

Posted on Jun 8, 2023 1:07 PM
Hi there longnhatking,
If capturing a window or menu is showing more information than you would prefer, then we would recommend following one of the other methods to take a screenshot on your Mac from here: Take a screenshot on your Mac
We are also always open to feedback on our products and services and would encourage you to submit yours about taking screenshots here: Feedback - macOS - Apple
Similar questions
- App Screenshot on Mac Hi, since Ventura I have to switch on edit-toolbox in screenshot app (Shift-Option-4), but this is annoying. How can I have this small bar always on ? Alex 463 6
- Safari full page length screenshot In Safari on macOS is there a way via the dev tools or by other means to take a screenshot or save an entire webpage as an image? This would be really helpful when collecting items for research. 2024 2
- How to take a full page screenshot in Safari? I’ve been trying to take a full page screenshot on safari, but the option doesn’t function correctly. It gives me an even smaller screenshot than the regular option. Any help to get this to work? Safari is not in a folder by the way. 3862 1
Loading page content
Page content loaded
Jun 8, 2023 1:07 PM in response to longnhatking.

Jun 8, 2023 1:21 PM in response to longnhatking.
I cannot replicate your issue. with my menubar and safari toolbar hidden in full screen, I take a full screen screenshot, and both the menubar and safari's toolbar are not seen in that screenshot. I would suggest that you try and Start up your Mac in safe mode and test. if it works in safe mode, run the Mac in safe mode for a few minutes. then you can restart your Mac normally and test again. if the issue doesn't happen in safe mode, but reappears after leaving safe mode, please inform us and we can move forward from there.
Jun 9, 2023 5:36 AM in response to longnhatking.
longnhatking. wrote:
Hi! Thanks for trying.
you're welcome.
Question: did you capture your screen with "Command shift 3" or "Command shift 4 space"?
I actually tried both. and using both methods, safari's toolbar was not seen in either screenshot. but it was shown when I used "Command shift 4 space" while safari was not full screen. is that what we are talking about?
And does your mac have a notch?
no, it does not. but my aunt bought a new M2 MBA about two months ago and when I saw how fast it was, I played around with it for a while. I wanted to see how it compared against my intel iMac. so I did some screenshots, screen recordings, and movie recordings. those are what a large chunk of what I use my iMac for. and the toolbar was not appearing in any of the screen grabs. so I am sure the notch is not the issue.
as of now, i'm thinking you should download and run the free version of EtreCheck so we can see if you have some software installed that is causing your issue. make sure you give "full disk access" to etrecheck. Learn how to use it by reading Using EtreCheck . if you need help interpreting the report, you can see how to post the report here by reading How to use the Add Text Feature When Posting Large Amounts of Text, i.e. an Etrecheck Report . and it automatically obscures sensitive things (like serial numbers) so you don't have to worry about sharing the report here.
Jun 9, 2023 6:01 AM in response to jeffreythefrog
I meant Command Shift 4 and SPACE while in full screen. My entire problem is with the “Capture selected window” function. I could use Command shift 4 to capture portion of the screen just fine, but I’d have to manually scale with the trackpad. So I’d prefer the command shift 4 space.
I’ll try your suggestion, thanks!
Jun 11, 2023 12:44 AM in response to longnhatking.
I wanted to make sure if my Mac was the only one that does this, so I went to a shop that Apple listed on their website as an Authorized Reseller in my country. I tested 3 Macs there, a Macbook Pro M1 2021 16 inch with a notch , a Macbook Pro M2 2022 without a notch , and of course, one that's identical to mine, a Macbook Air M2 2022 with a notch .
After configuring the 3 Macs exactly like mine: Have the Menu bar and the Safari toolbar to automatically hide, I proceeded to using Command+Shift+4+Space to capture the selected window, which contained neither of the bars.
The Macbook Pro M1 2021 and the Macbook Air M2 2022 both include the Safari toolbar in the screen shot even though the bar wasn't actually in the window captured (So it's a bit relief to learn that my Mac isn't going crazy). The Macbook Pro M2 2022, the one without the notch, actually did the job properly, producing a screenshot without the toolbar, containing exactly what's in the captured window.
So I am pretty sure by now that the Macs with the notch are going to do this regardless of screen size. An employee at that shop I went to tried to help me with a workaround of pressing Command+Shift+4, not the Space, and then manually scale the screen the leave out the toolbar, which is time consuming 🙄
Jun 8, 2023 7:44 PM in response to jeffreythefrog
Hi! Thanks for trying. Question: did you capture your screen with "Command shift 3" or "Command shift 4 space"? And does your mac have a notch?
I'll try rebooting in safe mode now, thanks!
Jun 8, 2023 9:17 PM in response to jeffreythefrog
Hi, I tried safe mode, didn't work. I still get the safari toolbar when I capture selected window
IMAGES
COMMENTS
Take a screenshot on your Mac. You can capture the entire screen, a window, or just a portion of the screen. How to take a screenshot on your Mac . To take a screenshot, press and hold these three keys together: Shift, Command, and 3. If you see a thumbnail in the corner of your screen, click it to edit the screenshot.
Screenshot a Webpage. Open Safari and go to " Safari > Preferences…. Click the Advanced tab and toggle on " Show Develop menu in menu bar .". Navigate to the webpage you want to capture and from the Develop menu, choose " Show Web Inspector .". Alternatively, you can hit alt-command-I (⌥⌘I).
Open Safari: Launch the Safari browser and navigate to the web page or content you wish to capture. Activate the Screenshot Toolbar: Once on the desired page, press the Shift + Command + 5 keys simultaneously. This keyboard shortcut triggers the Screenshot Toolbar to appear at the bottom of the screen, presenting a range of screenshot and ...
Download and install Snagit. Launch Snagit and click the "All-In-One" tab to the left. Click the Capture button. Select the area of the website you want to capture and click the "Launch a Panoramic Capture" button. Click start and start scrolling down the website and click Stop when you're done.
Now right-click (Ctrl-click) anywhere on the webpage and select Take Screenshot from the contextual menu. To capture the entire webpage, click Save full page in the top-right corner of the browser ...
Open the Chrome browser on your Mac and go to the page you want to screenshot. Press the Command + Option + I keyboard combination, and you will see a window appear to the right. Next, press Command + Shift + P and then type " Screenshot" in the Run field. You will see several screenshot options ( Capture area screenshot, Capture full size ...
Click the Edit button at the top right of the window. From there, click the Crop tool at the top left. Click and drag the corners of the marquee that appears to crop comfortably to the edges of your screenshot, then click Done at the top right. You've now captured the full length of a web page without any additional software or tools.
From here, enable the switch for Awesome Screenshot & Recorder and confirm. After that, click Quit & Reopen. Enable the extension: Go to Safari Settings > Extensions and check the box for Awesome Screenshot before its icon appears in the top left of the address bar. On a related note: 3 ways to quickly find all screenshots on your Mac
Is it even possible to take a screenshot that includes a portion of a webpage you would normally need to scroll to see? Yes, there is! But and it takes only ...
Shift+Command+4 then Space: Capture a window or menu. Shift+Command+5: Open the Screenshot app interface. Shift+Command+6: Take a screenshot of the Touch Bar on a Macbook Pro. To capture a screenshot directly to the clipboard instead of an image file, add Ctrl to any of the shortcuts listed above.
Learn how to take screenshot of entire page in macOS, MacBook Pro and Air. This video in English explains the steps to take screenshot of the entire webpage ...
How to take screenshot on a Mac: Pre-cropped screenshot. Perform the keyboard shortcut Command + Shift + 4. Click and drag your touchpad or mouse to select the region you want to capture, and ...
To take a screenshot of a specific window or menu, press Shift-Command-5 and select the Capture Selected Window option in the toolbar. The pointer will change into a camera icon. Move the camera ...
Awesome Screenshot is a browser plugin that can capture. the full site; the visible part or; a selection of the site. It also allows for basic annotation of the screenshot as well as downloading it or saving it on the web for access by URL. Available as extension to Safari, Firefox and Chrome.
To take a picture of the whole screen, press Shift-Command-3. To capture just part of the screen, press Shift-Command-4.
Here are the best ways to take scrolling screenshots on a Mac. Take Full-Page Screenshots in Safari With the Develop Menu ... Take Screenshots in an Online Tool The other good option for taking full-page screenshots of websites is by using an online tool. This is less convenient in some cases, but it comes with the benefit of being able to ...
To take a screenshot of part of the screen, press Shift-Command-4 and then drag the cursor to outline the area you want to capture. If you want to capture a specific window, press Shift-Command-4 ...
Take a screenshot on your Mac. You can capture the entire screen, a window, or just a portion of the screen. How to take a screenshot on your Mac . To take a screenshot, press and hold these three keys together: Shift, Command, and 3. If you see a thumbnail in the corner of your screen, click it to edit the screenshot.
Screenshot on Mac with keyboard shortcuts. Shift Command 3 is the most straightforward option. This keyboard shortcut captures a screenshot of your entire screen and automatically saves it. This is a go-to choice for anyone wondering how to take a screenshot on a Mac without much effort. Shift Command 4 turns your cursor into a crosshair.
Safari now has a ScreenCapture feature built-in, as explained in the article Full Page Screenshots in Browsers: In Safari DevTools, select a node, right-click, and you'll see Capture Screenshot in the context menu. There isn't a keyboard shortcut AFAIK, but it is available without additional third-party software.
Press and hold. To take a screenshot of your entire Mac screen. Shift + Command + 3. To capture a portion of your screen. Shift + Command + 4. To snap a screenshot of a specific Mac window. Shift + Command + 4. then press Space. To open the Screenshot app for screenshot options.
Safari Screenshot Tool. The easiest way to take a scrolling screenshot on Mac is with Safari. To take a scrolling screenshot on Safari, press Command, then Shift, and 5 to pull up the screenshot menu. Click "Options" and "Capture Entire Page" to take a scrolling screenshot. You don't need to manually scroll through the page with this ...
Open Safari and navigate to the webpage. Show Reader View if available and preferred. Take a screenshot, then tap on the thumbnail to edit. Tap Full Page > Done > Save PDF to Files > [Location] > Save. Share the PDF file with your Mac using AirDrop, iCloud Drive, or another method. Step 2: Open the PDF file in Preview.
Launch your web browser and go to Full Page Screen Capture's website. Paste or type the URL of the web page you want to take a screenshot of, then click "Capture Now.". Wait for the app to process the web page's screenshot. When the screenshot is ready, you'll see a preview below the URL field.
I always use Safari in fullscreen mode. I always have the "Always show toolbar in Full screen" option unticked, to maximize screen real estate, it's in menu View, top line. Whenever I try to take a screenshot with " Capture selected window ", or Command+Shift+4+space, I would expect to have the entire screen captured without the toolbar as I ...